


mark poulson
-
Posts
14,726 -
Joined
-
Last visited
-
Days Won
364
Content Type
Profiles
Articles
TU Classifieds
Glossary
Website Links
Forums
Gallery
Store
Everything posted by mark poulson
-
Unless you have access to the kind of injection equipment used for commercial plastic injection, you're going to have a tough row to hoe. I'm not sure what the exact process is called, but I know it's a lot more complicated than what a home builder typically has at his/her disposal. I would look at making a soft plastic bait out of buoyant material with a hook trough, so you don't have a tone of plastic for the hook to go through. Think along the lines of a Zoom Horny Toad, or the Air Frog, by Damiki.
-
This tool gives you two hands to assemble and arrange your skirt material, and to add different materials: http://www.tacklewarehouse.com/Naked_Bait_Jig_Spinnerbait_Skirt_Expander/descpage-NBSE.html
-
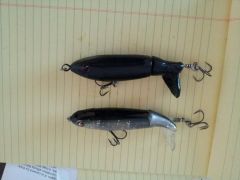
Because I am fighting a cold, I haven't been able to finish and fish my latest Whopper Plopper yet, so I have had a lot of time to think about my build. I realized that I shaped both of my Plopper tails to follow the original bait's tail as closely as possible. For me, that meant having a cone-shaped tail section with the Plopper tail blade coming off to one side. In the case of the tail with the metal Wacker blade, having a cone shape reduced the amount of material I had to mount the metal Wacker blade into, and was probably unnecessary. A cylindrical shape would probably work just as well, since the Wacker blade is plenty heavy enough to supply an eccentric load to the tail, and give the whole lure a good booty shake. Or I could just be way off base, with too much time to do what I'm least equipped to do, think. Hahaha
-
I just made a Tally Whacker tail for a Whopper Plopper. Here's a link: http://www.tackleunderground.com/community/gallery/image/15450-plopper-tail1/ Basically, I used a hammer and slightly rounded anvil point to tap the metal and expand it, so I wound up with a cupped and curved tail piece. I fit the metal into a dovetail saw's kerf, and seated/glued it in with super glue. Afterwards, I used bondo to shape/fair the connection, so it was concave, and gave the tail more structural support. Because I didn't get as much curve into the metal blade as I wanted, I angled my saw kerf to increase the angle of the tail. It rotates when I shoot air over it, but I haven't had a chance to test swim it yet. I'm still fighting the bug my youngest so generously shared with me. Once I do swim it, I'll report back, but, right now, even thinking about going down into the cold garage makes me shiver.
-
Look up The Crusades on the internet. Or the KKK.
-
I have not dipped twice, but I often make 3D eyes by dripping Solarez into drilled holes, until it actually domes up because it has great surface tension. I cure out the eyes, and then dip the whole bait in Solarez, with no problems. I've also changed the ballasting on already dipped baits, by drilling new ballast holes through the Solarez resin into the bait's body. Once I've gotten the bait to swim the way I want it to, I glue in the new ballast, fill the hole with bondo and sand it flush. I then touch up the paint, and brush on some Solarez to protect the new paint, lapping it onto the old Solarez around the hole. It bonds just fine.
-
I think you should look at AZEK PVC decking for a building material, if you're thinking of carving Musky lures. It is as buoyant as poplar, hard, strong, waterproof, and holds hardware well. Plus you can carve/shape it with the same tools you use for wood. Being able to test a prototype without any sealing is priceless. Tooth penetration isn't a death knell for a lure or a paint job.
-

Predator Bass Wiggle Wart Is A Salmon Killer
mark poulson replied to mark poulson's topic in Hard Baits
I added 1 tsp to 1 cup, and got a subtle greenish glow in what was a light blue/transparent plastisol. Darker colors may need more. -
Predator Bass Wiggle Wart Is A Salmon Killer
mark poulson replied to mark poulson's topic in Hard Baits
MasterChief, I also use it for more than lures. I have a stop block glued to my garage floor, so I don't back my boat into the wall, but, when it was low light, the block was hard to see. So I sprayed the block with some clear acrylic, and cover it with the GloNation Green/White powder. Then I sprayed more clear acrylic, this time saturating the powder. It dried hard, and glows like a light house when I'm backing in. I've also added the same powder to plastisol, and the baits glow subtly in the dark. -
Me, too, but maybe we get too preoccupied with trying to exactlymatch the hatch, and forget that fish are looking for food, so anything that stands out will probably get a sampling. I've caught trout on a mosquito fly in the middle of a mayfly hatch. I think the reason that most living things are the color they are is that it helps them survive. In the case of hellgrammites, being black or extremely dark helps them to not be noticed, and eaten.
-
I have a spare bedroom you're welcome to use, and my backyard is the CA Delta.
-
Dave, I am one of the do-it and see what happens people. If something works, I try to figure out why afterwards, and apply that to my next bait. But I really enjoy reading your posts every time, and try to understand them and how they relate to the lures I make. I think we each come to our passion from our own unique point of view, and that gives us all something different to share. Bassinfool, My kids love that show, and used to try to get me to watch it. A lot of it is really funny, but I guess I'm too old to watch a cartoon for 30 minutes, unless it's Ren and Stimpy. I still miss the Looney Tunes!
-
I heat my PVC baits with a hair dryer before I dip, and that helps the resin flow off more evenly when I hang them to drip off, before I put them under the UV light. I read on the Solarez site that you can heat the resin in a microwave for a short time, and that will make it flow more evenly. I haven't tried that yet. If it's cold when I'm dipping, I will use the hair dryer to warm the bait again after I've dipped it, while it is hanging and dripping. The warmer resin still adheres to the bait, but it flows more. Letting it drip longer doesn't hurt anything. I still get a thick enough coat with one dip.
-
For me, it's all about what you want from your baits. I have the Do-It Essential 5" senko mold. By varying how I pour, I can get variations, with the same plastisol/salt/flake mixture. If I inject my plastic hot (345+-), the salt settles more to the belly. So does the flake. If I tip the mold so one end is higher, I get more salt in the other end, and a wacky rigged bait spirals on the fall like it has a nail weight. If I want a more even distribution of salt and flake, I heat the mix to only 325, and make sure my mold is cool before I shoot it. There are tons of things we as makers can do to make our baits behave differently. The fun is in trying different things.
-
Look at your stream beds. They live in cracks between rocks, so they are dark, to blend in with the shadows. Having one a little lighter might help it stand out and get eaten better.
-
I've been injecting for two years, as a hobbyist only. I spray my injector with PAM between shots, and I have no scratching or O ring problems, so far.
-
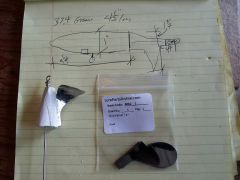 "If it don't fit, get a bigger hammer!" Words to live by. That was a drawing of the original bait. I find writing down the dimensions like that helps me figure out how to build. I made my copy 1 1/4" deep, to give the bait more of a keel, and to keep my ballast lower, to counteract the rotating tail. I ground off the sharp corner of the Wacker fin yesterday, and filled both sides where the metal comes out with bondo, to make farings for added reinforcement.
 -
The End Of An Era...uncle Josh Pork Products
mark poulson replied to mark poulson's topic in Wire Baits
Be sure they have water in them, and shake them a couple of times a year, to keep them from spoiling. -
I made another Plopper tail today, using a Tally Wacker tail from LurePartsOnline, just to see if it would work. Here's a link: http://www.tackleunderground.com/community/gallery/image/15450-plopper-tail1/
-
I made a Whopper Plopper tail from PVC and a sst Tally Wacker tail from LurePartsOnline. I used the anvil end of a metal working vice to shape and cup the metal, because I discovered that my ball peen hammer didn't make the trip north with me. A box with that, and all my wood lathe tools, seems to have disappeared. Anyway, 15 minutes of hammering, checking, and adjusting got me a tail that spins when I put it on a shaft and shoot air over it. Dieter, I am even more in awe of your metal working skills! I will be buying another ball peen hammer, some more lathe tools, and a digital caliper soon.
-
As I think about it more, one of the things that a through wire does is add some ballast up higher in the bait. I've found that doing that makes a bait more unstable, as in makes it hunt. I wonder if that had a lot to do with the success of some of the older wooden crank baits. I doubt it was done intentionally, but it might have been an unintended consequence, especially since a heavier gauge copper or brass wire was what was available "back then".
-
 Thanks guys.
 -
http://fishingtackleretailer.com/end-of-an-era-uncle-josh-to-discontinue-pork-products/ I hope this is the right forum to post this on. I figured jig makers are also jig fishermen.
-
I wonder if the through wire technique was developed because of softer wire, or weaker glue, or.....?
-
If you don't already have one, I'd suggest the Iwata Mac valve to put where your air line enters your brush. It is a micro air control valve. Being able to control air pressure right at the brush, so I could play around easily and not have to fool around with my regulator, made a huge difference for me in being able to play with air pressure as I paint. http://www.coastairbrush.com/proddetail.asp?prod=Iwata_Mac_Air_Controll_Valve&cat=317 This is just one place that sells them online. I'm sure there are others.
