


mark poulson
-
Posts
14,726 -
Joined
-
Last visited
-
Days Won
364
Content Type
Profiles
Articles
TU Classifieds
Glossary
Website Links
Forums
Gallery
Store
Everything posted by mark poulson
-
For me, the original Duo Realis, and the ones I made in shad designs, were great for clear water lakes down in SoCal. Up here on the Delta, the bluegill spybaits I made got bit in off colored water, but I haven't gotten bit on the shads yet.
-
 Dieter, I worried about that, too, but I made the tail prop blade thicker to give it some more strength. I also coated the tail section with runny super glue, before I painted it, and am hoping the Solarez resin will also help reinforce it. Fortunately, we don't have pike or muskies in our waters, or I would be worried more. The original lure's tail prop is thinner, and flexible, but I didn't want to invest in that material before I gave the PVC a shot. Both the air and the water are cold right now, so I think I'll have to wait for spring to test in on a fish.
 -
 Jonister, the truth in advertising message should read: 1. I had an original Whopper Plopper in hand and next to me to use as a guide while I was shaping both the tail and the head. 2. I've been shaping stuff my whole adult life, so I had a reasonable plan of action going in. I remember the sea lions on the rocks when I used to fish from them as a kid. They moved when they were ready, and I wasn't anxious to help them along. Those things are enormous, well armed, and fearless.
 -
Thanks guys. It was fun to make, but my hands are sore!!!
-
I had my heart in my mouth when I put in my float test bucket. Because I had buried the barrel wrap in the front part, and glued it in, I would have had to cut the shaft off and make a new front section if it hadn't worked. What's that saying about looking out for children and fools? When I was test swimming it off the deck this afternoon, a seal came by! I got it back in quick! I can't imagine how I'd ever get it back if a seal took it, not to mention how I'd get off the dock in one piece with a 12' pissed off seal on my butt!
-
My Knipex 7" pliers came but not my shaft wire, so I used a piece of sst wire I had in the shop. It used to be the control wire for my live well valve, so it's pretty stout. I finished the bait today, and did some test casts. It works!!! Thanks for all the help. I would never have tried it without the knowledge and encouragement you guys gave me. I posted it in the Hard Baits Gallery: http://www.tackleunderground.com/community/gallery/image/15445-whopper-plopper6/
-
I have some, too, buried somewhere in my garage. I used to by them once a year at the Bass-A-Thon by the hundreds, because they sold them in bulk.
-
I finished it today, and it works!!! Here's a link: http://www.tackleunderground.com/community/gallery/image/15445-whopper-plopper6/
-
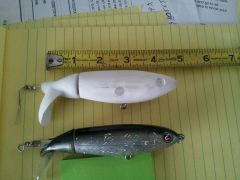
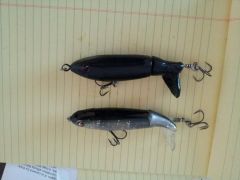
I painted it with Wicked Black, Solarez polyester dual cure resin, and red faceted glass beads for eyes. The eyes are not shining in this photo. The original weighs 36 grams, and hangs tail down at rest. My version weighs 41 grams, and floats horizontal at rest. I put 3 grams of ballast in the belly, in front of and behind the belly hanger. It swims great, with a plop, plop all the way. It is easy to pause, and to do a stop and start retrieve. The front section doesn't rotate on the retrieve. When I burn it, it leans slightly to one side, but not noticeably. The original leans more. It was a kind of an all or nothing build, because I couldn't test swim it until I had assembled it and put the barrel twist loop on the back end of the through shaft. I was so relieved when it floated in my water bucket, even though it weighed more than the original lure! Whoopee!!
-
Nedyarb, I wound up not putting a tube through the tail. Instead, I enlarged my original through hole to accommodate a buzz bait rivet at each end, which I super glued in place. That way, the tail is only touching the shaft in two small places, so I'm hoping it will turn more easily. I also put a rivet into the rear of the front section, so those two rivets would pivot on each other and keep my parts spaced. Since the bait was made from PVC, I counter sank the front of the first piece with a tight hole to accept the barrel wrap part of the line tie loop, and super glued that in. I may run some super glue down into the rivet in the back of that section, just for additional "don't rotate" insurance. I don't think I would have tried to build this bait from wood. Between the through wire, and the prop rotating so hard because it's eccentric, I think it would be too hard to waterproof it. Last night, I painted the inside faces of the joint with black nail polish, so I can paint the rest of the bait today with Wicked Black and coat it with Solarez, dipped, without having to worry about a buildup within the joint itself. First I am going to add another two grams of ballast in the belly, just in front of the hook hanger. I'm afraid there is going to be a lot of force from the rotating tail, so I want enough ballast low to keep the front part from turning, too. I'm doing an all black scheme, with red faceted glass beads for eyes.
-
Dave, It took about an hour, because I had the original right in front of me while I was doing the shaping. It would probably go a little faster if I were to do it again. Because I knew the PVC needed to be a little thicker, because it isn't flexible, after I hogged out the basic shape I shaped the inside of the prop first, and then trimmed the outside back down to as thin as I thought I was safe. I just went slow, so I didn't remove material from the wrong place. I kept renewing my reference lines, so I was able to think about what to remove, and why, in incremental steps. The genius of the tail is the cupped prop, which is what makes the plop-plop sound. It's like slapping the water with a cupped hand. That Dahlberg guy is pretty smart!
-
I'm going to paint it up, and coat it with Solarez tomorrow. If I can get the shaft through and bent right, I will take it for a test swim, rain or shine. The tail is carved (dremel sanded and shaped) from one piece of 1" thick by 1 1/2" by 1 3/4" PVC.
-
http://dubrofishing.com/
-
Here's what I've carved so far: http://www.tackleunderground.com/community/gallery/image/15443-whopper-plopper-1/ I actually did very little carving. It's mostly shaped with an oscillating belt sander, a dremel with small sanding drum, and I only carve where I couldn't fit the dremel with an exacto knife. I ordered some .051 wire shafts that will arrive tomorrow, according to the tracking. I'm excited to see how it works.
-
Have you thought about gluing in round/facet glass beads, so they are 1/2 burried, and then adding a drop of color into the hole to make the pupil? One of the benefits of having two daughters is that they passed their bead collections down to me when they outgrew them, knowing I'll never grow up.
-
Thanks. I'm wishing tomorrow would be here already so I can work on it some more, but, without the shaft wire, I'm on hold. I carved it from a piece of PVC that was 1" x 1 1/2" x 1 3/4". I drilled a pilot hole 1/2" in from one side, centered in the 1" dimension, to give myself a starting point and a reference. Once I got the rough shape on the bandsaw, I used both my oscillating belt sander and my dremel with a small sanding drum to shape it. The dremel really helped me get the cupping in the tail. I used an exacto knife to remove matl. where I couldn't use the dremel, and then hand sanded with 120 grit. I use a Whopper Plopper to trace/rough draw what I thought the finished tail shape should be, and then just slowly removed material until it got closer and closer, and I kept using the original's tail for comparison as I went, so I could make small removals and not spoil the workpiece by removing too much. That part was a little nerve wracking, because I'd never tried to make a prop tail before, but slow did the trick. I left my tail a little thicker for strength.
-
I'll buy some if you teach me how to work with it.
-
I just posted a photo of my copy of a Whopper Plopper in the Hard Baits Gallery. It was a fun build. I have some assembly, finish shaping and sanding, and fine tuning to do before I paint it, but I'm waiting for my .051 musky wire to arrive before I can do the assembly and water test it.
-
My copy of Larry Dahlberg's genius lure has a 1 gram lead ball for both ballast and rattle where the bondo dot is located, and a smaller plastic rattle in the tail section. I'll add more stationary ballast in front of the belly hanger if I need it.
-
It's raining and cold here, so I carved a Whopper Plopper copy yesterday out of Azek PVC trimboard. I'm waiting for my musky wire to do the final through drilling, finish sanding, and painting. I was worried I wouldn't be able to copy the prop tail section, but mine does rotate when I shoot air past the bait. It remains to be seen how it works in the water. The original is 4 1/2" long, 1" diameter, and 34 grams without hardware. Mine is 1" wide, but 1 1/4"deep, so I can add some ballast low if I need it. A black bird paint job is my plan, dipped in Solarez UV polyester resin for a top coat, which I hope will reinforce the tail prop without adding too much weight. A fun build.
-
Dave, I am thinking of sleeving the tail section, because of the offset prop and constant rotation. I'm like you. I don't want to ruin a good bait because I skipped a step. So far, I've found small plastic drinking straws, but I'd really like to find some metal tubes, like used to be used in ball point pens.
-
Nice bait!
-
Read the label. Devcon 5 minute epoxy is only water-resistant. Their 30 minute epoxy is water-proof.
-
That's a very nice offer. Let me try the .051 first. I think I need the thicker wire. But, then again, I've never made this bait before, so what do I know? Hahaha
-
Thanks LimpNoodle. I think I'll try the .051 wire first, to see how it handles.

