


mark poulson
-
Posts
14,726 -
Joined
-
Last visited
-
Days Won
364
Content Type
Profiles
Articles
TU Classifieds
Glossary
Website Links
Forums
Gallery
Store
Everything posted by mark poulson
-
Those are nice baits, but I think they have some fundamental flaws working against them. I'd offer these ideas, to try and save them. First, the angle of the lip is too flat (parallel to the bait's centerline) for such short lips. That is the angle for deep divers, with long lips. Lips that short should have some down angle from the centerline of the bait, to initiate the swimming action. If you used Lexan for you lips, you can heat them and bend them down, to see if that helps. I see your line ties run under the lips into the baits, so you might have trouble doing it. If they were my baits, I'd cut off the line ties at the bait, bend down the lips, and add a new line tie. I think the line tie should have been in the nose of the baits themselves, tight down to where the lip enters. Second, if you don't want to bend down the lips, I'd add ballast to the belly. I can't tell where you added ballast, or how much. I find that adding ballast at the belly hanger results in the widest Xing/wiggle. You might try adding enough ballast to get your baits to hang nose down, like a deep diver, which should help to keep the lips down during the retrieve. I like those baits, and I hope something can save them.
-
I don't think internally weighted hard baits are what is banned. I think it's lead sinkers and shot, stuff that waterfowl can easily eat.
-
Just remember Wicked paints seem to have some solvent in them, so, if you're using a solvent topcoat like AC1315, a barrier of gloss Createx will help prevent any interactions, like wrinkling.
-
Just remember hot lead and water/liquids don't mix without explosive results, as the liquid vaporizes instantaneously. Take your time, and wear protective clothing. Hot lead give 3rd degree burns when it contacts unprotected skin.
-

Help Please: I Can't Get My Plastisol To Clear Color
mark poulson replied to basspatrol's topic in Soft Plastics
Invest in a hand held digital thermometer. The temps. you heat the plastisol up to are critical. Here's a link to some: http://www.amazon.com/b?node=393284011 initially, as you heat in 1 minutes bursts, take it out, stir it to get the hotter plastic up to the surface, and check the temp. You need to get the uncooked plastisol up to 350 degrees to get it to convert to bait-ready plastic, but anything much above that will scorch the plastic and turn it yellow. That's why having a digital thermometer is critical. Use shorter bursts as you approach 350. After the initial heating to 350, I only reheat to 335, max., on reheats, so the plastic won't burn. And heat stabilizer is important, but too much will yellow the plastic, too. I use just a couple of drops per cup. Just so you don't feel like the Lone Ranger, everyone I've talked to about it has trouble with clear, and I only get one reheat before it starts to yellow. The colorants we use disguises the yellowing, I guess. But every plastic brand has it's own quirks. Some may yellow more than others, so you have to play around with some test batches until you get a system that works for your brand. -
I can't really comment on the learning curve of others. I have had the same experience with Rapala lures. Their baits break at the line tie, or right at the body/bill joint. It only took me a few to learn not to do it anymore. You'd think once would have been enough, but, nooo, I had to really learn the hard way! Hahaha
-
That's Mr. Bonehead to you! Hahaha
-
She's already into me for another $600 for her college stuff, so I should have a tab!
-
My youngest has one, and she's living with me right now, so I'll ask for her help. Grrrr....I'm sure it'll cost me a bunch!
-
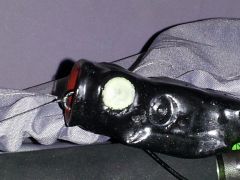
 One more pic, this time inside, no flash, under my desk where it was in shadows.
 -
 Hahaha. John, put the pipe down and step back!
 -
Dave, My days of cameras that can do that are long gone. It's my cellphone camera, or nothing. I'll ask one of my kids if my phone can do long exposures. I looked at the settings for my phone camera, and, as far as I can tell, there is no long exposure.
-
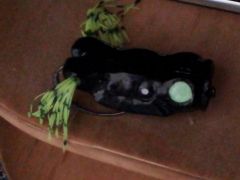
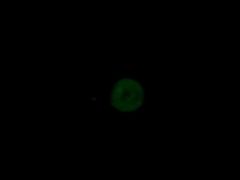
A hard PVC frog I made today with Glonation green/white powder in it's eyes. I can't seem to get a good photo of the eyes glowing in the dark, but here's my best try. The first pic. is with a flash, outside this evening, and the second is with the flash turned off.
-
 A hard PVC frog I made today with Glonation green/white powder in it's eyes. I can't seem to get a good photo of the eyes glowing in the dark, but here's my best try. The first pic. is with a flash, outside this evening, and the second is with the flash turned off.
 -
Sooo....I wanted to make a hard frog with big glow eyes, for night/low light conditions (actually, I like making them, and thought making big glow eyes would be fun. But don't tell anyone!) So I made the bait today, using a 5/0 Damiki beast hook, opened a little, for the single hook. Since I was making this black frog to have glow eyes, I made them 7/16" diameter, with a 1/8" recess so I could do Solarez 3D eyes. After I painted the bait with Wicked Black, I painted the insides of the eye recesses with the Glonation green/white, and hit it with the hair dryer, so it would dry quickly and let me recoat faster. Then I thought, what if I add some of the Glonation green/white powder right into the recess, and put a couple of drops of crazy glue onto it to lock it in place? The manuf. says it can be mixed with any clear medium, and crazy glue is clear. So I did, and, voila, it did lock the powder in the eye hole. Once I had done both eyes, I used my Solarez resin to fill the recesses, and was able to create a 3D mounding effect, because the resin has a lot of surface tension. I cured the first one in my nail light box, and then did the other side. Because the eyes are so much larger than the 1/4" eyes I've done in the past, the resin is raised in a more gradual curve, like a magnifying glass lens, instead of the more pronounced bead-like eyes I got in the past. But they are 3D, and stand out from the frog's face almost 1/8". But the best part is they glow like spotlights! Locking the powder with the crazy glue didn't diminish the glow effect at all. In fact, since the powder is pure pigment, more or less, the eyes glow more brightly than any I've ever done with the paint. After I'd taken it inside, to a dark interior bathroom, to check the glow, I dipped the whole bait in Solarez, and cured it in the nail light box. Because the eyes didn't require three or four coats of the glow paint, which dries very slowly, I was able to make, paint, and topcoat the frog today. My daughter says the eyes are cool. Coming from a 20 year old animator, that is high praise, indeed! So I thought I'd share. I'm still trying to figure out how to take pictures in the dark that show the glowing eyes. As soon as I can, I'll post it in the gallery. I just posted two pics in the hard baits gallery. The eye shows in the no-flash pic, but just barely.
-
I used some of the Solarez dual cure resin to make a mold of a soft bait that is no longer manufactured. It had lots of ribs (not as thin as the Missile Baits), plus claws that flapped, and antennas. I glued the soft baits down by their flat belly to a piece of Plexiglass, made a perimeter around them as a form, and poured in the resin, a little at a time, so I could UV cure each layer. In hindsight, I'm pretty sure I could have poured the whole thing and it would have cured, but I wanted to be sure the ribs filled in without bubbles, so I want slow. The mold cured out fine, it was flat when I pried it off the Plexi (remind me to use some release on the face of the Plexi next time). I drilled some vent holes down to the tips of the claws that were completely encased in the resin, so they would fill. I began by hand poring them, and that worked, but I wanted to inject them, because some of the claws didn't fill every time. I screwed a piece of the same Plexi onto the top of the mold, drilled injection fill holes for each bait, added some steel nuts as sprue extensions over the holes so there would be some plastic to be sucked back in as it cooled, and injected. It works. I just have to be sure to spray the cavities with PAM before each pour, so I can get the baits out without tearing.
-
Shane, There is a reason that soft plastic swimbaits come in the preformed clamshell packages. It is the only way to keep them straight. I poured a bunch of 3" to 5" swimbaits, and put them in a plano box, lying as straight as I could get them, but with them lying on each other, so I could fit them in the box. I keep it in the sun, behind one of my boat seats. Because I used a med. soft plastic, they swim, even when the tails are bent. I use them a lot with lead heads, and jika rigs, and they are fine, but the tails sometimes are bent, and they swim funny, like a struggling fish. Not always a bad thing.
-
Crayon And Candle Coloring Of Plastics
mark poulson replied to mark poulson's topic in Soft Plastics
As far as candle colorings go, I no longer use them. Since I began pouring plastics, for myself and a few friends, I've found that it's much easier and less time consuming to use the plastics colors sold by soft plastics manufacturers. They are much easier to control as far as plastic color consistency,aren't that expensive for a hobbyist like me, and produce plastic baits that don't have a funny feel to them, almost greasy. I have a ton of candle colors in a drawer that I haven't used since I began using bottled soft plastic colors. They are pretty, but I can match their colors if I want to with the stuff in the small bottles. -
Early morning/low light on Lake Castaic this morning, and a 2+lb largie liked my 3/8 oz. white with green/white glow powder chatterbait. Since the fish are eating small stuff right now, I threw it with just a white-themed skirt and no trailer, or trailer hook. Man, that lake is so pressured right now I was shocked when it bit. I was just throwing along a break to see if it would glow, and, bam!
-
I just painted some of my older green/white onto some white and chartreuse chatter bait heads. Two coats each, and I had added some of the glow powder to replace the pigment that had skinned over. The heads glow with a mottled, splotchy effect. I like it. I think it will make them more visible in low light, but not so bright as to be off putting. I topcoated them with clear Sally Hansen's Hard as Nails.
-
I've modified some Do-It molds to take bigger hooks. I don't have a steady hand, so, when I needed to enlarge the part for the hook's line tie, I used my drill press, locking the bit at the depth I wanted, and then moving the mold slowly so the drill press removed material like a mill. If you have enough meat in your mold, I'm sure you could do something similar. It just takes patience, and going slow, so the bit doesn't grab and take more material than you want to remove. If it does, there's always JB Weld for repairs.
-
Dieter does all hand painting, so look him up (Diemai) with the search and check out some of his stuff.
-
For a swimbait that size, I use .072 X 7/8" screw eyes, and they hold in PVC just fine. They should work for resin, too. I've tested that size screw eye, and 30lb. test line will break before the screw eye fails. I predill a pilot hole, run the screw eye in and then back out again, to cut threads into the pilot hole, coat the screw eye with gap filling crazy glue, and then run it back in. The excess glue that accumulates at the base of the screw eye makes a seat that locks the eye, and keeps in from twisting. Lately, I've been using Spro swivels for my line ties, # 8 for cranks (50lb), and #6 or #4 for swimbaits, and they don't fail. Having a swivel on the treble keeps the fish from using the weight of the swimbait to twist the hook out. I put a small piece of spinnerbait wire through the hidden loop of the swivel, from side to side, to insure it can't pull out. I've found several things that work for me with my jointed swimbaits. First, I use a 2/1/1/1 ratio for my four piece baits. The longer first section/head keeps it more stable. Second, I use a V profile for my bodies, tapering up from 1/2"+ at the belly to 7/8" at the shoulders, with flat sides. That removes more of the buoyant material from the belly, making it naturally less likely to roll. I can burn a bait back in, and it won't roll. Last, I keep my ballast as low as possible, and keep it as forward as possible. If I can put the ballast I need in the first section alone, I do, and only add it to the next sections if I can't get enough ballast in the head to get the action/fall rate I want. I never weight the last/tail section. That way, the tail is always more buoyant, and the bait swims level on even a slow retrieve.
-
Years ago, when it first came out, a friend who was a medic in Vietnam said they used it to hold ruptured organs together in their trauma treatments, because there was no way to do sutures. I use it all the time to close cuts. But I never use the accelerant to speed it up. That will cause bad burns from the chemical reaction. Been there, done that. But the fumes are nasty, whatever they are. They raise hell with my sinuses I do my super gluing with a fan behind me, and the big door to my garage open, or outside completely, if possible.
-
Will Drop Out, or some other kind of release agent, help rougher molds pour and release better?
