


mark poulson
-
Posts
14,726 -
Joined
-
Last visited
-
Days Won
364
Content Type
Profiles
Articles
TU Classifieds
Glossary
Website Links
Forums
Gallery
Store
Everything posted by mark poulson
-
That is a nice looking bait! If, by auto filler, you mean Bondo, then yes, I use it all the time. I wipe it with runny super glue after it's sanded to shape, to add some strength. I haven't experienced any shrinkage problems, but the coldest water I've fish is 50 degrees.
-
JR, They work. The hooks on the store bought models are very small, #6 and #8 trebles, and a good fish can bend them, if you don't play it or try to swing it. But suspended fish do eat them, or swipe at them and get stuck on the round bend trebles. And they are great for fish busting shad. After a striper messed up one I had bought, I made a couple of my own, with a little heavier hardware, I put #4 trebles on them. So far, the biggest bass I have caught on one is 7lbs. I had just caught a striper busting shad on a shallow ledge, and that fish bent out the #8 treble hooks on my Duo Realis spybait, so I picked up the rod with my homemade bait on it, and that 7lb bass ate it fast and hard on the next cast. The #4 treble hook went all the way through her lower lip. I'm sure she would have bent out the smaller hooks on the other bait, and gotten off.
-
I think the shine is a product of the thickness of the coating. Epoxy is thicker, so it adds depth. For me, it also adds another day to the construction process, and weight to the bait. I find the AC1315 doesn't diminish or dull the paint schemes in any way, and, in fact, enhances them. It is also thin enough that it doesn't obscure or fill in details I've added, like tracing the gill plate onto my PVC lures with my thumbnail, to provide a slight recess that adds shadowing. It coats diving bills on cranks, and doesn't peel when I grind them on rocks. I've got some wiggle warts whose bills are worn from rocks, but the paint on the bills, and the AC1315 top coat, are still adhering fine. I have had urethane coatings on bills peel in the past, and I've had epoxy coatings crack and chip, but not the AC1315. Lastly, it doesn't pull away from sharp edges, like epoxy does when it sets, so one dip coat covers everything. I add two coats just for the additional thickness and protection, but I have cranks I fish myself that I only dipped once, and the finish is holding up fine. The only thing that keeps this from being "the perfect country and western song" are the danged old solvent fumes, but I dip outside, and am careful to have good ventilation.
-
 Thanks. That's the plan, man. Hahaha
 -
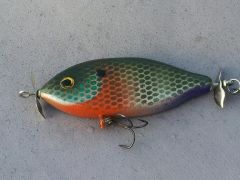
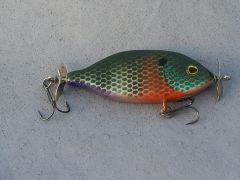
So, I was wondering if a spybait could be made in a bluegill size and pattern, so I made one. I figure subtle doesn't only have to be for shad baits and minnows. I just posted it in the Hardbaits Gallery. I won't get to fish it for several weeks (boooo) but I test swam it, and it performs. Now all I need is for the bass to appreciate it's performance! Hahaha
-
3 1/2" PVC trimboard spybait, 1 1/4" tall, 9/16" thick, 24.9 grams (including approx. 4 grams ballast). All Createx and Wildlife colors, two dips in AC1315 for top coat. .072 X 7/8" sst screw eyes for both props, and for the belly hanger. All the hardware is from Barlow's. I made it with the ballast in front of and behind the belly hook hanger, so it falls nose first at an ROF of one foot per second, but swims level on the retrieve. The props give it enough resistance to keep it up at a med. retrieve. The other spybaits I've made, and the store bought Duo 80 G-fix, all fall level, but swim nose up, because of how they have to be ballasted to fall level, and have the quiver on the fall. This bait doesn't quiver, but it does swim level. I'm hoping the props give it enough water displacement to add some quiver on the retrieve, or at least make it look alive. Fingers crossed!
-
 3 1/2" PVC trimboard spybait, 1 1/4" tall, 9/16" thick, 24.9 grams (including approx. 4 grams ballast). All Createx and Wildlife colors, two dips in AC1315 for top coat. .072 X 7/8" sst screw eyes for both props, and for the belly hanger. All the hardware is from Barlow's. I made it with the ballast in front of and behind the belly hook hanger, so it falls nose first at an ROF of one foot per second, but swims level on the retrieve. The props give it enough resistance to keep it up at a med. retrieve. The other spybaits I've made, and the store bought Duo 80 G-fix, all fall level, but swim nose up, because of how they have to be ballasted to fall level, and have the quiver on the fall. This bait doesn't quiver, but it does swim level. I'm hoping the props give it enough water displacement to add some quiver on the retrieve, or at least make it look alive. Fingers crossed!
 -
Didn't I read here that circut board can be cut with Wiss tin snips?
-
The shine will look the same, once it's in the water. "They're all sisters in the dark"
-
It's going to be hard to drill a straight hole if your center filler material is harder than the wood on either side. I would try clamping the two wood sides together and drilling them before I made the sandwich. Just put something temporary in the hole to keep it clean when you do your final sandwiching. I use a wooden jaw Jorgensen clamp to hold baits when I have to drill an already shaped bait. http://www.woodcraft.com/Product/413640/Jorgensen-6-Adjustable-Handscrew-Model-30.aspx
-
Since people have moved to cities, and become so far removed from nature, they seem to think they can reverse the effects of mankind on nature, just because "it's right". The only way to reverse our impact is for us to be gone, and that's not going to happen any time soon.
-
Remember, the first green pumpkin was a mistake that worked. Watermelon and pumpkin mixed together by accident, according to something I read here on TU. Read it online, can't be wrong!
-
 You are an artist! What material is it carved from?
 -
I think the key to the whole jika rig is have a buoyant bait, so it doesn't just flop over when it's dragged.
-
Many (too many) years ago I bought some dissolvable soft clay sinkers that were soft clay tubes you threaded your line through. I haven't seen them in a long time, but maybe something like that would help non-lead sinkers get down deep quickly, even with their smaller weight to size ratio.
-
Ouch! Hahaha
-

Etex Keeps Covering Line Tie And Hook Eyes Need Some Advice
mark poulson replied to bluedragon2k9's topic in Hard Baits
If you're making jointed baits, one trick I learned was to coat the inside of the joints with D2T, lapping it 1/4" onto the face of each section. The D2T didn't sag, and one coat was all I needed inside the joints. Then, I'd assemble the bait, put it on my ferris wheel lure turner, coat it with Etex, and then turn on the motor and let it turn. My turner motor was 1 rpm, so I had time to really inspect, remove drips, and touch up dry spots. Having the Etex lap over the D2T that 1/4" made for a really good lap joint that disappeared by the second coat of Etex. -
When you want to reinstall the tiny nozzle, try putting the needle in first, loose, and push it out the front enough to slip the needle onto. That way the nozzle's threads will line up as you slowly push it back into the nozzle cap. Do everything slowly. Those tiny parts are fragile.
-
Funny you say that. I was wondering how much difference it would make. I started using tear drop shaped drop shot weights, because I have a ton of them. Then I tried the ball shaped weights, and I found not much difference, too. The biggest thing for me has been finding the right weight for that day.
-
Ben, I've never done that. It might work. I worry that 350+- plastisol might bubble the paint and top coat. If it does work, it would let you add flake over your clear coat, too.
-
Where the ballast weight is in regard to a centerline running from your line tie to your rear hook hanger is critical in how stable you lure is. The higher the ballast goes up into the lure from the belly, the less stable the lure becomes. A general rule of thumb is to keep you ballast as close to the belly as possible, and also closely centered around the belly hook hanger. Using a preweighted belly hanger, one with lead already poured around it, gives you a good start. Or you can use an egg sinker, with your belly hanger wire pushed up through it, and spread at the top. Small cranks are the hardest to weight correctly, because you have less space to play with, so how you do stuff is more critical. Good luck.
-
Bob is right, a weighted belly hanger will make your bait more stable. Here's how I find out how heavy a belly weight to use. I would reseal the wood temporarily with crazy glue, reinstall the hook hangers and hooks, and float test to see how much ballast was needed to get it to hang down at about 45 degrees. I use split shot and egg sinkers, added to the tines of the belly treble, to see exactly how much ballast weight I need. Then weigh all of the weights to get an exact amount, find a weighted belly hanger of that weight, shave off .3 grams for the weight of you paint and topcoat, and then do like Bob says. That way you're sure you don't overweight it, and wind up having to drill out some of your ballast lead.
-
Just go slow when you're removing the rest of the lip. The line tie may run through the lip, and you don't want to find it with a good saw or knife.
-
I think SpikeIt makes something for that.
-
Unless you're making heavy swimbaits that give a big fish enough leverage to bend out a hook, or unless you're fishing really gnarly grass/weeds/cover, so you have to horse your fish out quickly, your line will typically break before your hooks open. I usually only have them open when I'm using pliers to pull them out of a fish's hard mouth parts in the net.
