


mark poulson
-
Posts
14,726 -
Joined
-
Last visited
-
Days Won
364
Content Type
Profiles
Articles
TU Classifieds
Glossary
Website Links
Forums
Gallery
Store
Everything posted by mark poulson
-
"Heard it in a love song...can't be wrong"
-
I guess what I said was confusing. Sorry. I was talking about my three and four piece jointed swimbaits when I said no weight in the tail section. For my two piece glide baits, I do weight the tail section.
-
Douglas is right. The two types of baits are weighted differently. I never put weight in the last section of my jointed swimbaits, so the tail is more buoyant, and helps the bait swim horizontally. I've found that adding weight to the tail results in a tail down swim. While it does look like an injured trout struggling to swim, I find that a horizontal swim is more successful. I have made several two piece glide baits that do glide with an S swimming motion. For me, equal rate of fall of the two glide bait sections is critical. How it is achieved is up to each builder, but I add belly ballast to each section, after I've added the hooks and split rings so I get an accurate read. I also put the hinge hardware into each section so I get a true rate of fall, and work to get the bait sections to fall at the same rate, and horizontally. As was suggested here by Vodkaman and others when I posted about my problems earlier, having the two sections fall at the same rate, and horizontally, seems to put less binding force on the hinge, so it is freer to move with the changing vortices during the swim/glide. A free moving hinge is also critical for my glide baits. I am not arguing with Butch Brown's 250 modifications. I am only saying this works for me.
-
I love this video: Is the two slot lip so you can adjust the slip wire attachment from the front slot to the rear slot to vary it's diving depth?
-
It looks to me like the front of the lure's notched face provides a diving bill, so the buoyant bait is pulled slightly under during the retrieve. I weight my larger walking baits with the ballast 3/4 of the way back to the tail, so they sit almost horizontal, but with the tail slightly lower, and the front 1/3 of the back out of the water. The weight back helps with the cast, and insures that the front slows first, so they walk. I'm guessing, if you already make walking baits, just modifying the front to have that diving bill face will do the trick. You can adjust how deep they go on the retrieve by changing the angle of the bill.
-
Man, I use bicycle spokes for hinge pins on my jointed hardbaits. How in the world do you bend them? I'm thinking a forge and anvil! U DA MAN!!!
-
He sure makes nice baits!
-
How do you want your bait to swim? I don't know what kind of action a darter bait is supposed to have.
-
The way the metal bill flashes when it X's, it reminds me of a chatterbait.
-
Maybe I'm not seeing something, but they look to me like the only ballast is the trebles, and the metal lip, which extends back into the bait. Is that the case?
-
I'll jump in on this and say that I use a water bucket on my driveway to ballast my two piece jointed glide baits, and to make sure they fall horizontal, and at the same rate. I used a River 2 Sea S Waver when I first started as my guide for both joint gap and body section ratio. Now I can pretty much judge how much gap my joint needs by holding the assembled bait head down, and seeing how far to each side the rear section falls.
-
They're fun and easy to make, and to fish. Prespawn, spawn, and post spawn. And up until the fall, as long as you have cover with an edge.
-
A picture of what you're looking for would help. I think of a red wine color as really a reddish purple, like a deep oxblood. I would start with a purple, make it as deep as you like, and then add either some red or some red flake (maybe both), to give it the red wine hue. Just don't try to drink it! Hahaha
-
IronBass, I get that action if I leave the joint looser. The tighter the joint, the longer the S swim, and the less the side turn on the pause or jerk. Being able to adjust the joint gap on the water to get the retrieve I want is another reason to use screw eyes and hinge pin, and also why I love PVC. No water intrusion worries.
-
Let's not bring politicians into the argument.
-
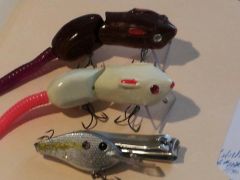
I just posted two pictures of two more rats in the HB Gallery. The brown one looks black, but it's not. It's just my poor photography skills. Nathan, I did paint the interior of the 1/4" eye recesses with Bob's green/white glow in the dark paint, and it really does glow! My daughter says it's creepy, and that's a great endorsement. The pictures include a flat sided shad crank with movable ballast that hunts.
-
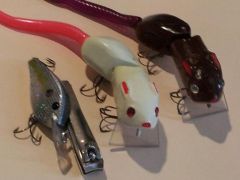
 These two rats are the same as the black and grey I posted earlier, except the brown has glow in the dark 3D eyes (thank you Nathan and BobP). The shad is 2 1/2"X 1"X 7/16" ( 2.5 bait profile), weights 14 grams fully dressed, with a 3 gram integral weight belly hook hanger, and a single moving sst ballast ball, weighing .5 grams, and moving side to side about one diameter. I wanted to use two balls, but they filled the entire side to side hole. It is a flat sided bait, and has a bill that's 3/4" wide, so it has a very flat, no roll wiggle, which is why I went to the narrower bait with the narrower bill (thanks to all here who suggested that). The line tie is a little more than 1/3 of the way from the bait to the tip of the bill. I bent the 1/8" Lexan bill up a little to help it dive faster. It hangs nose down, dives to about 6' (the water wasn't too clear, so this is a guess). The ballast hole is just about where the shad dot is located, slightly above the centerline drawn from rear hook hanger to front line tie, and just slightly behind the belly hanger centerline. It is actually directly over the belly hanger when the bait is resting, or being retrieved. I didn't do this on purpose, but it works. It moves from side to side pretty quickly, as opposed to the fatter baits with the larger X ing, that move from side to side every 3-4'. I think this is due to the flat sides, and the thinner profile and bill. It is PVC trim board, glued up with gap filling super glue, including the bill placement and line tie anchoring (with the help of accelerator on a drip wire thanks to Ben). I made this bait to see if it would work and it does. I made the moving ballast shad baits to see if I could get and easily reproduceable hunting action, and I can. I don't know if it can be done as easily with a wood bait, but I suspect, if you use a piece of plastic drinking straw to line your movable ballast hole, it shouldn't be too hard. It seems to me that, as long as I don't put too much of the ballast up high in the movable section, this method works. I've gone as high as a 3/1 ratio, but this one is 3/.5, or 6/1.
 -
bass100, Those baits are beautiful! What is your painting process?
-
 X2!
X2! -
 Really nice!
 -
 That duck looks alive! Great job. Please post more detailed pictures. I will never build one, but I'd love to see more.
 -
I was able to get my two piece swimbaits to glide (thank you Dave and everyone else here) after struggling for a long time. I copied a successful shape first, the S Waver, and I think the ramped chin helps the bait change direction when I pause and jerk. These are the key things I learned here that made my baits glide: 1. Making sure that each of the two pieces sank perfectly horizontally as individual pieces. 2. Making sure the two pieces sank at the same rate of fall by holding the side by side, and releasing them in my float bucket. 3. Making sure there was no friction in the hinge at all. I use screw eyes and a sst bicycle spoke pin for my hinges. The long pin keeps the screw eyes from self-adjusting, and I can run them in or out to tune my joint gap. I've since made several other successful two piece gliders, using the same ideas and proportions, in terms of ratio of front to rear sections. I also did not give the joint too much play. I found, the tighter the joint, the larger and lazier the S wave motion. In retrospect, I had made two piece baits in the past, but I was disappointed in their lazy S swim, which I was sure would never catch fish, so I went to three and four piece baits instead. Shows how much I know! Hahaha
-
Cedar is an exterior trim material, and the rough side is called Rufsawn. It is the bandsawn face that comes when a 2" thick surfaced four sides (S4S) plank is resawn with a bandsaw to give two thinner planks. The rough face give a different, less formal, effect, and weathers into a really cool looking face. Because cedar is a stable wood, it doesn't cup when the two sides have different surfaces, so having one side rough and the other smooth gives you two options when you're putting up cedar for siding, fencing, or trim.
-
If I read that right, he only adds violet hilite, and gets that great color. No white pigment at all???

