


mark poulson
-
Posts
14,726 -
Joined
-
Last visited
-
Days Won
364
Content Type
Profiles
Articles
TU Classifieds
Glossary
Website Links
Forums
Gallery
Store
Everything posted by mark poulson
-
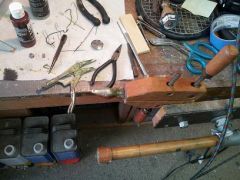 I hope you can see this. It's a lure held in a vise grip so I could stencil the belly joints using both hands. I use the wooden clamp in the vise to hold the vise grip when I need to rotate the bait to do the sides.
 -
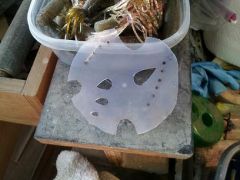 Here's the margarine top I used to make my clear stencils. It is semi-soft, but hitting it with a hair dryer helps. For me, it's not rocket science, or I'd have to ask one of my kids to do it.
 -
Fifty lashes with a wet noodle for you, me hearty! Hahaha Funny how life gets in the way of stuff, isn't it.
-
I feel your cold! It rained here this morning, more of a shower, and then the sun came out, so I was able to dip two more cranks outside. I do the same, and have never tried painting over it, either. Here's the foiled bait. You can see the joints and wrinkles, but they feel smooth. I have only dragged a coated bill over some rocks on one trip so far. I'll try and abuse one tomorrow, so we can all see if it holds. When I tried that with a urethane, it peeled, but Solarez has held up fine. If the AC1315 holds up, holy crow! A note of warning. Even though I dipped outside, I didn't turn the fan on inside when I hung two baits to cure (lazy and complacent), and I feel the fumes from the AC1315 now in my eyes. Weird, but I know eyes can absorb chemicals, too, so be sure and use good ventilation blowing out from behind you.
-
 John, It is not hard, but it takes a little getting used to, in terms of how to hold the stencils, and what order to do things. I'll take a picture of my margarine tub top stencil, so you can see it's not that complicated. Finding a way to hold the bait so I could have both hands to position the stencil and then paint it was the hardest part for me. I wound up using a combination of my bench vise, a wooden Jorgenson's clamp, and a small pair of vise grips.
 -
 In this picture you can see the black sharpie dots I put on first, to help me orient my stencil.
 -
I've used Zap to glue my threads, and, believe me, it won't fail. I have to use an exacto knife to cut it off if I want to change skirts.
-
I don't dip, but that's what I found when I tried. You could probably make an A rig-type setup, with multiple wires, so you could dip lots of baits at once.
-
It probably worked, and he's too busy catching fish to post! Hahah Your method is exactly what I do, too. Have you tried it to make phantom baits that are translucent? On a clear plastic bait that is a really good clear water scheme.
-
There's no need for either a stand or a rotator. The light box itself has room for hanging three cranks at a time, max, or they'll bump into each other. I only do two at a time. I open my bench vice enough to set the light box with it's opening up on the two jaws. The light had two switches, one to turn on the power to the light, and another to actually turn the light on and off. Those switches are on the back of the light, so they are on the underside when I have it on the vice. I am able to access them between the open jaws. The switches are not tall. I could do the same thing on a flat suface if I spaced them up with a couple of pieces of wood. I hang my baits from V shaped wires so they suspend in the light chamber. I lift them out and turn them every 30 seconds for three minutes total. The entire light box is lined with reflective material, so both sides get hit no matter which side is facing the actual bulbs. And there are four bulbs, so the light is hitting them from lots of angles. I read here that 30 second intervals work best, so that's why I do it. I also read here that these lights give off the proper UV wave length, so that's another reason I use this light. You can also take them out into direct sunlight to cure, but I find the finish is clearer when I use the light box. I dip my baits in the Solarez, and let them drip back into the container. If you plan to do this, too, be sure your doors are closed, and window shaded. I found out the hard way that UV rays are reflected off hard surfaces, and can reach back into a shaded garage. I had some drips cure in my dipping jar, and had to screen the rest of the material to get rid of the cured chunks of crap that wound up in it.
-
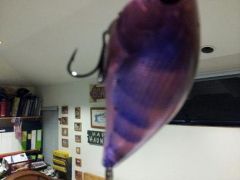 I'm amazed at how solid they look when the light is shining down on them, but how translucent they are when back lit. I'm hoping this makes them easier to see, but harder to identify as fake. Our SoCal lakes are clear!
 -
The second dip did smooth the foil joints so I can't feel them with my finger. The AC1315 has more body than the SC9000 urethane I have used in the past, but it is thinner by far than either epoxy or Solarez. An hour after I dipped it again, I was able to handle it to put on the hardware, but it still has a slight smell, so I put it back out in the garage to cure more under the heat of my work light. I plan to test fish it tomorrow.
-
I just took it off the hanging wrack and put on all the hardware. Two dips did smooth over the foil joints so that I can't feel them with my fingers. It's only been an hour, so it still smells slightly, so I know it's not fully cured yet. But I didn't mess it up putting on the hardware. It's a new-for-me bait design, so I'm going to test fish it tomorrow. If it works, I'll post it in the Hard Baits Gallery.
-
Man, that looks terrific! Congratulations!!!!
-
I don't dip tubes, but my buddy asked me if I could try and dip one, using a large hex shanked Allen wrench, because he wondered if the shape would transfer to the overall shape of the bait, and make it's action different. The good news is I could easily dip with an Allen wrench. Thanks to you guys, I coated it first with worm oil, and the bait slid off just fine. The bad news is the outside of the bait just rounded itself off, and totally lost the hex shape. But it did tell me you can dip just about anything, as long as it doesn't get melted by the hot plastic.
-
Wouldn't a sand paper finish catch more water, and increase the bait's action even more?
-
I bought my 36W light here: http://www.amazon.com/For-Pro-UV-Lamp-36W/dp/B0050ISSQ0/ref=sr_1_6?s=hpc&ie=UTF8&qid=1422630911&sr=1-6&keywords=36w+nail+uv+lamp It has worked for more than a year with no problems. Just don't drop it! Hahaha
-
Woodie, You're the expert. I just turn on a $10 lathe I bought at a swap meet40+ years ago. I have it turning slow to medium, because it has oiled sleeve bearing, and I didn't think they'd hold up to fast speeds. I have never tried turning it myself, because I don't use a lathe for making my lures. I find the decking is harder than the trimboard, and I have to use sharp blades, slow feed rates, and light pressure, or the PVC melts. With a table saw, it makes wispy little trails as it's cut. On my oscillation belt sander, it gets sticky if I try to remove too much too fast. I cut it to bland shape with a radial arm saw, cut the profiles and lip slots with a band saw, cut the joints almost all the way through with either a table saw, for multiple jointed lures, or with a dovetail hand saw, if I'm making one jointed bait. I leave enough material so I can final shape the bait as one piece, and finish the joint cuts once it's shaped. I do most of my shaping at the oscillation sander. I add details with a dremel or by hand, final sand with a vibrating sander, first 80 grit, and then 120. I'm telling you all this because it's been so easy to use for me I'm hoping something I do will help you adapt and use it, too. Not having to worry about water intrusion, ever, has made my lure making a worry-free process, at least as far as lure body and paint failures are concerned. Getting bit on them is a whole 'nother deal! Hahaha
-
It's a concrete sealer someone here (I apologize, I don't remember who) suggested. I went to their website and ordered a 4 oz. sample to play around with. Here's where I got the sample size, and then the quart I'm now using: http://www.directcolors.com/product/sample-size-sprayable-satin-finish-concrete-sealer/ I decided to do a full on test right off the bat to see if it had any application or storage problems. I tried the same dipping/drying routine I had used with SC9000 urethane successfully. I tried dipping a bait out in front of my garage on a work bench, and letting it drip back into the container, and it was no problem. The AC1315 didn't mess up either my heat set air brush paints, or my lure bodies, plastic or PVC. I wiped the last drips off the bottom with my finger, and scraped that back into the container, too. The stuff never even skinned over. After my test bait had stopped dripping, I took it back inside the garage, and hung it over my work area. I used a small piece of paper towel to wick the hook hangers clear, and to take the last drip off the bottom of the bait. I let it hang for 15 minutes, and then hit it with my hair dryer on low. After another 15 minutes, I hit it again with the hair dryer. After an hour, it was hard enough for me to clean out the line tie and hook hanger holes, and add the split rings and trebles. I fished the bait the next day, and it held up fine. It didn't soften or scratch. But I found that, on larger surfaces of my swimbaits, I needed to let it cure another day to get really hard. It does have fumes. I tried dipping inside, and didn't really smell them, but my eyes glowed afterward, so I only dip outside now if I can, and leave a fan blowing out of the garage when I bring baits back in to cure. I also leave a work light shining on them overnight, to keep them warm enough to cure out properly. This process isn't scientific, but it works for a hobby builder like me. This stuff is easy to use, and to store. It goes on a little thicker than the urethane I had been using, but not as thick as epoxy or Solarez. And it goes a long way. I would probably still be dipping in the 4 oz container, but I tipped it over outside while I was dipping (did I mention I'm clumsy?) and so I reordered, but this time the quart size. There's a basketball sized circle on my driveway that's really shiny now. Hahaha
-
As soon as it's light enough to work I'll go out and dip it again, and report back.
-
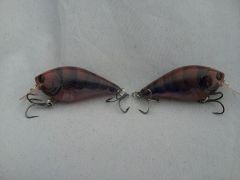
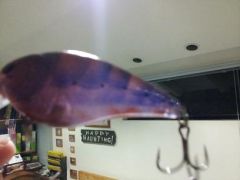
 Thanks guys. I was shamed into trying stencils by all the great work you guys here do. The colors are mostly Createx transparents. I cleaned the plastic with acetone, shot Wildlife color sparkle white on the belly until it shone, then did several light coats with Createx med. brown over the back and shoulders, down to where I wanted the joints to end. I cut a clear margarine tub top to the shapes of several different joint sizes, and used Createx violet with some deep blue to darken it a little to shoot the joints. I used the same violet to mark the claws on the top side of the bill. I used transparent orange to mark segments on the belly, and to make the claws on the underside of the bill. I used my thumb for a template for the bill claws. I just took some pictures with light shining through the baits so you can see how translucent they look when back lit.
 -
For me, I heat my plastic, no matter what brand, to 350 degrees, to get it to change to a clear, flowing plastic. Once I've heated it that hot once, I try to pour/inject it at 330 degrees+-, so it doesn't overheat and turn yellow from scorching. I'm sure every brand of plastic is different, but this is what I try to use as a guideline. An infrared thermometer is a really good investment. Just be sure you stir your plastic before you check the temps. The surface temp of plastisol will almost always be lower that the internal temps.
-
I just dipped a foiled bait. I can still feel the edge of the foil, although it isn't as sharp as before I dipped it. Tomorrow I'll dip it again, to see how it builds. I'll let you know how it works out.
-
If I want to take them apart, I do drill them out like you said, but that's really hard to do. Mostly, I paint them while they're still assembled, and just brush on the top coat, so it doesn't get into the joints or hardware. AC1315 works really well for this.
-
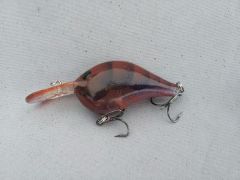
I held one of the 2.5 baits up to the light, to show how translucent they are.


