


mark poulson
-
Posts
14,726 -
Joined
-
Last visited
-
Days Won
364
Content Type
Profiles
Articles
TU Classifieds
Glossary
Website Links
Forums
Gallery
Store
Everything posted by mark poulson
-
That is an easy mold to make with POP.
-
The more you thin epoxy, the thinner the film that's applied, so the weaker it becomes, too. Less is less.
-
That's what I found, too, when I used straight braid on my walking baits. I still use braid, but I add a 7'+- leader of 20lb mono, because it is stiffer and fouls less. I'm planning to use either fluoro or mono, in 20lb test, depending on how slow/fast I want my glider to sink.
-
littleriver, Thanks for the great read, and the two links. Amazing stuff!
-
Sorry if I caused you pain. Hahaha Since smaller gliders are soooo sensitive, I'd suggest you trace out your bait's profile on a piece of paper like I did, and mark the locations of the ballast exactly. Then go ahead and paint and top coat the lure, so it's at it's finished weight. If it just barely floats when you're done, try casting it and see if the shape of the lure, and the weight of the line, are enough to get it to glide just under the surface on the retrieve. If it doesn't you can always wrap a little lead wire around both the front and back trebles, to keep it level in the water, until it just barely sinks, and try it again. I take a spool of the lead wire with me to my test pond, so I add weight during the testing. If that's what it needs, you can super glue the wire to the hook shanks, and it'll stay forever. If it sinks after you've finished it, put the lure back over the tracing, mark where the two ballast locations are, and drill a small hole in the center of both ballast areas, a little at a time, to lighten it. Take two different setups with you to test fish it, one with fluorocarbon line and one with mono. They will affect the buoyancy of the lure differently, and one or the other may be enough to get it to work the way you're looking for. Good luck.
-
Another forum to join? I'm still dithering about rejoining facebook, so I can communicate with my daughter who's in college back in Toronto. Hahaha
-
 Hahaha
 -
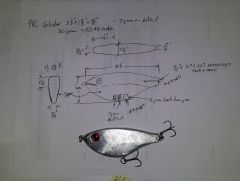
Ben, The drawing of the actual Roach lure on the website Dieter posted showed the hook hanger past the center, so I did it that way, in case it was important. I'm going to make one with the ballast spread a little more toward the head and tail, to see if that makes a more gentle action, and, when I do, I'll probably drop the belly hanger more into the middle with no weight in it.
-
Are these new molds somewhere on their website? I've looked twice, but I can't find them.
-
I will keep you in my thoughts. Keep us posted. We're all rooting for her.
-
-
He needs the money to keep up his penalty payments to Gene Larew for the salt inclusion patent case he lost. Hahaha
-
Sounds like it should work.
-
When one of my cranks spirals, it's usually because I don't have enough ballast forward of the belly hook hanger. In order to figure out how much ballast a new crank needs, I take a successful crank of similar size and shape, either mine or a store bought, and test float it in my water bucket. I add ballast to my new crank until it hangs at the same angle as the successful crank. It may not be scientific, but it works.
-
I weight my swimbaits so they fall head down. They do stay level on the retrieve. Here's a recent gallery post of one I made a few years ago. It shows my line tie in the open mouth. http://www.tackleunderground.com/community/index.php?/gallery/image/12021-7-inch-blacksilver-trout/
-
"And the truth shall set you free", so spill!!!
-
Can the fish read? I mean, I know they spend a lot of time in schools, but, come on man!!!
-
If you keep the ballast in the first section, and maybe in the front part of the second section if you run out of room in the head, but don't put any ballast in the tail section(s), the lure should stay level on the retrieve, no matter where you put your line tie, within reason. I typically cut a V notch for an open mouth look on my jointed swimbaits, and attach the line tie with a hole inside the mouth. That puts the actual line tie about midpoint in the lure's front face, more or less. I do this to "hide" the line tie a little. I certainly would never put one lower than that.
-
 Beautiful job!
 -
1/8" lexan is pretty tough stuff. If you epoxy and pin it into your lure, it should hold a line tie that doesn't go all the way back into the lure just fine, at least for shallow and medium divers. But, for the Barbara Hershey, collagen-filed, deep diver lips, I would still run my line tie wire back into the lure body, and anchor it with epoxy.
-
Ya think???!!! Hahaha
-
That's not the one, but it is a good link. Thanks.
-
I'd like to think I'm not hallucinating, or that my memory isn't playing tricks on me. Someone here did post a video, or a link, I hope.
-
First I'd put a front to back centerline on the lure, and another line crossways on the lure's face, square to the first centerline. Close counts, so take your time to get it as close to square as you can. Then put masking tape onto the lip, and a centerline on the lip. Wedge the lip into the sloppy slot using toothpicks as temporary wedges, trying to get the centerline on the lip in line with the centerline on the lure, and the lip surface parallel to the cross ways line. Trust your eye. There is no way to get it perfect, but you should be able to get close. Once you've gotten it so it looks right to you, remove the wedges and lip, fill the lip slot with epoxy and wipe some onto the part of the lip that'll be inserted, and reinstall the lip, again using the toothpicks for alignment wedges. Wipe off the excess glue, and let it set up. Cut off the toothpicks, if they won't come back out, and seal the cutoffs. Test the lure. Next time, take the time to make a wooden miter box to hold your lure blank so you can cut a squared up slot while the blank still has flat sides. You can use a coping saw for this, too. To widen the slot for your lexan, remove some more material from the bottom, so you always have the flat, square upper cut to use to align you lip.
-
If the line tie is in the lip, but not extended into the lure past the lip, I'd drill two vertical holes and glue in some sst wire pins through the lip portion that's embedded.
