


mark poulson
-
Posts
14,726 -
Joined
-
Last visited
-
Days Won
364
Content Type
Profiles
Articles
TU Classifieds
Glossary
Website Links
Forums
Gallery
Store
Everything posted by mark poulson
-
Those are some beautiful lures.
-
Man, I could watch that stuff for hours! I can't wait to try one.
-
I suggest you contact Solarez and ask them. Otherwise, sand and file.
-
Thanks for the pictures Dieter. Those are very nice lures. I ordered several of the scatter lip Rapala lures, and I'll be able to see up close how they're made, and perform. I'll post more once I've gotten them.
-
 Thanks Hokie. I hope the bass agree!
 -
-
I've never heated my lures, but I haven't coated in cold weather either. I'm guessing that heating the lure before dipping would result in a thinner coat, as the resin would be more runny at higher temps.
-
How do you know the size bait the lips are designed for?
-
I dip, hang for five minutes+-, clear the tail drip and hook hangers, hang for another five minutes+-, clear the tail drip and clean out the hook hangers again, and then hang them in the nail light. I think I may cure differently than the manuf. recommends. I hang for 30 seconds, lift and turn 180 degrees and hang for another 30 seconds. I repeat this until the bait has hung for a full 3 minutes. The lift and turn, when the bait is out of the nail light, takes about 10 seconds. So far, I haven't gotten any haze, even on a dark brown lure. When I use a sharpie, I spray two coats of Createx gloss over it, heat set, and then dip, and the sharpie doesn't run.
-
I find 1" thick is the most useful size for me. I use a bandsaw to rip it to whatever width I want, because the saw kerf with bandsaw is thin, so I don't waste too much wood.
-
Nicely done. You might be able to keep the weight lower and still get a good gap for the hook by hinging the hook like the Sebile crank, so it sits down onto the tail during the retrieve, but can swing up on the strike. That would put the hook back farther, so the full gap would be available.
-

Whats Going On? D2T As A Sealer Over Wood.............
mark poulson replied to Diesel Fitter's topic in Hard Baits
I use Wicked White as a base coat, and it covers well, but I also use several coats. http://www.coastairbrush.com/categories.asp?cat=620 -
Try local art supply stores. Out here in SoCal, Graphaids is a chain that carries 4oz. bottles of Zap a Gap.
-
Do you seal the balsa first so it doesn't absorb water once you begin fishing the frog?
-
I am a utility painter, at best, and only paint for myself and my friends. I leave my pressure up around 35-40 psi, and use the two stage trigger to control how much pressure I paint with, and the needle paint limiter to control how much paint I'm shooting. I thin by eye with Auto Air 4011 Reducer until I get the consistency of milk. If I want to do really fine detail work, I have a Master brush with the air valve under the nozzle, but I seldom use it.
-
I dip my baits in Solarez, and haven't noticed any haze, so far. Maybe it depends on geographic area, or local humidity? I live in Los Angeles, near LAX.
-
Contact the resin manuf. to see what they recommend.
-
Thanks JBlaze. I'm taking it out for a swim today, to see if the fish like it, too.
-
Try going to a local lumber yard and asking for samples of whatever PVC decking and trimboard they carry.
-
Setting Up Carved Master Swimbait In Molding Box
mark poulson replied to biggamefish's topic in Hard Baits
Cutting it is going to be a pain, so do it before you make your mold, and you only have to do it once. I would mark angles joints (V shaped) on the master, and play around until I had them symmetrical. Then I would cut them with dovetail saw, which is a very fine, stiff backed hand saw that cuts a very thin line, and is easier to control than either a band saw or a larger hand saw. Take you time, fix any mistakes with bondo and sand paper, and seal the cut master before you make your mold, so it doesn't shed wood into the mold. -
Thanks Ben. I wanted a little darker than their version. It works better for me here in SoCal.
-
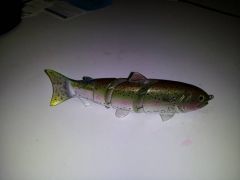
A 6" Spro BBZ-1, originally in sexy shad, that I repainted. I wiped down the original with denatured alcohol to clean it, then sprayed my Createx and Folk Art colors right over the existing paint scheme, using the shading of the shoulders and the shad spot as a guide to how far down onto the sides I kept my paint scheme. The side pink is Createx fluorescent pink, and the trout dots are black sharpie. I brushed on two coats of SC9000 to seal the sharpie, and brushed on one coat of Solarez as a final top coat. The green in the photo is brighter than the actual bait from the flash. It is more of an avocado on the shoulders, and transparent light brown over the avocado on the back. I added some of the brown Createx to my avocado green Apple Barrel, and then oversprayed the back and sides with Folk Art Metallic Peridot, which is a muddy green with a slight gold flake, and makes both the green shoulders and brownish back a little brighter. I redid the soft plastic tail with sharpies.
-
I shape my baits with an oscillating belt sander with an 80 grit belt. For removing a lot of material, I'll use a 50 grit belt first. I fine sand with a palm sander, first with 80 and then with 120 grit paper. I touch up with hand sanding, using the old paper I've taken off the palm sander. If I use a wood rasp, I find I need to hold the bait in a vise, but I do use files for hand shaping, too.
-
The Auto Air 4011 Reducer works fine for both Folk Art and Apple Barrel paints.
-
My experience with floating soft plastic frogs from Stanley is that they need to be so light that they don't cast well.
