


mark poulson
-
Posts
14,726 -
Joined
-
Last visited
-
Days Won
364
Content Type
Profiles
Articles
TU Classifieds
Glossary
Website Links
Forums
Gallery
Store
Everything posted by mark poulson
-
 Deiter, Once again, nice work. You have the shifting weight system down to a science. And I really like your paint jobs! I have been hesitant to use lead balls (in my case split shot) for shifting weights because I am afraid that the soft lead will eventually get deformed, and may tend to stick and bind. Have you had that problem? It's good to hear your voice again. I hope you and your wife have a great holiday season, and a very successful upcoming fishing year.
 -
You need some kind of release agent so the second half's POP won't stick to the first. I use diluted D2T glue, two coats, to seal the face of the first half enough to make it semi-glossy, and then use spray PAM as a release agent. I dry and cure my first half with the masters still in place, clean up around their edges as best I can to get a clean separation line, seal the first half with glue, and then spray the face with PAM. Then I fill my second mold half tray with POP, brush some onto the masters in the first half with an artist's brush to insure that the POP fills all the little nooks and crannies, and then lay the first half face down into the second half. The excess POP will squeeze out the sides. I clamp the halves together, turn them over so the wet half is on top, and tap and vibrate them so any air bubbles will move up and away from the masters and mating faces. I've found that putting a little too much POP in the second half, as long as it's well mixed and kind of runny, is much better than not quite enough, which is a recipe for air bubbles and voids. Take your time, and it will come out fine. I brush glue onto the second half face, once it's dry, too, because POP is soft by itself. The glue helps the molds to hold up a long time. And I brush the glue into the mold cavities to make them slicker, which cuts down on air bubbles in the plastic baits. Just be sure to dilute the glue with some denatured alcohol (DA), maybe 2 parts glue to one part DA, so it soaks in, and doesn't lose the details in the POP. I make sure I've mixed the epoxy thoroughly before I add the DA. Otherwise, the DA will bond to one half of the two part epoxy, and it will never set. Good luck.
-
Mike, I took your PAM advice and sprayed the allen wrench I used for dipping a tube. It came out okay, and slid right off when I was done dipping. Thanks.
-
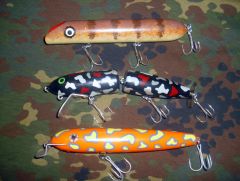
Very nice, but you should post your lure photos in the gallery, under hardbaits.
-
I use spray PAM to lube my plunger before I load it each time.
-
Ethan, See if your school has a wood shop, or a wood working club, and join. They'll have machines you can use. You can talk to the teacher about what you want to do, and see if he/she will allow you to do it in class as a project. You can also cut the slots with a hand saw. Just do it while the blank is still rectangular. Use a really fine toothed saw, like a dovetail saw, and take your time. If you're doing cylindrical baits you can make a jig to hold the blank and keep the saw square to it. If the slot looks crooked, once you've put the bill in without glue on a dry run, enlarge the slot to make it straighter, use wooden toothpicks as shims to hold the bill straight while your epoxy sets, and then cut the toothpicks off with an exacto knife. The epoxy will be plenty strong to fill whatever gaps there are around your bill. Just make sure you're happy with how the bill sits before you mix your epoxy and start the installation. Once you've glued it in, it's a bear to tear it out and redo it because it's crooked, and you didn't see it ahead of time. Been there, done that! Hahaha
-
Jerry, I really like the new gallery format. Having the latest comments posted on the opening page is genius!
-
 How about powder coating the lead?
 -
Have you contacted him for his advice?
-
BobP, Would heating the lure before coating it cut down on the bubbles?
-
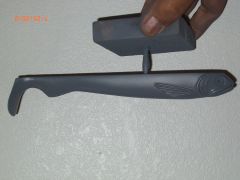
As Ben said, be sure to rip it lengthways, with the grain, and not cross grain. If you rip the block with the side, where you have your hand in the picture, against your fence, so the blade cuts top to bottom, you'll get the most stable pieces. If you're making 1/4" by 3" strips, that's the most stable, but the outer pieces might warp a little. 3" is pretty wide. If you plan to laminate two pieces together, make sure the grain in each piece is opposite of the other, like this (), so they cancel out each other's tendency to warp. If you're making 1/4"X1/4" strips, as long as you rip it with the grain you shouldn't have an issues. The grain is nice and tight, and there's not enough wood to really move much.
-
Just be sure you don't get a brush with a plastic handle. Acetone will eat that up.
-
Pete, Once again I'm amazed and inspired by your workmanship and artistry. I only build for me, so a hand formed bill works, but I love how you've come up with a process to repeat the curved bill so perfectly. I cupped the bill after it was installed and bent, so I could use the bandsawn slot for alignment and attachment. Did you make a curved blade of some kind to cut your bill slots, or is the slot in the lure square?
-
A lathe is kind of limited in the shape of baits you can make. I'm not saying it's bad (I own one) but, depending on what kind of bait you want to make, you might want to consider other machines first. No matter which type of bait you plan to make, an air brush and compressor will make successful painting a whole lot easier, and fun.
-
This is for us hobbiests who make stuff out of stuff we have on hand, and don't pour, because we are too cheap to invest in a pot and molds. When shaky head fishing first started out here in SoCal, years ago, my buddy and I immediately started making our own, by clamping split shot onto the bend of a 60 degree jig hook, to get a longer hooked head. We were using 7" worms, and wanted the hook farther out toward the tail, because the fish seemed to be biting the tail and not getting all of the worm in their mouths. We would swing, and have a half a worm come back to us. We would glue the split shot in place with crazy glue, and then paint them with whatever paint was handy, and finally settled on nail polish as the best solution. Recently, I made some more heads with heavier split shot, and used the removable shots. After I clamped the shot onto the hook, I used a pair of needle nose to bend the removable ears out so they were flat, giving the head a wide, flat seat when it hit the bottom, and helping to keep the head upright during the retrieve. I glued the shot, like always, but then had an "inspiration". I powder coated the head, and used my heat gun to "cure" it quickly so I could test it. The head was rock solid, and the paint didn't chip, when I tested it in my local pond with a concrete bottom. So here's another cheap alternative to pouring your own. I use a Sohumi jig hook for mine, because it has a longer shank. I got it from Barlow's: http://www.barlowstackle.com/Sohumi-114-Jig-Hook-Size-40-P2507.aspx
-
Some inline spinners have two blades, and sometimes the second blade doesn't spin. Don't ask me why, I've never made them, so I'm clueless. I've never had a tandem blade spinnerbait whose second blade didn't spin, unless the swivel was fouled.
-
I'm wondering what the effect of the cupped bill is on crankbait actions in general. Does it tighten their wobble, help them run more true, make them run deeper, do nothing at all? I recently tried (again) to make a Fat Rap copy with PVC trim board. After making the belly a little deeper to lower the center of gravity as a way to make up for less buoyancy (it worked) I moved to shaping the bill. The original Fat Rap bill has a V shape, which I duplicated in past attempts by bending the 1/8" lexan I use in a vice, with two spacers at the edges of the bill, and one in the middle on the opposite side. When I closed the vice, it did bend the lexan, but it stressed it and eventually caused fault lines. So this time, I hollowed out a piece of my left over PVC with the narrower end of my belt sander, heated the bill with my heat gun, and used the handle of an exacto knife to force the middle of the bill down into the hollowed out PVC, which was clamped in my vise. It worked. The Fat Rap swims with a tight wiggle, and doesn't roll at higher speeds, which is why I lowered the belly in the first place. I know Hazmail routinely shapes his bills with hot oil and nesting dies, but I was too lazy to do that much work. And the heat gun/hollow form worked out great. So I'm thinking about cupping the bills in some of my deeper divers, but I was hoping someone here has already tried it, or, at least, knows ahead of time if it works, and what kind of effect it produces.
-
Happy Holidays to all.
-
Jason, Are you still going to sell plastisol?
-
I put a cup full of air compressor oil in my garage compressor tank before I began using it 30+ years ago, and the steel tank is still good. I haven't drained it since I got it. But I don't use it much, not like the compressors on the job that we beat to death, and drain every day. I also live in SoCal, with relatively low humidity. But adding oil into the tank before you begin using it will coat the inside with oil as the water level rises, since the oil floats on top, so it coats as it rises.
-
Thanks guys. I think I'll stick to softer plastics. I've done enough to my poor lungs without adding glass spheres! hahaha If softer plastic is more buoyant, does that mean adding softener would make medium plastic more buoyant, too?
-
The Yum jitter worm thread got me worried. I am down to my last bag of those worms, and I went online to find more. They are no longer made by Yum. Their worm was prone to breaking in half after a while, but they worked. And no one else seems to make a similar 7" trick worm that floats. I used to buy floating worms from Bass Pro that were kind of hard, but they don't sell them anymore either. I use them for shaky head fishing. They are buoyant enough to float the 4/0 hook in my shaky heads. So I'm faced with making a POP mold and pouring my own. I am wondering if a med. plastic by Caney Creeks will make floating worms, or is there another brand I should use, or another hardness. Any help would be appreciated.
-
That makes your wooden bait edible.
-
Tacklewarehouse, or Lurecraft, or somebody, sells sst hitch hikers that you can glue into the base of your bait. If you can get the ones with the centering pins they are easier to use, since the plastic goes on straight ever time, but they're more expensive. I suppose you could just make your own centering pin by gluing a piece of sst wire into the center of the hitch hiker, but I'm too lazy to do that.
-
Amen!!!!!! A dust mask is mandatory, or you'll be in trouble real quick. The dust has electrostatic charge, so it sticks to everything, and will, at a minimum, raise hell with your sinuses. But breathing it into your lungs is a disaster.

