


mark poulson
-
Posts
14,746 -
Joined
-
Last visited
-
Days Won
365
Content Type
Profiles
Articles
TU Classifieds
Glossary
Website Links
Forums
Gallery
Store
Everything posted by mark poulson
-

Question about bib and weight to get desired action
mark poulson replied to JB.TM's topic in Hard Baits
I don't do 3D printing. I barely type. But I carve lures out of PVC, so I have some experience with trying to achieve a particular action. My rule of thumb is rounder lures have roll, flatter sided lures don't. Something to do with how the shape affects the water as it flows past (thank you Dave). If I were you, like Wayne said, I would make some wood mockups of different cross sectioned lures that were otherwise similar in size, length, lip, and attitude in the water, and begin to experiment until I got a shape that acts the way I want it to, and then do my 3D printing based on that lure. -
Question about bib and weight to get desired action
mark poulson replied to JB.TM's topic in Hard Baits
-
Am I the only one who repurposes my "over bent" spinnerbaits and turns them into swim jigs? Even though I use 28 gauge wire to reinforce the R bend, the wire is eventually opened up a couple times anyway, and then it's time to retire them, before I lose a good fish when one breaks. The wire coming out of the head is still plenty strong for this, and it's easy to make a loop bend tight to the head for the line tie. I use Lurepartsonline spinnerbait blanks, and their heads come through grass and tules really well.
-
I lay then out on an old metal baking pan that has had it's teflon coating worn almost completely off. That was the only reason I could sneak it out of the kitchen. The thin metal draws the heat away quickly. I always worry that an ice bath will leech out some of the salt in my senkos.
-
If it's a new airbrush, send it back. If it's used, break it down completely and soak it overnight in Createx Airbrush Restorer. https://www.coastairbrush.com/proddetail.asp?prod=Restorer
-
The obvious answer is to fish more! Hahaha
-
Crayfish HairJig on a 3/8oz Arky Style Head - Tying Video Just Dropped
mark poulson replied to Felder's topic in Wire Baits
It's your design. I just tweaked it a little, so thank you. -
Sorry. I now get mine shipped to my local Home Depot. There minimum order is small.
-
Try using medium super glue, like ZAP Glue's medium, and some of their accelerant. That's what I glue my weed guards in with, and then don't come out. Here's where I get mine: https://www.amazon.com/Pacer-Technology-Zap-Tube-Adhesives/dp/B000BQSKFU
-
You came to the right place. These folks know everything about pouring, and will gladly share their knowledge with you if you ask.
-
See if your local lumber yard or home center can order just one length for you.
-
That's a really neat idea!
-
I use ammonia-free Windex, and water with just a little dishwashing liquid soap for my everyday cleaning when I'm painting, and Createx Airbrush Restorer for my bi-monthly deep soak and clean (I do it when I think the airbrush isn't shooting well). I find that back flushing in warm, clean water between colors, and wiping down my needle after each painting session, are key to keeping my airbrush clean and spraying well.
-
Crayfish HairJig on a 3/8oz Arky Style Head - Tying Video Just Dropped
mark poulson replied to Felder's topic in Wire Baits
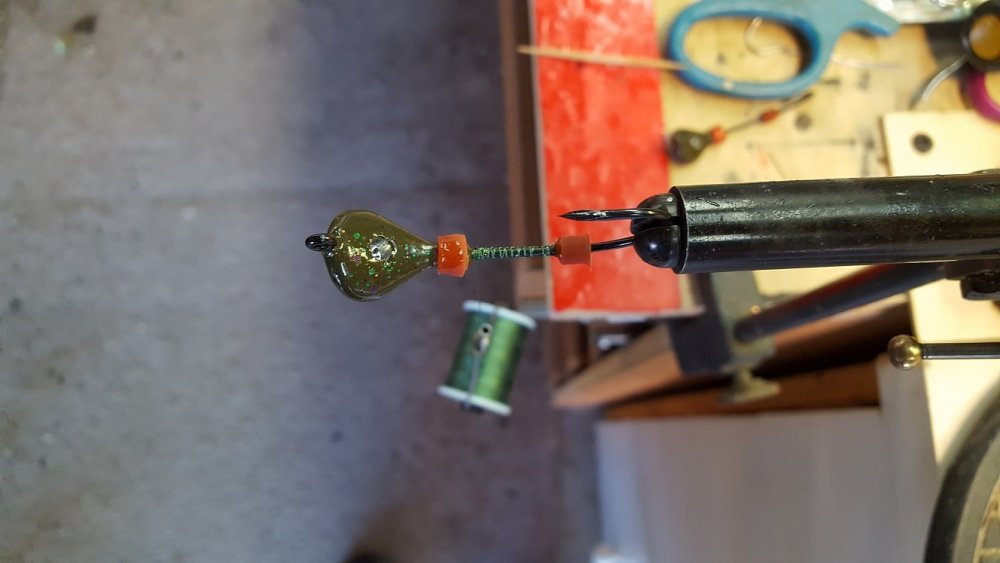
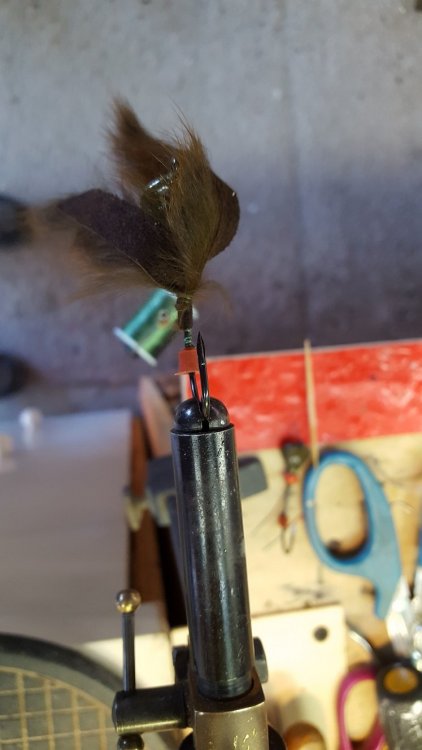
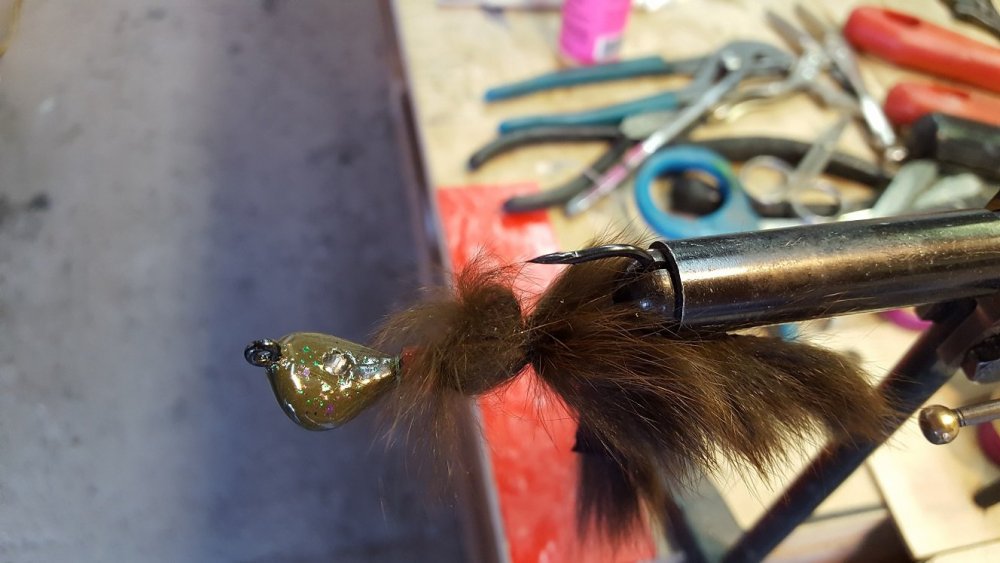
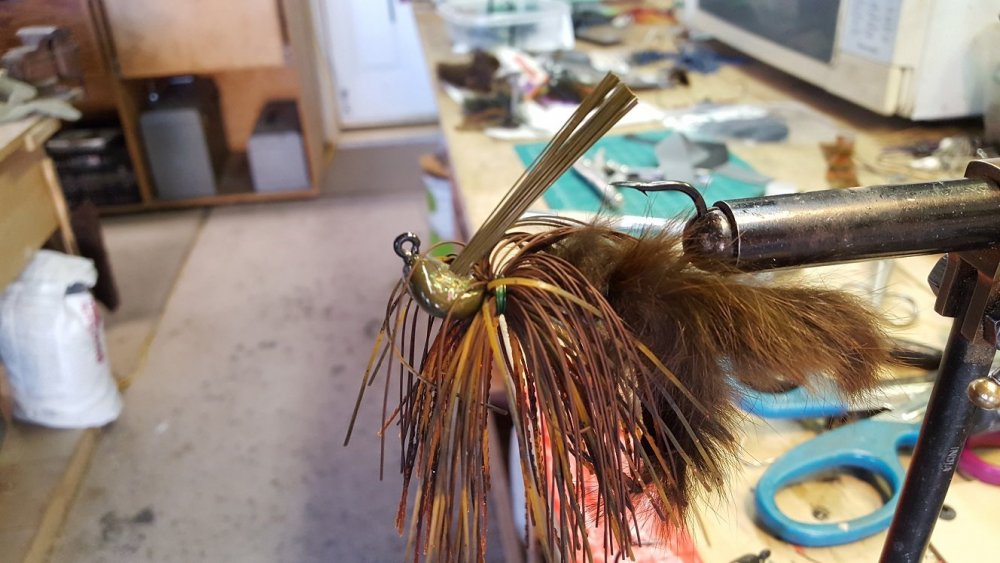
I thought about what Smalljaw said, and I figured there had to be a way to add scent without killing the zonker's action. Then I looked at at Felder's video with the craw body made of paper, and got an idea. I added a second rubber skirt band closer to the hook bend, to make room for a scent pocket. Then I tied on the zonkers backwards right behind the head band. I flipped the zonkers back over and tied them just behind the hook bend band, so they would still flare. I wound up with a patch of zonker fire between the skirt and the zonker claws that I can add scent to, without disturbing the claw fur. Here are pictures of the steps I used, and the finished jig. I used the skirt bands because my heads don't have the same collar and bait keepers that Felder's have.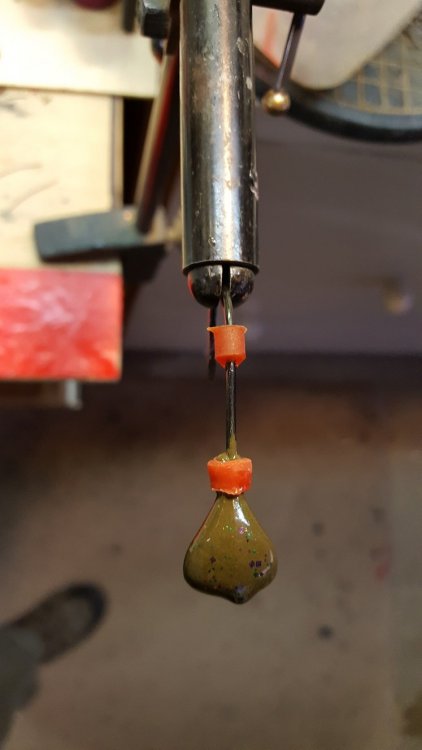
-
If I were going to cure the paint next to a BBQ grill, I would keep my digital thermometer handy to check the temps as I go, and have a hot glove handy, too. Aluminum heats up fast, and holds heat, so be careful.
-
It depends on your airbrushes needle size, and the paint you're shooting. I use a .3mm nozzle, and I thin my paint to the consistency of skim milk. I am able to shoot with 15psi up to 40psi without problems. Lower than that, and my paint can be spotty, requiring constant triggering. Higher than that, and I blow the paint off the lure blank. I would make sure my paint is thinned, and then do some test spraying on a piece of white paper, to see what works for your particular airbrush.
-
Crayfish HairJig on a 3/8oz Arky Style Head - Tying Video Just Dropped
mark poulson replied to Felder's topic in Wire Baits
I haven't had a chance to fish one yet, but they look good in my 5 gallon test bucket. So far, I have only used it on claws. I hope to find out tomorrow. -
Crayfish HairJig on a 3/8oz Arky Style Head - Tying Video Just Dropped
mark poulson replied to Felder's topic in Wire Baits
Could the way I blew the zonker dry with compressed air after I dipped it in the Spike-It be the reason that mine seemed to still have good action? I'll go back out and do more testing once the garage cools down. It's 95 degrees out there right now. -
Crayfish HairJig on a 3/8oz Arky Style Head - Tying Video Just Dropped
mark poulson replied to Felder's topic in Wire Baits
After I watched your first video I got some Texas cut Zonkers, and tried your method, using 3" strips as the craw claws. It is really neat how the craws stand up. I also like how it slows the fall of the jig, which should help with pressured fish. Thanks again for sharing the idea. I'm playing around now with ways to add scent, like dipping the Zonkers into Spike-It garlic flavored dyes. So far, it seems to hold the scent, and the hairs still trap air on the fall, and spread out once they hit bottom. -
Thank you.
-
I'm glad it worked out. I don't think you can make a mistake that most of us haven't already made. Everything I know about bait making I learned here on TU from generous members willing to share their knowledge.
-
Is that the vinyl glue used for plastic pipe?
-
If you build some matching mold boxes, with 1/4" plywood bottoms and 3/4" x 3/4" borders, spray the box insides with some kind of a clear acrylic sealer, and mix some yellow carpenter's glue into you POP just before you pour it into the mold box, the molds will be strong enough to clamp, and will last for years. I have some that are more than 10 years old and they still injection pour just fine. I line the bottoms of the boxes with fiberglass drywall tape, for additional reinforcing, and put some 1" finish nails around the inside of the borders to help anchor the POP, but I've found that, on the two occasions I had to remove the POP to remake a mold half, the carpenter's glue sticks to the mold boxes very well by itself. Be sure to mark the cavity locations before you install the 1" nails so you don't drill into them when you drill your 5/8" sprue holes. I use cut off 8D nails to align the two box halves, and clamp the halved together after they're poured and cured to drill the 5/8" holes with my drill press. Try and keep the baits 1/2" away from the borders, so you can carve tapered holes from the 5/8" sprues to the cavities.
-
I spray my silicone molds with PAM cooking spray every couple of pours. The baits come out a little more shiny, but they don't look like baits from an aluminum mold.
-
The front half is two screw eyes, and the rear half is a hinge pin that runs through the bait from top to bottom.


