


mark poulson
-
Posts
14,726 -
Joined
-
Last visited
-
Days Won
364
Content Type
Profiles
Articles
TU Classifieds
Glossary
Website Links
Forums
Gallery
Store
Everything posted by mark poulson
-
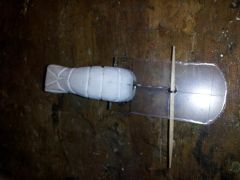
 It works. I tweaked the line tie so it ran straight, it ran true, and it dove fast down to 16'+-. No bites, but it was so windy I didn't throw it for long.
 -
I use a ferris wheel-type design, with two large plywood discs, with opposing screw eyes, mounted on a BBQ rotisserie spit, and suspend my lures between the two discs with paper clips and rubber bands. I made the discs large enough to hole two rings of screw eyes, so I could theoretically turn twelve lures at a time, but I found that six at a time, three on the inner ring and three on the outer ring, leaves me room to coat them on the turner after they're assembled, and to reach in and deal with drips, runs, and dry spots, without the other lures getting in the way. Here's a gallery link to a photo: http://www.tackleunderground.com/community/gallery/image/3592-my-paint-shop/
-
 Looks good! You should get bit on that!
 -
Gene, I'm sooooo jealous!!! Hahaha
-
I have a POP mold that didn't pour right, but there wasn't enough meat in the wood frame to enlarge the sprue holes. So I wrapped the top of the mold with duct tape, and let it extend up 1". When I pour the mold I fill the duct tape reservoir with hot plastic, and don't have any more problems with voids or shrinkage. I learned from that mold to make my wood lure boxes out of 3/4" material, so I can have larger sprue holes.
-
Invest in a digital thermometer, and you won't be sorry. Harbor Freight has them online and cheap. Once I took the guesswork out of plastic temps, I stopped having the same problems you're having.
-
Hahaha. Lately I've been doing a lot of light sinker C rigging, and they eat it so fast and deep, they're gut hooked before I even know they're on. I pinch down my barbs to make turning the hook and getting it out easier. But it still happens. That's the drawback to deadsticking a C rig, but I do get bit.
-
Our version of "friends with benefits". Hahaha
-
I'm hoping it will dive 12-14'. I think the longer, wider bill will help.
-
Bob, What I remember from that color thread is that dyes were just really fine particles of pigment. I have no idea why some of them bleed. Maybe they're gut hooked. Hahaha
-
Aaron, I am just a hobbiest builder, but I've been able to make cranks that work. I use PVC trimboard exclusively now for my bait making, but this is how I did it when I used wood, too. I cut my cranks from a rectangular blank that is the right length, height, and thickness for the crank I want to build. I trace the outline on one side, including the location and angle of the bill. Then I cut it out on a bandsaw, including the bill slot. You can cut them out using a scroll saw or a jig saw, too, or even a coping saw. I use an oscillating belt sander, one that moves up and down as it turns, to sand down to the outline. For me, shaping at a stationary sander gives me the most control, and I can change belt grits to cut material at the speed I want. 80 grit is what I mostly use on cranks. For big jointed swimbaits I use 50 grit to remove most of the material, and then switch to the 80 to finish shaping them. Always wear a dust mask for the sanding. Sanding dust is murder on your lungs and sinuses. Then I use a compass to mark a centerline all the way around the sanded perimeter. I go back to the sander, and shape, using the centerline as a guide to keep the lure more or less symetrical. I use a vibrating pad sander for my final sanding. I try and leave the centerline, and restore it if I accidentally sand some off, because I find it is a key to getting my bills and line ties centered, too. I put a centerline on my bills, and use that to drill my line tie hole, and for alignment when I install the bill and line tie in the crank, I do it mostly by memory now, and use my own lures for patterns, but I started out using successful commercial cranks that I liked as guides, for shape and bill size/shape/location, and to try and figure out what works and why. I came up with a ratio of the lure length to bill size, based on each type of crank I liked, and also the ratio of lure to line tie, and line tie to bill end, that I can apply to new lures. It's not exact, but close enough for my needs. It varies with each size crank, but it's easy enough to figure out, once you have a lure to use as a guide. I use how successful lures sit in the water as a guide for how I ballast my cranks. I make my bills from either 1/16" or 1/8" lexan, and my line ties, if they are on the bill, from sst wire, epoxied in place. I use sst screw eyes, .072"X7/8" , for my hook hangers, and for my line tie when it's in the lure, and not in the bill. I am no expert, but I hope this helps.
-
 Nice "school". When I make jointed swimbaits, I make them in batches of 6, too. The operations seem to go faster that way, for some reason.
 -
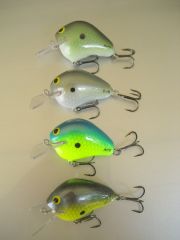 Those look really good.
 -
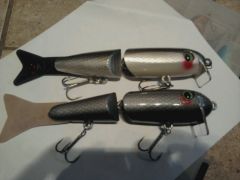
 Mark, I created a slot in the bottom of the tail that is from two intersecting holes, one directly back from the tail, and one up from the belly. I determined the angles of the two holes by laying the hook on the side of the lure, and marking the position where the hook point is down below the tail of the bait, and again where the point is up and "deployed". I also marked the pivot point of the hook eye. I tried to make it in the midpoint of the lure body, top to bottom, so there would be plenty of material to anchor the stainless steel wire pivot axle. Once I drilled the two holes, I used an exact knife to cut out the slot connecting the two holes, forming a V shaped slot. I hope this helps. I posted pictures of the finished lures that show the hook in the down and up positions.
 -
Thanks. I've been stuck at home for this week, on call for jury duty, so I had time on my hands. I'm no carver, but a sharp knife and PVC makes carving much easier.
-
I'm glad I only use the stuff that's already in the squeeze bottles. I can see pigments are a whole 'nother deal.
-
Good luck.
-
Remember, all you're trying to do is give the white a warmer, live look. I wouldn't stress too much about exact mixes. Like Smallmouthaholic said, a little yellow, a little brown, and you're home free. Think dirty white.
-
I finished the crank in a green pattern, with chartreuse highlights, and highlighted the carving with orange sharpie. I also put purple sharpie dots on the craw's body, and dipped the whole thing in SC9000 three times.
-
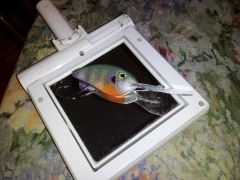
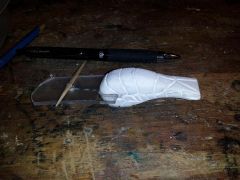 Side view showing bill 1/2" into lure. The sst line tie wire extends another 3/8" beyond that. They are epoxied in with D2T.
 -
 Top view showing centerline on lure and bill. I used an exacto knife to carve the lines in this crawdad crank. The crank is 2 1/2" long, 1" tall, 3/4" thick, PVC trimboard. The 1/8" lexan bill is 2", and the sst wire line tie is out 7/8" from the lure. The whole setup, with hooks and split rings, weighs 20 grams.
 -
 It's an easy build with PVC. Not having to worry about water intrusion makes me fearless. I never even checked to see how well my top coat covered the inside of the slot. All I worried about is keeping the slot clear for the hook shank to swing freely. I doubt I would have even thought about trying it with wood.
 -
I hope you're right. I'd hate to have to "retire" them. Hahaha
-
Thanks Gary. I hope you're right. I caught a 7lb bass on a homemade crank in the crappie pattern this year, and lots of smaller ones, too. Before the shad move shallow in the spring, and during the summer, the bass out here feed on sculpin, crappie, bluegill, and crawdads. When they're on the shad, it's hard to get bit on anything else, but there are lots of times when they eat other stuff, and small crappie are on their menu, too. Sometimes I wonder if my crappie, which are pearl white with a green back and shoulder mist, and then metallic gold mist over that, might look like baby bass, too.
-
Note: The temp reached 98 here yesterday. Ouch!!!!!

