


mark poulson
-
Posts
14,726 -
Joined
-
Last visited
-
Days Won
364
Content Type
Profiles
Articles
TU Classifieds
Glossary
Website Links
Forums
Gallery
Store
Everything posted by mark poulson
-

Turkey Injector Okay? Oil Rubber Molds?
mark poulson replied to anamealreadyinuse's topic in Soft Plastics
I use a Cajun food injector I bought from Cabela's years ago. I spray both the inside of the injector barrel and my POP molds with spray PAM before I pour. My molds have plywood boxes surround the POP, so I can clamp the two parts together. I think you will have to have some kind of support for a rubber mold, or it will deform if you use a lot of pressure to inject it. When I inject, I put the tip of the injector into the plastisol, draw some into the injector and then push it back into the plastisol, to warm the tip of the injector first, and then I fill it all the way and inject. As long as the plastisol stays hot enough, I can inject with no problems. -
It looks interesting, but they don't have any details included, like whether it's waterproof.
-
Man, those motors look like they could power my truck!
-
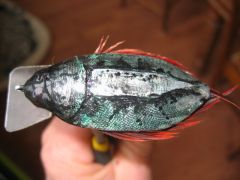 That is beautiful!!!! Are those feathers at the edges? How are they affixed?
 -
It is my understanding that the colors we use with plastisol act as a softener, too. Could adding more color actually make the plastisol softer, and more prone to shrinkage denting? i guess you could test the idea by pouring a batch of clear flukes. You can always reuse them in another pour, and that might help you see if the coloring is the culprit.
-
Just remember, little bbq motors turn 15lb turkeys all the time. Balance is what's important.
-
I found the sst hitchhikers here: http://www.luremaking.com/catalogue/catalogue-index/catalogue-items/wires/snap_on_cork_screws.htm
-
I've gotten some larger sst hitch hikers in the past, so I know they're made, but I can't remember where.
-
I was going to try again today. I'll let you guys know what happens. I am ready for it to be operator error, which seems to be my strong suit.
-
Bob, I read that and had to laugh. I have a few lures that are now worthless because I couldn't leave well enough alone. But I did rescue one shallow running jointed minnow bait by cutting the lip off almost flush with the bait, and making it a wake bait. Dumb luck, which I seem to have an abundance of. Hahaha
-
I feel your pain, Dieter. I have a bait I made with a crooked bill because I left the line tie twist wire too long, and tried to force seat it when I set the lip. Of course, it moved. Grrrrr!!!!! Now I drill an oversized and overdeep hole for the twist wire line tie under the lip, dry fit it several times until I'm sure it's not going to be under any strain, and then fill the hole and the lip slot with epoxy to set both the lip and the line tie in place. I cover the area next to the lip slot with blue tape, and use my finger, dipped in alcohol, to remove the epoxy squeeze out. After I've gotten all the excess epoxy cleaned off, I recheck both the lip and the line tie to be sure they're centered. Once that's set, I check again to be sure the line tie is centered. Now is the time to fine tune it if it's not. Then I put blue masking tape around the line tie on top of the lip, so I can fill the drilled hole in the lip with epoxy, and then turn the bait on it's back, belly up, and lock both the line tie and the twist wire stem in place with D2T. I use my finger in alcohol to shape the epoxy around the twist wire. I've found that the twist wire doesn't have to be perfect in order for the bait to run true, and I haven't had it move when I've gotten bit. It 'aint purdy sometimes, but it holds.
-
Yes, I add both the flake and the salt after I've brought the plastic up to 340, and have already added my coloring. But I stir it enough when I add the salt and flake that I need to put it back in the micro for another 15+- seconds before I inject it. Is that last microwave session what's changing the flake color? I'm going to pour some today, and I'll try adding the salt, reheating, and then adding the flake without reheating before I inject it. Fingers crossed.
-
Sounds like you're on the right track. Good luck.
-
"Coffin bills" for medium running cranks have been around for a while. I think the idea was to get a more snag resistant bait than the round bills, and most medium and deep runners are fished slower, so deflection isn't as critical. But shallow runners benefit from having the bill wide enough to protect the hooks when they encounter brush and snags, because they are fished fast through the cover. The full square bill keeps them from twisting on impact at higher speeds, so it affords some additional hook-snagging protection. I think the shallow runners with rounded or chamfered corners may be to help the bait run more true, but I personally don't chamfer or round my squarebill corneres, other than to soften the sharp edges. But that's just my take.
-
Most hobby and craft stores, and even art supply stores that sell crazy glue sell the accelerator. Here in SoCal, I get mine from Graphaids, an art supply store where one of my kids gets her supplies.
-
One last thing. I am no Metal Meister like Dieter, or a good wire bender like BobP. Typically, I bend a loop by doubling my wire around a nail, and then bend the loop at 90 degrees to my tag ends. Then I clamp the loop in a bench vice, with duct tape on the jaws to protect the wire, and clamp a pair of vice grip pliers on the very end of my tag ends. I twist the vice grips to twist the wire. When I'm done, I try and fine tune/straighten the whole arrangement so it's all in line while it's still in the vice. I seldom get it perfect. But I've found that the key to a straight running bait is to get the line tie aligned with the centerline of the bait. The twisted part that extends below the lip and into the bait isn't as critical, because the water is hitting the top surface of the lip, so what's going on below isn't as critical. Don't get me wrong, I try and get it straight, too, but I am not as worried about the underlip wire as I am about getting the actual line tie loop on the bait's true centerline. I've been fortunate so far. My medium and deep running cranks, which have the line tie out on the lip, have worked out well. Knock on wood!!!
-
That's what I do, too, except I only brush the glue over my ballast after I've pushed it into the hole. I use 1/4" lead wire in 1/4" diameter holes, so the ballast fits tight. I've never had the ballast move. I usually use bondo on top, and sand it smooth before I start to paint.
-
When I put my line tie down into the lip, for deeper diving cranks, I use a sst twist wire, and run it under the under the lip and into the lure body, where I anchor it with epoxy. It looks like the top example in your photo attachment.
-
Wow, that thing looks like a night tournament glow stick!
-
Both. Painting and shaping both put particles into the air that can be inhaled. I use water borne paints, and spray with my Garage door open, a 20" box fan behind me blowing out, and shoot the paint toward the open door, so I seldom use a mask when I paint. Probably stupid on my part. But it's really important when you machine and sand the PVC. The sanding dust is really irritating for my sinuses. I never shape or sand the PVC baits without a dust mask. Never. After I've sanded a bait, I take it outside and blow the sanding dust off it, and my hands. Someone here said the dust has static cling, and I believe it. When I don't use a mask, I can count on blowing my nose all night.
-
I use a hair dryer for my Createx-type paints because, when I came to TU and first started using them, everyone recommended doing it. I find the coats dry faster, so there's less chance of one coat "melting" the one under it, and I can apply multiple coats and colors more quickly. I can also paint and top coat the same day with a hair dryer, so it speeds my building process. I don't build every day, or every week, so, when I get a wild hair, I like that I can shape, paint, and top coat a bait in one day, let it cure for another day, and then fish it. I've seen your work. You actually know how to paint, and have talent, so your experience is a little different than mine.
-
When I made jointed wooden baits, I coated the insides faces of the joints of the unassembled sections with D2T first, lapping it out onto the faces about 1/4" for lap. Then I assembled the baits, put them on my drying wheel, and coated the faces with two coats of Etex. I use a screw eye and hinge pin system for my joints. If you get epoxy in the hinge joints and it sets up, you're in for a nightmare try to get it out again, unless you can disassemble the baits again to clean out the hinges.
-
Is there more than one place in Idaho???? Hahaha
-
It was just too easy. Hahaha Actually, I was thinking that was a really original idea for making eyes. I wonder what the eyes would look like if you put the old contacts back in, and poured right over them.
-
I get them when I inject too fast.