


mark poulson
-
Posts
14,726 -
Joined
-
Last visited
-
Days Won
364
Content Type
Profiles
Articles
TU Classifieds
Glossary
Website Links
Forums
Gallery
Store
Everything posted by mark poulson
-

Another Lure Design With Shifting Internal Weights
mark poulson replied to diemai's topic in Hard Baits
I can see you cut a lot of hand work out of the process. I look forward to the pictures of the pike you catch on it. -
Thanks.
-
Thanks for the expert info. I still remember how nasty lead fumes were, and it's been 40+- years since I poured. I don't know how much lead dust I've breathed over the years, or how much asbestos. I used to pour my own sinkers from plumber's lead off the job, and do my own breaks. When I started in construction in the '60s, we never wore dust masks or respirators. The good news is my chest xrays come back clean, and I'm too old to die young! But I still worry about others, especially kids.
-
Thanks. I can't tell on their website which one it is you use, but I'm leaning toward the 128.
-
I was reading the primer on lead pouring, and added this: One important thing to consider is that vented fumes and dust go somewhere. If you vent to your yard, or your neighbor's yard, you are just relocating the problem. I don't pour any more, so this is just a heads up. I had to take a lead safety course as part of my State Contractor's License program, and they didn't address this, either. But when you vent to the exterior with a fan, both lead fumes and dust become airborne, and can migrate to areas where kids play, vegetables grow, and where things people handle can get coated. I don't know what is available in the way of filters to prevent this kind of thing, but I don't think anyone here wants to create these kinds of problems for themselves, or for others.
-
One important thing to consider is that vented fumes and dust go somewhere. If you vent to your yard, or your neighbor's yard, you are just relocating the problem. I don't pour any more, so this is just a heads up. The last time I poured, Nixon was President.
-
Crankpaint, What brand of 5 minute epoxy do you use?
-
Another Lure Design With Shifting Internal Weights
mark poulson replied to diemai's topic in Hard Baits
Another great video and lure. The pike are in BIG trouble next season! Thanks for sharing. -
Just remember that the hooks and split rings rattle a lot by themselves, especially on a "rattle" bait that wiggles so fast. Sometimes that's enough, like on highly pressured fish.
-
Just buy a decent brand, that's rated for at least 50lbs. That way, if you hook several fish at once, the snap swivel will hold until your line breaks.
-
 Very clever idea!
 -
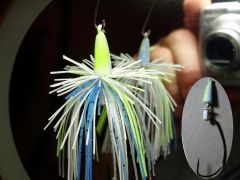
 How long does it take you to do the foil and photo finish?
 -
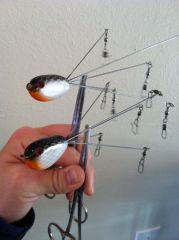 I haven't tried to make a rig yet, but I was wondering if the wires, pulling at an angle from the center of the wooden front body, would tear out the side of that body. Have you thought about using a large rivet to reinforce the rear of the front body, where all the wires exit? Or just a small piece of aluminum or brass tubing.
 -
That is a great tutorial. Thanks again.
-
The Etex techie said to wipe the bait down with denatured alcohol before you recoat if it has already cured out. Fresh Etex , like 12 hours old, will bond to the next coat with no wiping needed.
-
If you want to help our economy, buy something made here.
-
Which silicone do you use, the 128?
-
I pinch one end of a Spro swivel until it's the same size as the barrel, so it will slide into a snug hole, and then glue in the swivel, being careful not to get glue up into the barrel. I use bigger swivels for swimbaits, and smaller ones for cranks. All of them are stronger than the line I fish, so strength isn't a problem, and the Spro swivels are sold by rated strength. I have found that drilling the hole the same depth as the swivel, and the adding a couple of drops of gap filling crazy glue by letting it run down the side of the hole to the bottom, gives me enough glue to use the pinched part as an anchor. I think cutting off one end and just gluing in the barrel would probably be enough, but I haven't tried that. If you do, and you're using wood, I'd suggest you "treat" the wood around the hole first with the runny crazy glue, it makes the wood stronger and helps the swivel hold better. I've never had a failure of this swivel system.
-
My rotisserie motor turns at 1 rpm. That's plenty for the ferris wheel type turner I made. With the two 18"+- plywood wheels turning at 1 rpm, the farther from the center shaft I put the lures, the faster they are really traveling, and 1 rpm keeps epoxy even without throwing it off the lure. And the rotisserie motor is meant to turn heavy roasts with the spit down through the center, so, as long as I load the turner evenly, it's plenty strong for turning lures.
-
I think the guys have covered everything, but I would add one step that helps me. After I've shot paint for a while, I find my brush doesn't shoot as well, so I do this. The nozzle had tiny air jet holes that can get clogged. After I've back flushed with both water and cleaning solution, if the brush is still balky, here's what I do. I loosen the nozzle assembly slightly, and then back flush the brush with acetone. Then I tighten it again, and backflush again, first with acetone, and then cleaning solution. The acetone loosens any paint that has clogged the little holes, and I can see the paint floating in the bowl after I backflush. I clean that out with my finger. It helps get back to painting faster. I hope it works for you, too.
-
Having your house and garage robbed sucks! People who do that stuff should die from hemorrhoids.
-
How Important Is Quartersawn Wood For A Carved Lure?
mark poulson replied to Topwater plugs's topic in Hard Baits
For me, there are two different questions with regard to grain orientation, strength and density. For strength, you just want to avoid the part of the tree that's really close to the center, because that is sap wood, with wide growth rings, and not as strong. And orient the grain front to back, because cross grain is weak. If the wood you use has dramatic changes in grain pattern, then use the part with tighter grain, and it will be stronger. For density, unless you're making a suspending lure, I doubt it will make much difference. Whatever difference in weight a denser part of the wood has will probably be balanced out by the additional sealer the less dense wood can absorb. When I made bigger (8") surface plugs from douglas fir, I would look at the grain, but I doubt it made a difference. Just a carpenter being compulsive. For smaller plugs, out of pine or balsa, I don't worry about it, other than to make the grain run front to back. -
Line Tie Placement For 1/2" Wide Basswood Crankbaits For Bass.
mark poulson replied to davey's topic in Hard Baits
Off hand, I'd say keep the line tie in the nose of the bait, tight to where the lip exits the bait, and run the lip at a 45 degree angle to the centerline of the bait. A flatter angle will cause the bait to run deeper, but you may have to put the line tie into the lip a little. Think of a RC 2.5, and you'll have a good jumping off point for a crank that size. You can also take a look a one of the Rapala DT (dives to) series that gets down to the depth you want, and see how it's lipped and where the line tie is located. Every crank has a slightly different shape, buoyancy and center of gravity, so you'll probably still have to play around some. Also, the shape of the lip also bears on how deep it goes, and how stable it is, too. If it were easy, I'd do it!- 1 reply
-
- 1
-

-
 Nice. What kind of a mold did you make for them?
 -
He lives!