


mark poulson
-
Posts
14,726 -
Joined
-
Last visited
-
Days Won
364
Content Type
Profiles
Articles
TU Classifieds
Glossary
Website Links
Forums
Gallery
Store
Everything posted by mark poulson
-
I think you're right. The picture needs to be reduced.
-
It sure didn't take you guys long to figure this thing out! Could you use three or four spinnerbait willow blades, and one central spinnerbait-type hooked lure, and be legal in CA?
-
There are a lot of epoxies on the market, but they are either a glue, or a decoupage epoxy, with different designs for the very different functions. D2T is, first and foremost, a glue, meant to be applied in thin glue joints. It's strong and rigid, so there's no joint failure or "creep". But it is brittle when applied over large, flat surfaces. I started out coating my woodens swimbaits with D2T. I found that D2T cracked and chipped off in big flakes when my swimbaits hit anything hard, like a rock. I went away from D2T to Etex, and then NuLustre, for topcoating. Both are decoupage epoxies, designed for coating large, flat surfaces like table tops and bars. They are not as strong, but they will expand and contract with the wood they cover, and they both dent instead of chipping. Lots of builders use D2T for cranks, and I have done it, too. But larger baits are problematic.
-
Look at my gallery. I think it's page 7. I used a ferris wheel design, with a BBQ rotisserie spit and two plywood discs. The rotisserie motor is 1 rpm, and is plenty strong, as long as I load the wheels evenly. If I want to turn just one bait, I mount a similar sized bait directly opposite. By using the adjustable meat holders that came with the BBQ kit to hold the plywood discs, I am able to adjust the spacing of the two discs to accomodate up to 18" baits, although I've never build one over 12".
-
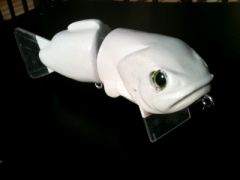 It looks great! What did you carve it out of, and how much does it weigh? Big fish eat all kinds of stuff, so I wouldn't worry about scaring them away. They are curious about anything that "invades" their territory. If you get followers who won't commit, have a weighless Senko or fluke ready to throw back on them, just like when you fish a frog.
 -
Thanks.
-
Thanks for the contacts. Frank, Can I spray the Spike It through my Iwata brush?
-

206664 10150168926638753 362491793752 6960274 3216428 N
mark poulson commented on fishnart's gallery image in Hard Baits
 Now cut that out! You're just rubbing my nose in it now. Hahaha
 -
I think a 2 oz bottle is probably the smallest quantity you can buy. I would worry that a 1 oz bottle might dry up too fast.
-
I want to try and airbrush some of the soft plastic swimbaits I pour. What kind of paint/brand should I use, and who sells it? Thanks in advance.
-
Will do. Thanks.
-
I wouldn't use the Devcon 5 minute epoxy. It's "water resistant". The D2T is waterproof. I found that out the hard way when my twist wire hook hanger unscrewed itself from the back of one of my swimbaits, and I found the 5 minute epoxy had turned soft and punky. Crazy glue will work fine for both the hook hangers and seating the lip. I use the gap filler Zap glue, so I have more working time to align the lip. Then I hit it with a squirt of their accelerant. The balsa will fail before the glue.
-
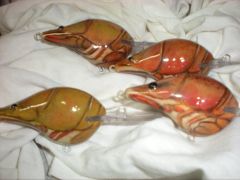
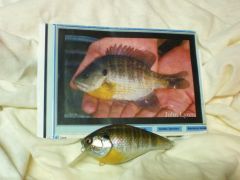
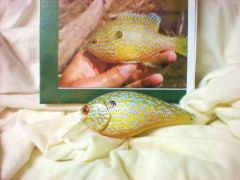
 Really nicely done. I love how you used the lavender (?) as a base coat. I've seen that a lot on live bluegills. Great job.
 -
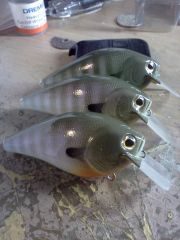
 Those will get bit!
 -
Normally, top pour molds need a reservoir on top, like a big, deep sprue pouring hole, to allow for hot plastic shrinkage as it cools. I couldn't figure out how to add a reservoir easily on my swimbait molds, so I just pour them slowly, and keep the plastic temps down around 340+-, to try and reduce shrinkage. If I "overpour" and leave a big mound of extra plastic on top, sometimes it shrinks back down to the right height, but I have a lot of trimming to do. Mostly, I just live with concave backs. The fish don't seem to mind.
-
I keep mine in a ziploc baggie, just to try and keep it clean and fresh.
-
About the size of a small paper clip wire will work. If you make them too big, the plastic will just run out of the bottom of the mold, but you can always make them smaller after the mold is finished if you need to by adding some bondo. It will stick to the sealed mold, and works fine.
-
Vent holes are just a path for trapped air to escape when the hot plastic is poured in, so they don't have to be anything more that tiny air vents at the tip of the antenna. It's like the difference between filling a bottle with water, and then turning it over to drain, glug glug glug, or draining a water filled straw when you take your thumb off the top, whosh. The air that's outside the bottle can only get in by forcing it's way past the water, while the air enters the straw from the top as the water exits the bottom, unimpedded. Since your mold is finished and sealed, adding fine grooves from the tips of the antenna to the edge of the mold may be difficult. You could just drill tiny (1/16"+-) holes right through the mold at the very tips. Aluminum molds use fine vent grooves to a large central vent hole to vent. As long as there is a clear path for the air to escape, it will work. Just be sure the vents are clear before each pour.
-
I measure my D2T by volume, but it's not exact. I squeeze out separate matching lines of epoxy and catalyst, and then mix them really well. Ever since Riverman turned me on to Flexcoat syringes, I always measure all my top coat epoxy, like Et4ex, by volume, and never have a problem.
-
 You cheated! You're an artist!!! Hahaha Truly beautiful.
 -
 That is a beautiful paint job. Really well done!
 -
 Props to you (sorry, I couldn't risist) Nice job!
 -
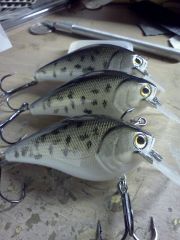
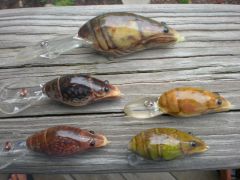 Really nice paint jobs. I'd hit them.
 -
+1000!!!!
-
Vent holes help. You may have to inject to get the antenna to fill.
