


mark poulson
-
Posts
14,726 -
Joined
-
Last visited
-
Days Won
364
Content Type
Profiles
Articles
TU Classifieds
Glossary
Website Links
Forums
Gallery
Store
Everything posted by mark poulson
-
It's kind of funny how I figured out how to make this work. The first time I tried it, and saw that the plastic divider had melted, I had a panic attack, thinking my master was ruined. I had let the master cool on top of my stove, trying to figure out my next move. Then I thought, what the heck, I can't make it any worse, so I put it back in the oven to resoften the plastic, and it worked. The soft plastic came out in one spongy piece. Now I remove the plastic right after I take the master out, while it's still soft. I've found that, the way I bake the clay, it is a little soft when it first comes out of the oven, but hardens as it cools. Maybe I'm baking it wrong. But it works for me.
-
For reaction baits that are fished fast, no. For slow moving baits that are feeding baits, yes.
-
Having something challenging and fun to do is why I do it.
-
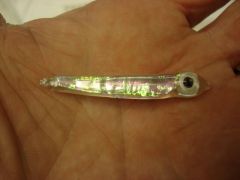
You can paint over the glitter, but that kind of defeats the effect you get from glitter on top of paint. I usually put the glitter nail polish over the Createx. Createx is water based, and the nail polish is solvent based, so I don't have problems. I don't overbrush the nail polish, just in case the acetone in it's solvent base has softened the Createx a little. If you get some of the Sally Hansen Celeb City nail polish, their silver, it works great over clear plastic baits. Even though it looks like it's solid when you brush it on, if you hold the bait up to the light you'll see that it is translucent, so the bait is really a mottled see-through, with silver flash, and red gills (I use a red sharpie to mark the gills after the nail polish has dried). Fish looking up will get the silver flash but not a hard, "this is artificial" silhouette.
-
I've done an informal survey. 90% of dippers polish their rods, and the other 10% lie.
-
 Thanks.
 -
I recently made some sculpey clay masters for soft plastic silicone molds, and wanted hook slots in them I put one of the clear plastic dividers from a plano box (we all have tons of them) into the clay where I wanted the hook slot. I baked the clay masters belly up, and used a pair of tweezers to remove the plastic divider right after I removed the masters from the oven, while it was still soft from the heat. It left a perfect hook slot.
-
I don't want to spend too much time polishing my rod! I am planning to use some old allen wrenches, to get the hex shape, so I don't think they will polish up. They are old and used, kind of like me.
-
+1 Enjoy your time with her.
-
Is it a "never been used" brush, or one that's just sat for a long time? If it's new, contact Badger and ask them what to do. If it's been used, but has sat for a long time, follow Ben's instructions. Assuming it has teflon seals, take it apart completely, and soak the parts in clean acetone overnight. If it doesn't have teflon seals (verify that with Badger if you don't have the original packaging) then don't use acetone. Try paint thinner. Every once in a while, when my brushes won't spray paint, I clean the tip with a soft brush dipped in acetone, remove the needle, and clean it, put it back in but not tight, and backflush with acetone. I also loosen up the nozzle parts a little and backflush with acetone. If they still won't spray right, I take them apart and give them a "Ben Bath" in acetone. I clean my brushes really well after each paint session, using a spray bottle to get all the paint residue out of the bowl (over a tupperware cleanout bowl), backflush with water, then windex, then a water/one drop of dishwashing solution, and I run the needle in and out to make sure all the paint is cleaned out of the barrel. It takes me a minute+ to do that. I have a larger tupperware filled with clean water next to my paint station, sitting on a small towel, and a smaller cleanout tupperware there, too, so I don't put the dirty water back into the clean. My soft, cheap artist's brushes with plastic handles are always soaking in the clean water, ready to use, so I'm never tempted to skip a step in my cleaning routine. Developing a good, quick cleaning routine that is second nature to you is a real key to successful painting, so you don't have to spend your time getting old paint out of the brush, and can concentrate on getting new paint onto your lures.
-
If you're using Alumilite, you can seal the master with a rattle can clear, so the wood fibers are locked, and then make the mold. The silicone won't stick to the clear acrylic sealer, and you won't lose any details.
-
If i were using resin, I'd try and make the baits lighter on purpose, so I could place ballast in the bottom of the lure to both achieve the floation I wanted, and to give the lures a bottom heavy orientation, which would keep them stable at all retrieve speeds. One tip I'll share is to keep the ballast in the front sections, and in the head only if possible. If the tail section is more buoyant, it will help keep the lure swimming horizontal at all speeds.
-
If you're going to use epoxy, be sure and "screw" the twist hanger in counter to the direction of twist, so you force the epoxy back into the hole instead of pulling it up the twists and out of the hole. Ben, Thanks for the great link.
-
Gino, Iwata brushes are great tools. I own a Badger siphon brush that has glass jars for larger amounts of paint. It was cheap, but it works really well. I use it for base coating large baits, and multi piece swimbaits, or multiple baits. It has a .5 tip, and I can spray mud through it. But for most of my painting, for finer details, and regular Createx-type paints, I use my Iwata with a .3 tip. It's amazing, easy to clean (critical), and a workhorse. The only paint it has trouble with is thick base coat white. Thin your paints to the consistency of skim milk, and you'll never have a problem. Multiple light coats, heat set after each coat, are the key to successful airbrush painting of lures. When I'm doing only one or two cranks, I never use anything but my Iwata.
-
If it sat for a while without ever being used, chances are it's insides are dry. Lube it up, and give it a whirl. You can use airbrush clean as a lube, but you'll probably have to take it apart and lube everything by hand to begin with, in order to get it working. If it's been used before, do what Ben said.
-
The reason Bill Siemantel, and Spro, used straight joints on the baby BBZ is that they take up less space, and that's a big concern on a 2", 4 piece lure. I've found that V joints create a smoother water flow, and enhanced vortices (thank you Vman) and are critical for good swimming bigger jointed swimbaits, especially at low speeds. At least, that's been my experience.
-
The storage issues always held me back from trying the original DN. It sounded like the perfect topcoat, except for those issues. I have tried to simplify my building and painting processes over the years, because, while I love building and painting, I'd rather be fishing. If you're just a hobby builder, like me, and want something easy that works, PM me and I'll tell you what I use. I did make jointed swimbaits for sale for a while, and they are still swimming with no paint issues.
-
 I painted and dipped these Thursday, and fished the popper on Sunday. Three keepers in the morning over a grass bed! I wanted the bone for low light, and stained water. I'm going to do one of Predator Bass' sammie knockoffs next.
 -
Great looking bait. What kind of foil did you use?
-
 Looks great! You're all set for dredging up those winter bass. I would have never have had the courage, or the genius mind, to put that long a bill on a crank. Let us know how deep it runs, and how stable it is at speed.
 -
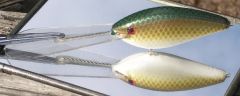
 I just wanted a yellowish warm white, and the guys on TU pointed me in the right direction. I'd painted some bone swimbaits before, but they all looked either yellow or grey, and cold, with no life. Adding the tan and the gold metalic seemed to warm them up.
 -
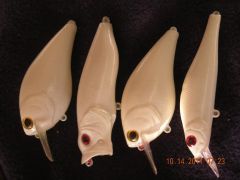
No, Bob, they're Predator Bass and Bustin Bass unpainted bodies. If I could carve like that, I'd never pick up a hammer again! Hahaha
-
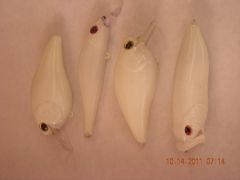
Thanks. I used a red sharpie to hilite the gills, and the throat after the topcoat had cured, and put some Sally Hansen Hard As Nails clear around the belly hook to protect from hook rash on all the baits I painted. They're in the boat now, begging to go swimming.
-
I posted a group of baits that I painted in my bone in the hardbaits gallery. I like how they came out, thanks to the help from you guys. My photography skills are even worse than my painting skills. All I can say is thank goodness for digital cameras.
-

