


mark poulson
-
Posts
14,726 -
Joined
-
Last visited
-
Days Won
364
Content Type
Profiles
Articles
TU Classifieds
Glossary
Website Links
Forums
Gallery
Store
Everything posted by mark poulson
-
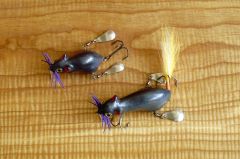
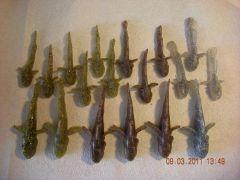 Here are some 3" and 4" sculpins I made, along with the masters from Sculpy clay, and the molds. The 3" weigh 6 grams, and the 4" weigh 12 grams. I fish them with Falcon weighted hooks, or football heads. The fins stick out, but fold back on the pull, and then pop back out on the pause.
 -
A small suggestion. Try using Plano box dividers for lips when you're testing. They can be easily trimmed with siccors to make them initially, and then with toenail cutters or diagonal pliers when I'm testing them, and are easy to install and remove with crazy glue. I always start with a lip that's a little bigger than I think I'll need, and trim it on the water until it works the way I want it to. After that, it's a simple matter to replace it with a lexan bill of the same size and shape.
-
Jerry, I surrender. Enough changes. By the time I learn to navigate one software, you change it and I have to start all over! Hahaha
-
I guess it's just a "learn to live with it" deal. Thanks.
-
D2T is Devcon 30 minute epoxy, also known as Devcon 2 Ton (D2T). You can get denatured alcohol at lumber yards. Make sure you mix the 2 parts of the epoxy well before you add the alcohol. Otherwise, the alcohol will bond to one part of the 2 part epoxy, and it will never set right. Use a cheap brush to apply it, let it soak in, and recoat. Several thin coats are better than one thick coat. Adding the alcohol will make the epoxy take longer to set, but that's the way to go.
-
Be sure the POP is dry by setting in an oven on low for half an hour. Then seal it with thinned epoxy, or thinned Carpenter's glue. Several coats. It's important to thin the epoxy or glue so you don't lose the details in the mold. Let all that dry overnight, and you're good to go.
-
I try to match the Yamamoto formula of 2 parts plastic to one part salt. You do have to stir a lot to keep the salt, which is heavy, in suspension. If I'm pouring a lot of baits, I still get more salt in the last baits of the batch. Play around and find a system that works for you. I've had many fewer problems since I switched to the NorPor silicone cups instead of pyrex. The plastic stays hot longer, and I don't have to worry when I stir during the pour that the heavy wire mixing wand I use will shatter the pyrex.
-
I've made both POP and RTV molds. Both work well. The RTV works best for top pour molds for baits with fins and details. The POP works well for two piece molds, and for injection molds. Be sure to seal the POP with several coats of D2T epoxy, thinned 50/50 with denatured alcohol.
-
JCS, A white bait turning yellow in the sunlight makes sense to me. Lots of things yellow in the sun. I just wonder why the green fades, and leaves the pumpkin, or yellow.
-
I fish a lot of Zoom green pumpkin lizards. When they've been in the sun, they fade to pumpkin, with no more green. The same thing happens with Yamamoto watermelon. It fades to a kind of yellow. Does anyone here know why?
-
 Really nice carving, and a great job, all around.
 -
 Very nice lure! How deep does it dive? Is it stable at all speeds?
 -
 How did you seal in the eyes? Do you polish the cut ends?
 -
-

Experiments With The Softness Of Swimbaits
mark poulson replied to swimbaits101's topic in Soft Plastics
I use med. plastic, too, and don't add salt. Sometimes I add garlic scent, but most of the time, I don't. Usually, it's just for bottom/slow presentation baits where there's enough time for the fish to nose down and examine the bait. Using a pyrex bowl to pour must be a real pain. Do yourself a favor, and buy a pyrex measuring cup, or, better still, a silicon NorPor cup, which lets you pinch down the spout to make really fine pours, and keeps the plastic hot a lot longer. I get them here: http://cgi.ebay.com/SILICONE-MEASURE-STIR-POUR-1-2-CUPS-MEASURING-NEW-/190490076167?pt=LH_DefaultDomain_0&var=&hash=item7216ef2a2c Good luck. -
Large Tank Compressor Or Small, "quiet" Compressor?
mark poulson replied to mholden's topic in Hard Baits
-
Thanks Ben. I think I'm going to put a shutoff in front of my manifold, and just live with the hoses. Did I mention that, aside from being cheap, I'm lazy
-
And now accepting the award for best video in an above/under water setting, Dave "Vodkaman"! Great video! Those years of making adult movies sure did pay off! I've found that my square bill lures swim a little more shallow, because I make the bills only slightly wider than the lure body, while I make my round bills much wider than the lure body. I find that the shape of the lure, round vs. flat sided, is what determines how much wiggle and wobble my lures have. I made a flat sided deep diver with a bill the same length, 2", as a favorite round bill that runs to 16'. But my lure's bill was only slightly wider than the lure, 7/8" instead of 1 3/8", and it only runs 12-14' on 10lb test.
-
Are you kidding? I'm still trying to save up enough to dry out my last wet willy! Ben, I was thinking it would be convenient to be able to disconnect my brushes from one hose, instead of the three I know have draped over my workbench. But, at $14 a pop minimum, I'll just put in an inline ball valve, and live with the hoses festooning my workbench. I should have done that when I built my original manifold, but... "Too soon old, too late smart".
-
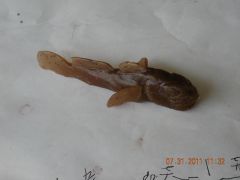 Dave, You know I'm a carpenter, and love to work in wood. I decided to try the Sculpy because I wanted to see if I could get the details, and the thinner fins, with it. I was surprised at how easy it is to shape and work. If I tried to carve the sculpin from wood, or PVC, I'm sure it would wind up mostly filler and glue.
 -
Hand Poured Ribbon Tail Worm Is It Possible
mark poulson replied to rockslide's topic in Soft Plastics
I bought a 4" lizard RTV mold from Lurecraft, and had trouble pouring it, due to the small legs and thin tail. I figured out that if I poured the plastic, and then pressed a smooth faced piece of melamine down onto the open mold while the plastic was still hot, I got thin arms and tails. I do have to trim the entire lizard, once it's cooled, which is a pain. The plastic sticks to the melamine, so when I remove the mold, I use an exacto knife to trace around the entire lizard, which is still stuck to the melamine, to trim it. But I have to be careful, because it's really easy to amputate a leg. I now use NorPor silicone cups, instead of Pyrex cups, to melt and pour my plastics, and it's much easier to pour thin stuff. I wear gloves, due to the heat, and pinch the top of the cup into a small opening, so I can get a finer line. It works better for me. -
Large Tank Compressor Or Small, "quiet" Compressor?
mark poulson replied to mholden's topic in Hard Baits
If you're trying to shield the house from the compressor noise, I would just insulate the corner or area that you're putting the compressor into with fiberglass batt insulation, or line the wall with the soft sheet material that's used for message boards. You can also add another layer of drwall, and even use a J channel sound isolater to mount it. Go to a real builders supply, not home depot, and ask them about sound isolation systems. I wouldn't put the compressor in a box. Building a box for the compressor will reduce the amount of air that it can get for both painting and cooling. The compressor builds up heat while it's cycling, and needs air to cool it. Otherwise, you'll shorten it's life. My compressor is in a corner, under a work bench, with enough room to get it out if I need to. The walls of my garage are plastered, for fire, since it is attached, and the noise has never been an issue. -
I mark the lip slot on the rectangular blank, along with the lure outline, and cut the lip slot with a bandsaw when I cut out the profile. If you have a tablesaw, you can make a jig like Pete's, and a thin blade. Using a jig makes cutting on a tablesaw safer, not safe. Be careful.
-
I just check out the sites. Those are some pricey little buggers!
-
Thanks guys.