


mark poulson
-
Posts
14,726 -
Joined
-
Last visited
-
Days Won
364
Content Type
Profiles
Articles
TU Classifieds
Glossary
Website Links
Forums
Gallery
Store
Everything posted by mark poulson
-
 You really seem to have it down pat! I am still trying to figure out what comes first, and what direction you start painting from.
 -
 That's a really neat paint scheme. What did you use for the belly green? I am jealous of your scaling and gill/fin stenciling. Really well done.
 -
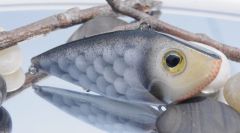
Baitfish that school, like shad, do it to appear larger as a group, and to disorient predators. Having an additional eye spot on it's side helps the shad in this disorientation. Shad don't feed in tight balls, but in larger, loosely connected schools, following the plankton. But when they are threatened by a predator, they form tightly knit balls. The same holds true for silversides, sardines, anchovies, and other similar schooling fish that feed on phytoplankton. Bass hunt by sight and by vibration detection. Obviously, a large school of bait, in a tight ball, offers a much larger vibration profile than a single bait fish. And the added spots in the bait ball provide additional visual disorientation. It's no accident that bass hang on the edges of bait schools, picking off individuals that stray from the main school, or drive them to the surface to break up the school and separate individuals, which are easier to catch. The eye spot on cranks imitates the eye spot on a shad, and makes the bait seem more realistic.
-
I set my hitch hikers in D2T if they're big, or in Zap gap filler glue, and then hit that with the Zap accelerant. I use stock sst hitch hikers for attaching floating worms to my floating mouse cranks.
-
 Nice! I'd hit it!
 -
+1
-
If it's a soft plastic tail, I use a homemade sst spring, like a hitch hiker, only bigger for swimbait tails. If it's a hard plastic fixed tail, I cut a slot into the tail section and slip the tail in, anchoring it with glue and pins. If it's a hard plastic moving tail, I drill two hole in the leading edge of the tail for split rings, and then add some sst eyes in the back of the next section. I'm sure there are a lot of other ways to do it, but these are what I do.
-
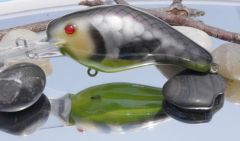
 Rich, Thanks. It's PVC. I'm not sure yet how deep it dives, but it does dive, and swims without rolling. I just wanted to see if a deep diver with a square bill and flat sides would work. So far it does.
 -
I thought that, too, just like all crawdads turn red in a bass' stomach. Then I found a bass with live bluegill wedged in it's throat, struggling at the surface. I netted them, and pulled the bluegill out. The bass dove down out of sight, bam!, but the bluegill struggled on it's side, obviously damaged and in shock. That bluegill was also kind of a light brown, so maybe it has something to do with fright, and trying to disappear.
-
Great paint scheme, Matt. You're right about every bluegill being different. I had a bass spit up a 2" bluegill last year that was beige!
-
I just checked the soft baits gallery, and four pictures of some soft swimbaits disappeared. Does anyone know where they went?
-

Freshly built jerkbait. Length – 17 cm, weight – 110 gr.
mark poulson commented on Dziadzia's gallery image in Hard Baits
 Very nice. I love how crisp your stencil work came out, and how you were able to soften the side bars without losing the scale details.
 -
-
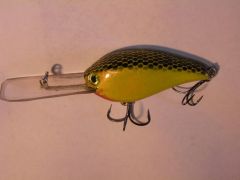
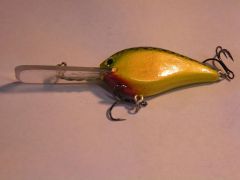
A repaint of a deep diver I just made. I found that, once I'd added paint and three coats of urethane, 1 gram of additional weight, this bait would only float if I switched to #3 split rings and #4 trebles. So I stripped it down, removed 2 grams of ballast weight from behind the hook hanger, added some BBs as a rattle, and repainted it. I used Createx trans. yellow over pearl white for the whole bait, black with tulle netting scales on the back, and trans red on the chin. Finished weight, with #4 split rings. #1 treble on the belly, and #2 on the tail, is 30 grams, which is a full gram lighter than the original, even with the rattles. It floats head down at a 30 degree angle, with the tail up, like a Rapala DT16.
-
In my experience with walking lures, Bob is right about the ballast being the most important factor. Placing the center of gravity just slightly behind the mid point will result in the tail having more inertia, and continuing to move after the front has stopped. The farther back the ballast, the more exaggerated the walking motion, but the harder you have to jerk to work the lure. There is a fine line between having a bait that walks, and one that's so tail heavy it just sinks tail first. Every bait is different, so I find I have to test each new shape to find the "sweet spot". I've found deeper bodies roll less, due to water resistance on the sides.
-
This is what I do after every paint session, or if my brush starts to act up. I back flush with acetone with the nozzle tight, then loosen it and back flush again. After this backflush I check the cup. Typically there are little chunks of dried paint flushed back into the cup. I remove those with my finger. Then I tighten the nozzle and backflush again with acetone. Last, I pour some of my water/dw detergent mix into the cup, and move the needle back and forth to get the acetone out of the needle barrel. Then I backflush with the water/detergent mix, and I'm done.
-
Bojon, The link to your video doesn't work any more. Any chance you could post it again, or a picture of your cutter?
-
I've found that acetone is a much more aggressive solvent for cleaning than alcohol. If I backflush with acetone, and then loosen the nozzle slightly and back flush again, it's amazing how much dried paint is pushed back into the bowl. I don't know exactly how airbrushes work, but I do know that having the tiny holes in the nozzle clogged makes painting almost impossible.
-
I would start with a pearl white base, not aluminum. I've used Auto Air aluminum, and it's a darker silver. Then I'd play around with one of the transparent Createx greens to get the color I want. Finally, I'd fog the back and shoulders with the green, a mist coat to give the entire bait a greenish hue, and then use a stencil to add the same green in darker lines down the sides. I do that color scheme for my black crappie pattern, using Brite Green, and then mist Folk Art Metalic Gold over the sides and back to warm up the green a little.
-
Very well put!
-
Finally, a use for the neighbor's cats!
-
If you're cutting or chopping the lead, do it over a drop cloth, so you can collect the "saw dust" or chips that you'll make, and use them, too. And wear a dust mask. If you have kids, or plan to, lead can be dangerous, so be careful. Funny, but it turns out that the old expression, "It'll put lead in your pencil", is actually not true. Lead poisoning kills sex drive. And leads to irreversible developmental problems in kids.
-
I use solvent based sharpies a lot, because I'm not a very skilled painter. When I use them under epoxy, I shoot a coat of Createx clear over them first. When I use them under urethane, I heat set the sharpie colors thoroughly first. I find that black doesn't run under urethane, but red does, even when it's heat set. I use red for my gill highlights, and don't actually mind a little running there, since I dip my lures and hang them tail down, so the red runs look kind of like the bait is bleeding. If I don't heat set the red, I get a full blown set of flames! I also find that red soaks in and spreads if I put it on over epoxy when it's fresh. I've used it to brighten older baits, and that hasn't spread. The red doesn't seem to spread over urethane, fresh or old.
-
 I did a float test after I painted and topcoated them, and I had to change to #4 split rings and #4 trebles on the black/chartruese to get it to float again. Now I know to allow a gram for paint when I ballast them. Doh!!! Ben, I'll give it a try. There are still bed fish on our lakes, so, like you said, the black/chartruese should still work.
 -
Dieter, I still can't get my PM and gallery links restored below my avatar.