


mark poulson
-
Posts
14,726 -
Joined
-
Last visited
-
Days Won
364
Content Type
Profiles
Articles
TU Classifieds
Glossary
Website Links
Forums
Gallery
Store
Everything posted by mark poulson
-
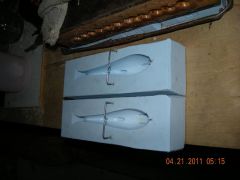
 This is how I hang my weighted Falcon top hook in my 5" Lurecraft swimbait mold, #5/894. I pinch a big split shot on the bottom of the hook, just behind the lead it comes with. It's a 6/0 hook, and 1/4oz weight, but it's not heavy enough by itself, and the weight isn't low enough, to keep the bait stable on the retrieve. It swims fine a low speeds, but it swims on it's side at faster retrieves. I fish it on the bottom, so that's not an issue, or I'd add more low ballast.
 -
 This is how I hang my weighted Falcon top hook in my 5" Lurecraft swimbait mold, #5/894.
 -
Try Target Coatings' super clear interior urethane, SC9000. http://www.targetcoatings.com/shop/catalog/SuperClear_9000_Water_Based_Polyurethane_Series-25-1.html It will hold up to handling, and does not diminish the paint scheme at all. I use it for my bass lures, and it holds up fine for that, even though it's labeled interior.
-
The AZEK brown is harder than the white. Both are hard enough for my bass lures, but I would only use the brown if I were making a bait for the salt. I use sst screw eyes for my hinges, and found that I need to make the pilot holes just a little smaller than the threaded part of the screw eye, or they act like wedges and tend to split the AZEK. If I see cracks develop when I insert a screw eye, typically when I screw in the hook hanger into the thin tail of a crank, I make sure to coat that section in crazy glue, which penetrates and makes the PVC stronger. The only lure failure I've had is when I beat one into a concrete pier repeatedly, rather than make the proper cast beneath it. That lure did split along the screw eye line, which prompted me to go to one size larger pilot hole.
-
 Jesse, I got those from http://bustinbassbaits.com/index.html The cheek color is Createx Irridescent turqouise, and put it on with a brush with only a few bristles. Matt, Thanks. These lures run really true, and are a blast to paint up. I am a carpenter, and I never dreamed I could ever paint anything except with a roller, so painting is a whole new ballgame for me, and I find I really enjoy that part of the process.
 -
GetJonZd, The website says brush on the first layer thin, to get the details, and then brush on more layers. Do you really need to do that, or, after you brush on the first layer, can you just pour on the rest, so you can fill a mold box quickly?
-
Bob, You're probably right, although automotive catalyzed finishes seem to be virtually bullet proof. I was thinking more of the problems that might arise if you put DN1 over a finish that's affected by acetone. I've never done it, so I can't speak from personal experience. But I have had lacquer clear coats wrinkle the finish beneath them, so I thought it was worth discussing. I'm actually happy that acetone does affect so many lure finishes, because it makes repainting much easier. A quick dip in acetone to restore a "virgin" surface is a whole lot quicker and easier that scuffing.
-
Dieter, Great tutorial and pictures. I've used hammers my whole life, but it never occured to me to use the side of the hammer face to make a radius, like you do with you plastic hammer. Thanks for sharing your knowledge.
-
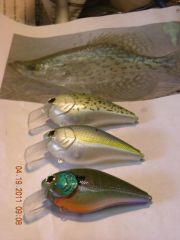
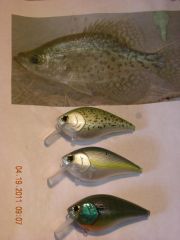 Three RC 2.5 knockoffs, and the crappie I tried to copy
 -
Three RC 2.5 knockoffs, and the crappie I tried to copy
-
If you spray your master lures with a release agent like PAM you'll have an easier time getting them back out of the mold without damage.
-
Pyramid has both largies and smallies, plus stripers. It is a fun lake if the weather cooperates. But I've been snowed on there in December and January, which is no fun. It is the reservoir where the Aqueduct water first enters the SoCal distribution system, and it's level goes up and down 6'+-, depending on how much water is being moved through it. They also release water to Castaic during the week, to generate electricity, and then pump it back up on the weekends, when power is cheaper, and there is less demand. The lake is usually an algae green or clear. There are weeds in the early summer that last through fall. There is skiing allowed, and PWC's, so there is a lot of lake lice during the warmer months. The launch ramp is off Smoky Bear Road, at the head of the creek where the Aqueduct enters the lake, and there can be weak current there if they are really moving water. The wind blows up there a lot, since it's near the top of the Grapevine, but it is a good reaction lake when the wind blows. Hope this helps.
-
If you're going to epoxy in twist wires, you can make the wood around the hole stronger, once it's drilled, by dripping some crazy glue in and letting it set up. Balsa sucks up crazy glue, and the fibers around the hole will be stronger, for a good bond with the epoxy when you set your hardware.
-
Dieter, I don't speak or read German, so I couldn't even register! But your description here is very clear. I have some hammers with plastic faces, but they are flat faced, and used for taping metal parts without marring them. What kind of plastic hammer do you use? I would have thought to use a steel ball peen hammer, but I know this will stretch the metal.
-
If I were going to add color over an existing bait, and then clear it, I would first test to see if acetone would affect the exist finish. If it does, I'd stay away from a solvent based clear coat. One of the great things I've read about DN1 is that it penetrates the paint scheme and bonds really well with it, so I'm guessing it might react with the factory topcoat if acetone does affect it. It's an easy test to do, with a small paint brush dipped in the acetone, and then applied to a small part of the crank. I've found most factory lure topcoats are, indeed, affected by acetone, so I would surely test before I proceeded. My repaint routine with factory baits, like Norman DD22's, if it is affected by acetone, is to dip in acetone to clean and "reactivate" the factory finish and then paint and clear with a water based urethane. A quick dip isn't going to make the factory finish peel. It's just going to make the surface clean and ready for paint.
-
I live in SoCal, and fish Castaic , Piru, and Pyramid most of the tme. This mold is super easy to pour (I can do it), and comes out really nicely. I use spray PAM as a release agent, becase the tail is very deep, so I want to be sure it's easy to strip after I pour. You can do laminates easily, too, because there is enough RTB in the mold to keep the first pour plastic hot until you have time to add the second layer.
-
Dieter, How do you get the cup shape in your spoons?
-
Dave, I've found, for me, the only way to reduce head movement is to increase the length of the head section in relation to the rest of the lure. For my lures, a head that's 1/2 the total body length is the most stable, but it makes jointing the smaller rear sections difficult. When I make a lure with that long a head, I only put a hook in the front section, so the smaller, weaker hinges aren't stressed by a hookset, or a fish pulling on them. Your double pin hinge system eliminates head shake completely. Congratulations. Did you find you had to round both ends the sections to get it to swim right, or is that just to give the hinges more play?
-
 You seem to have it down pat. Nice paint job.
 -
I have worked with wood for a living for over 40 years, and thought I'd pass along a little of what I've learned over that time. A note about sandpaper. Basically, there are two types of sand paper for wood working, open coat and closed coat. Most sheet sand paper, other than wet and dry, is open coat. The abrasive granuals are actually removed during sanding, and they have a friable, sacrificial medium that holds the granuals in place. This type of sand paper cuts fast, because it doesn't load up with the sanding dust and resins in the wood, but wears out quicker than closed coat. It's also less expensive. The second kind of wood working sand paper is closed coat. As the name implies, the granuals are locked in place by a rigid medium. Sanding belts are made this way. Closed coat papers, or cloths for belt sanders, last much longer, but will load up more quickly than open coat, and require the use of a gum rubber belt cleaner to open the grit faces periodically. For me as a carpenter, the best paper I found for sanding blocks was either sanding belts, or the discarded carbide sanding belt from floor sander. A used belt is just right for my uses, and lasts forever. Sanding belts are easily obtainable, and making a block for them simply involves cutting a piece of 1X to the width of the belt, and a length that will allow a snug fit, with rounded over ends. Floor sanding belts require cutting a piece of 1X hardwood to the length of the belt width, the width that's comforable to hold, typically 3 1/2", and ripping a shallow slot down the length of one 3/4" side. Then it's a matter of tucking the sanding belt into the slot, wrapping it all the way around the block tightly, and cutting it off with enough extra to fold the other edge into the slot, too. Because floor sanding belts are very stiff, the belt paper folds sharply at the corners. The paper is so stiff that I find I have to make the second fold with the paper off the block and the second edge in the slot alone. Then I fold the paper into the shape of the block, with the edges for the slot facing in, and slide the paper onto the block from one end. For me, it's impossible to tuck the second edge in with the first edge already in place. Once you have a piece of paper molded to fit the block, you can slip it off one end, and slip another on, although I find it easier to just make several blocks for different grits. You can make the same kind of blocks for full sheet open coat sand paper, but it wears out really fast, and there is a lot of unused paper wasted.
-
Great lures and videos!
-
 I bought a 5" lurecraft RTV swimbait mold. Big mistake. I should have bought three! It was fun pouring, and I was able to make a liminate, too. The trick, for me, is waiting long enough for the first color to cool enough so the second doesn't just kind of blend into it. I uses a Falcon 6/0 1/4oz weighted hook, and pinched a big split shot onto the bottom of the hook, behind the factory lead, to get the ballast lower. It swims well at low and moderate speeds, which is how I use it anyway. Here's a picture of a 4lb1oz fish I caught with it yesterday, along with the swimbait. The mold has a recess for big eyes, so I inset some of Predator Bass 3/8" self adhesive 3D eyes, and sealed them in with some Mend It.
 -
I bought a 5" lurecraft RTV swimbait mold. Big mistake. I should have bought three! It was fun pouring, and I was able to make a liminate, too. The trick, for me, is waiting long enough for the first color to cool enough so the second doesn't just kind of blend into it. I uses a Falcon 6/0 1/4oz weighted hook, and pinched a big split shot onto the bottom of the hook, behind the factory lead, to get the ballast lower. It swims well at low and moderate speeds, which is how I use it anyway. I posted a picture of a 4lb1oz fish I caught with it yesterday, along with the swimbait, in the softbait gallery.
-
 timbojrjr, These are a great fish catcher. They are small enough to get bit by everything, and big enough to catch big fish, too. I use #4 triple grips on the front, and #6 on the back, to aid in the nose down attitude I like.
 -
X2 I'd love to know, too.
