


mark poulson
-
Posts
14,726 -
Joined
-
Last visited
-
Days Won
364
Content Type
Profiles
Articles
TU Classifieds
Glossary
Website Links
Forums
Gallery
Store
Everything posted by mark poulson
-
Check out this thread: http://www.tackleunderground.com/community/topic/20853-two-color-ripper-bait-production-video/
-
That's great news. I've heard nothing but good things about your baits, and I'd love to be able to buy some online. I'm looking forward to you posting when the site is up and running.
-
If you brush has teflon seals, so it can shoot solvent based paints, try taking it apart and soak the nozzle parts and gun overnight in acetone. The tiny air holes in the nozzle can get clogged and you won't be able to see it, because it's way back into the tiny holes. When you reassemble the brush, fill the bowl with clean acetone, back flush several times, and then shoot some fresh acetone through it. Last step is to shoot some water through the brush, and back flush with water, to get all the acetone out. A drop of airbrush lube on the needle, and you're good to go. Try and develop a thorough cleaning routine for each time you change colors and finish painting, and it should only take a minute to keep your brush clean and painting well.
-
When are you guys due?
-
I googled TJs, but couldn't find anything about powder paint. Do you have a real link I could try?
-
 Frank, I have a friend who pours his own swimbaits, and he uses Mojo hollow lead sinkers for the through line channel. It provides the ballast at the same time, and different sinkers give the lures different sink rates. He gave me one to try. I used an awl to make a hole through the bait from the front to the belly, and pushed a Mojo sinker into it. Then I threaded the line through the sinker, and the plastic that was left. The lead is soft enough that it doesn't abrade the line, and the treble comes loose in the fish's mouth, so it can't use the weight of the lure to help throw the hook. You could probably make a plug cutter out of a drinking straw of the right diameter to remove a plastic core and make inserting the lead sinker a little easier. I would probably use a piece of spinnerbait wire as a pilot, and slip the straw over it to keep the hole in line. Good luck.
 -

Help Finding Or Where To Buy Wieghts For Crankbaits
mark poulson replied to Rangerboats1's topic in Hard Baits
You can also buy spools of 1/4" lead wire. I think Cabela's is the place I bought it last time. Cut it with an exacto knife. 1/8" of lead wire equals one gram, +-. -
Just be sure the 5 minute epoxy you use is water proof, not just water resistant. Devcon 5 minute epoxy is only water resistant, while their 30 minute epoxy is water proof. You can google Decon and check the spec. sheets for the two. I used the 5 minute to glue in some hardware on a lure, and it got soft and punky from water over time.
-
D2T 30 is water proof. The 5 minute is only "water resistant".
-
That bait swims really well. And I like the color schemes. Did you use a belly weighted hook, like a Falcon, or is there some other ballast system that keeps it swimming so well?
-
Google airbrush supplies, and you'll find tons of links.
-
I've never used a pot, so I'm only guessing here, but isn't there a good chance the salt and flake will be heavier in the first baits, because it's a bottom pour, unless you constantly stir it? When I hand pour, or use my meat injector, I have to constantly stir to keep the salt and flake up off the bottom, and, even then, it still settles pretty quickly. Once it's drawn up into the injector, it doesn't seem to be an issue, but it is when I'm hand pouring out of a pyrex cup. I typically add at least 1oz of salt to 4oz of plastic, and 1oz of softner. I just finished the Del's plastic I had been using, the medium soft, and am going to start on a bottle of the new green plastic from Lurecraft in the super soft mix. I'm guessing I won't need any additional softener with that.
-
I think you are talking about powder coating lead heads, and you should probably post this question on the wire baits forum.
-
I see, said the blind man! Too simple, and too smart.
-
Pouring Plastic- Hundreds Of Bubbles
mark poulson replied to Pencils-n-flies's topic in Soft Plastics
I'm no expert, but here's what I've found. 1) I always put at least coats of two thinned 1/1 D2T and denatured alcohol, and then a third thinned 2/1, epoxy to alcohol, to get a shinnier surface. 2) I dry my POP in the oven for an hour at 170+- before I seal it. 3) I get tiny bubbles in my small open pour molds if I stir my plastic too vigorously before I pour. I think the POP cools it fast and traps the bubbles, instead of letting them migrate up to the top. With my Ika molds, or other top pour two piece molds, if the bait is thick enough to keep the plastic melted, the bubbles rise up to the sprue. With thinner plastics, even if I inject them, I still get tiny bubbles if I am not carefull to stir slowly to avoid bubbles before I inject. -
Ben, Color me stupid, but how do you use your homemade tool to make scales? Mark
-
 Actually, they throw so well, I use them to hit cruising bass over the head and stun them. Then I just scoop them up with my net! I guess, if I left the sprue attached, they would look like swimbaits. Now that you've planted the seed........
 -
I think I was the one who first mentioned using super glue on balsa baits, but I only make them occasionally, and then it's one at a time. It is expensive. I would probably use two coats of thinned D2T if I were making a bunch of balsa baits. I've used Gorilla glue, the kind that foams, for laminating pine together to make thicker blanks, with no failures. I moisten both faces of the wood before I apply the glue, and clamp them together and let them sit overnight. I think the glue, which is drawn into the adjacent wood by capillary action (that's why I wet the two sides first) is at least as strong or stronger than the wood itself. I've tried hitting a cutoff that's held in a vice, and the wood breaks, not the glue joint. The foam out excess is soft, because it expands and foams when it's exposed and unclamped, but the glue in the clamped joint is hard as a rock. Balsa is a softer, weaker wood than pine, so, if I were thinking of using it for laminating balsa, I would do a test to see if the glue joint breaks before the wood. I just don't know how deeply the glue will penetrate balsa. Another potential problem with laminating balsa is that drill bits might drift because the glue joint, which is typically in the center of the blank where the hardware attaches, would be harder than the adjacent wood. Like trying to drill into a hard grain line. If you use a through wire system, I'm pretty sure it would work fine, but you really should make a test laminate with a through wire to see for yourself.
-
And the Oscar goes to......
-
Now THAT is a scary picture!
-
Yeah, they are just the Ika body. I buy skirts from GYCB, cut them in half, and melt them on with a soldering gun.
-
Try going to the hardbaits section of the TU Gallery. There are some baits with terrific paint jobs there.
-
A cribbage board might work. Seriously, if you are only doing three or four different baits, you could do the appropriate hole patterns in a flat piece of hardwood, and just label which holes are for which bait. Basically, you wind up with a T shaped hole pattern, with the top of the T, the center line of the bait, having a series of holes for the line tie and the rear hook hanger, and the leg of the T having a series of holes for the belly hanger(s). I would probably use PVC, because that's what I have available. Any material that's hard enough to keep the holes from getting too sloppy.
-
 Thanks Ben. It was a lot of work, because it was my first time. I'm pretty sure I could work out a system to make it faster if I had to. I was actually thinking of hitting my buddies up for all their broken Rapalas. But I am too lazy.
 -
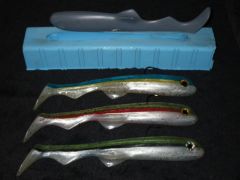
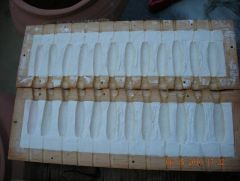
Heman, I just posted a picture of my mold in the soft baits gallery. Click on the gallery link below my name, and it will take you to the mold in the soft baits section. I hope. Basically, I made a wood box from 1X pine and 1/4" masonite, cut it in half, cut the skirts of a dozen Ikas, and embedded them half way into the wet POP. I remade this mold twice before I figured out to coat the ikas with POP before I embedded them, to cut down on air bubble. Once the first half is set and cured in the oven for an hour at 170-degrees, I coat the first mold half with two thinned coats of D2T. Then I mix up another batch of POP, fill the second half of the mold with it, spray Pam onto the first mold half, with the Ika masters still in place, and set the first half down onto the second half that's full of wet POP. I do coat the masters with fresh POP before I put the mold together, again to cut down on air bubbles. After the first half is on top of the second half, the one with the fresh POP, I turn both over, so the wet POP is on top, and tap the top with a rubber handles screw driver to hlp get any remaining air bubbles to migrate away from the masters. Once the POP sets, I repeat the curing and sealing process with the second half. I use cut off nails to align the two halves, and I clamp them together before I hand pour my Ikas. I hope this helps.