


mark poulson
-
Posts
14,726 -
Joined
-
Last visited
-
Days Won
364
Content Type
Profiles
Articles
TU Classifieds
Glossary
Website Links
Forums
Gallery
Store
Everything posted by mark poulson
-
Google AZEK decking, and you should be able to find a supplier. Ask at a local lumber yard, not a Depot-type home improvement store, and they should know what you're talking about, and be able to find it for you locally, if they don't carry it.
-
That bait'll never work! With those ears, the mouse will hear the bass coming, and leave. Seriously, that's a great looking lure. You have carving skills, for sure. If I were you, I'd look into AZEK PVC decking, which is strong, hard, and buoyant. It is an even grained, wood fiber and PVC mix, and carves really well. Just don't put too much pressure on it with a power sander, or it will start to melt. Then get some sst .072 screw eyes for the line tie and hook hanger, and you're set. If you google AZEK, you'll find a local distributer. Same with sst screw eyes. I get my AZEK through my local lumber yard, who can get it from one of their suppliers. I don't think you could hang a hook on the tail of your mouse, because the material is too thin, but there looks to be plenty of meat in the front for that.
-
I try to thin it to the consistency of milk. Try spraying light coats. With Apple Barrel paints, and with any thicker hobby paints not specifically designed for air brushing, it's a good ides to use a brush with a bigger tip, because the pigment particles are coarser than in true air brush paints. I use a Badger 360 for that. I think it has a .05 tip. I know it sprays everything I put in the bottle, and puts a lot of paint on at one time. I have to be careful not to put too much on, or it will run and sag. More, lighter coats are the best advice I can give you.
-
Whittler, I think you're probably right. Now, admittedly, I'm a ham fisted painter, but here's what I've learned, so far. All of my airbrushes have Teflon gaskets. I used to wash my brushes with windex, and then let them sit, and they would stick the next time I used them. Then I'd have to take them apart, soak them in acetone, and backflush with acetone to get them to work again. Now, between colors, I wipe out the extra paint with a rag or piece of paper towel, flush and backflush with windex, and then again with soap and water. Once I'm done painting, I do windex, soapy water, and then clean water, and I'm usually fine the next time I pick up the brush. Paint still gets back up the needle bore hole, and has to be cleaned out, but I've found, if I remove the needle, and then spray first Windex, and then soapy water into the bore from the needle locking nut end, it gets most of that paint loose enough to be removed by running the needle back and forth a few times down the bore backwards, carefully, so I don't scratch the bore. And paint and cleaning residue still get into the finger trigger area, and that's a pain to clean. If anyone has a neat way to clean that, without having to dismantle the entire trigger assembly, I'm all ears.
-
Congrats. on what sounds like a good tourney bag! Glad to hear the reel held up well, especially after it's "bath". The woman who was totally unhelpful worked for Pure Fishing, which is the parent company, I think. Either way, she ws useless. No clue about customer service. Just the opposite with Tacklewarehouse.
-
I emailed Tacklewarehouse to ask them how to handle the defective reel. They said either send it back to them for replacement, or give Garcia a call. So I called Abu Garcia. They were as worthless as tits on a boar. I might as well have been talking to myself. Sample of their genius, "Well, I guess you could send it back in to us". Pitiful. So I emailed Tacklewarehouse again, and told them what happened. They sent me a replacment reel the same day, along with a return shipping tag for UPS, so I didn't have to pay for anything, and I had my replacement reel in my hands before I had to send the defective one back. Plus, someone from their store called me to see if I had gotten the replacement reel. They are truly a class outfit.
-
 Once again, the spoon meister strikes!
 -
 Really, reely nice.
 -
Remind me again why I like you????
-
One of the few blessings of getting older is a merging of past, present, and future. When I was younger, it was called tripping. Nowadays, it's probably due to global warming.
-
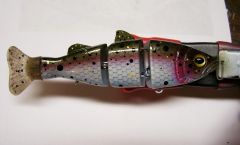 Very nice. I really like the gill carving.
 -
I've had the wrinkling problem when I've let a rattle can paint coat sit longer than the recommended recoat time, but not long enough to fully cure. If you recoat during the recoat window, the two coats meld into each other, like spraying the old nitrocellulose lacquer. I've also had wrinkling when I've redipped urethane too soon. You really need to let it set for the recommended time before you redip, or the first coat will sag under the second.
-
 She's a keeper! :yay:
 -
Ouch! I know the feeling. I snapped the tip off a swimbait rod two months ago when I rotated my ram mounted console sonar so I could see it from the bow, and didn't notice the tip was resting against it. Grrrr!!!!! Fortunately, it was an Okuma rod, with a lifetime warranty, so I called them and told them what happened, and, for $12.95 shipping, they sent me a new rod. Class outfit. I would not buy another Premier. The ones I bought were on clearance to make way for the new, "improved" version. If I had realized that (if it seems too good to be true.....), I would have thought twice about it. But they are light, and seem to cast okay (they do not come close to the old Chronarch MG50's), so I'm thinking I'll hold onto them and use them for jigs and heavier stuff. I'm just going to stay away from magnetic brakes from now on, unless they're on a reel that has centrifugal brakes, too, like the Summit.
-
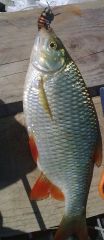 Fishius niceus!
 -
Depending on the machine you buy, a 3/16" or 1/4" should be fine. Generally speaking, the more intricate the cutting you want to do, the smaller you want the blade. But the drawback to thin is strength. Since a band saw blade is a strip of sawblade welded into a loop, the weakest part is the weld, where all blades finally fail over time. The wider the blade, the wider, and stronger, the weld. 1/8" blades are best for small, intricate patterns, but they are relatively fragile. I have a 16" bandsaw in my Garage, and I have a 5/16" blade on it. Blade tension, along with a sharp blade, is key to getting good results from a bandsaw. The smaller, table top saws have much smaller wheels and shorter blades, and can't be tensioned as much as a bigger saw, which is another good reason to stay with a relatively thin blade. Thick blades, like 1/2" or 3/4", really need more tension to reach the proper taugtness, when the blade will "sing" when you twang it with your finger because it's stretched. The tension keeps the blade running and tracking true, instead of drifting as it cuts. Thinner blades don't drift as much, because less blade is actually in the wood during the cut. Just remember to take the tension off every time you turn off the machine, or the rubber bands that line the two wheels will take a set, and have an imprint of the blade on only part of their faces, which makes it difficult to get the blade to track properly. After a while, tensioning and untensioning the blade will become second nature to you. And leaving the blade tensioned accidentally won't ruin your machine, as long as you don't do it all the time. One last thing. I've found cutting small details is best done by hand, with a file, rasp, or Dremel tool with a sanding drum. Don't ask a bandsaw to do something it's really not designed for.
-
Chris, Thanks for the offer, but I'm going to get it replaced, and then use it. I like how light it is, and, as long as it holds up, I can find uses for it. The handle shaft isn't stripped, only the nut. As long as the shaft isn't machined undersized, I could always find a brass nut to use, in a worse case scenario. But I'm pretty sure a reel that I bought three weeks ago new, and only used twice so far, is still under warranty.
-
Cadman, Second field test. First, the good news. I got a 5lb5oz largemouth on a T rigged 4" Zoom lizard. The bad news. The nut that hold the handle on stripped out on the reel I was using for the T rig. It didn't come off when I had the fish on, but it slipped enough that the handle was cockeyed after I'd landed the fish. I tried tightening it, a real pain on the water, but it kept slipping, until I finally took the reel off, and put the Chronarch MG 50 back on (did I ever tell you how pissed I am that they "upgraded" the MG to the Core, and added $100 to the price?). When I went to put the Revo into the storage locker, the nut popped off, and so did the handle. I have an older Quantum E600 with that same problem, and both it and the Revo Premier were made in Korea. The newer Quantums are not. I don't know if this is the problem, or just a cooincidence. I also saw on Tacklewarehouse that they now sell an upgraded Premier, with 10 BBs, and another $100 in cost. It also has centrifugal brakes, in addition to the magnets. That is a big improvement, since the magnetic brakes stink. Figures.
-
You shouldn't have to seal a plastic bait. Try wiping it down with acetone, instead of alcohol, before you prime and paint. Your really don't even need to prime, unless you want good coverage for a solid paint finish. I do a lot of ghost finishes on jerkbaits, which are almost completely transparent, and don't prime before I use Wildlive Colors irridescent violet and green. I don't have problems with that. For solid paint, like a pearl white, I sometimes prime with rattle can white primer, which is cheap, and gives me a quicker build up of the pearl white airbrush paint. But you can shoot on the Createx without a primer. It just takes a little more paint/mre coats to get good coverage.
-
If you don't have a hook hanger at the back end of the lure, put a small straight pin into it's bottom as it hangs, so the drips have something to go down, and all you'll have when it dries is a tiny pin hole to deal with.
-
Like Dieter said, there are a number of different methods to use. Screw eyes are, by far, the simplist method. I would let the wood you're using make the choice. If it's balsa, either thru-wire method is the choice, or the internal plate. If it's pine, or a hardwood, as long as you predrill, and strengthen the threaded hole by running in the screw eye, and then backing it out, coating it with super glue, and then running it back in, screw eyes work fine. Remember, as long as you're using a cranking rod with some kind of monofilament, as opposed to a flipping stick with 50lb braid, the line or rod will break before the hook hanger fails.
-
+1 A band saw is much more versatile, and the longer, loop blade will last a lot longer. For me, having used both, I vote band saw, hands down.
-
Do you know what the "sizing" they used was? I'm only familiar with the stuff that used to be used in wall papering, as a bonder for hard to hang paper.
-
Most of the shop built vacuum tables I'm familiar with were for veneering large pieces, like wood tabler tops. So they were large, generally a full 4X8 sheet of plywood as a base, 1X2 strips for the sides, and a grid of 1X2 inside to support the perforated top sheet of 1/4" tempered masonite peg board. If you're making a smaller vacuum press, you might want to look at some of the expanded metal that readily available, which comes in lots of patterns, and has lots of holes. Whatever you choose for a top layer, just remember to support it well, and evenly. Once you pump out the air and create a vacuum, there's a lot of pressure from the miles of atmosphere above us.
-
Bob, That is what was recommended to me originally, and it's worked out fine. "If it ain't broke, don't fix it". I suppose the ext. might be even more durable, but I haven't needed to try it, because the int. works so well.
