


mark poulson
-
Posts
14,726 -
Joined
-
Last visited
-
Days Won
364
Content Type
Profiles
Articles
TU Classifieds
Glossary
Website Links
Forums
Gallery
Store
Everything posted by mark poulson
-
Would powder paint work for weights with no insert? As for painting them with spray paint, one of the things I really like about tungsten is how hard it is, and how I can feel the bottom with it better than lead. Wouldn't a spary paint damp down that hardness? And I've used sharpies. It does wear off, but so does the paint on Tru Tungstens factory painted weights. Since it's a fast drying ink, I just touch them up on the water, like I do with lead head jigs whose paint chips.
-
You can use carpenter's scribes, or a drafting compass. Set the width close to half way, pass it down one side, and then reverse the blank and do the other. If it's not dead center, the space between the two lines will be.
-
For those of us who aren't rock steady anymore, a rest, something to sit your air brush holding forearm on, makes detailing much easier. I use my other hand when I can, or the back of a chair in front of the paint area.
-
Those are some great looking work stations.
-
If you have access to a surface planer, and the pieces are at least 12" long, that's the way to go. It won't hurt the cutters at all. For smaller stuff, you can use a table saw with fence, or a bench top belt sander.
-
The filer fabric I'm familiar with is available at masonary supply stores. It's what we drape over gravel backfill behind retaining walls, before we add a soil cap, to keep the muddy soil from percolating down and filling the voids between the gravel. The water can pass through, but not soil. Any loose weave fabric, like a light cotton, will work. Just as long as the air can pass thru it. The wet paint will stick to the fabric, and, if you're using water based or borne paints, you can run it through the washer after you paint. Old T shirts will work. Otherwise, for solvent based paints, you can dip it in TSP (tri sodium phosphate) to get break down the paint, and then wash it. You can use synthetics, too, but be sure the solvents won't melt the fabric.
-
I am amazed at how neat your work are is, and how you can paint so well. The last time my garage shop was that clean was in August of 1981, when I first moved into my house. If I had your setup, I'd drape some washable filter cloth over the green AC filters, to catch the wet paint before it clogs the filters themselves.
-
The finished faces are just the same material, embossed with hot rollers that melt the pvc and embed the wood pattern and slick sides and backside. I'd cut out a crankbait-sized rectangle, with the finished surfaces removed, add screw eyes (it holds them fine, just use a small pilot hole) and trebles, a see if it floats okay.
-
That looks like the same stuff I use. Put a piece in a tub of water to see if it floats. Mine is about as buoyant as Poplar. If it's the same stuff, you scored. You can make a ton of lures from that stash, and they will all be waterproof from the start. So, no sealing, no finish failure due to water intrusion, and the material is hard enough that it doesn't dent easily. The newer version has a coarser mix, so I do a couple of dips in Minwax Polyacrylic after I've finished shaping and sanding, to fill some of the surface divots. Three dips, two hours apart, usually do the trick for me. It carves,drill, and cuts well, but the sanding and saw dust are murder on my sinuses, so I wear a dust mask whenever I machine it. Even when I hand sand. Good for you!
-
Pete, Sorry, I can't post photos right now. My Daughter went on my computer and a root kit, whatever that is, got on through Java. My brother-in-law took it home and cleaned it off, but I have my business stuff on there, so I haven't hooked it back up to the internet yet. And my photo software is on that computer. I'm waiting on some new anti-virus software he's going to install. Basically, think of the setup as a sketch pad on an artist's eisel (sp?). You can hang the tulle from above where you're going to paint, and then drop it down over the lure and pin it tight. It's really simple, and that's why I did it, trust me. 68KingFisher, If you do it, maybe you could post a picture of your version. If I had you spray room, I'd mount a 3'X3' piece of 3/4" plywood on the wall between you two corner filter racks, mount a 2'X2' section of foam, tape the tulle to the plywood above the foam, put the two rows of screws in the plywood at either side of the foam, and, voila!, it's on! I use duct tape on the tulle so I can change it easily, but it lasts a long time. And I keep the push pins and rubber bands in a baggie that I pin to the foam when I'm not painting.
-
I use the bridal tulle material. I made a spray board so I could spray it using my gravity guns without spilling the paint, and so both my hands are free to add paint, or clean the gun quickly in case of problems. I took some dense foam material that's 1/4" thick (it's the stuff we use to protect foundation waterproofing before we backfill with gravel), hung a double layer on a sheet of plywood I have leaning up near my work bench, and then put two vertical rows of 3" screws into the plywood, one on each side of the 16"X16" foam that I mounted onto the plywood with duct tape (what else?) I used duct tape to hang a piece of the tulle from the top of the plywood that is big enough to drape over the foam. To spray my scale patterns, I hang a lure horizontal between the two rows of screws, using paper clips and rubber bands. Then I drop the tulle down over the lure, and use push pins to attach it below the lure. The push pins are about 3/8" long, so that's why I doubled the 1/4" foam. After that, I put in a row of pins above the lure, as needed, to get the tulle to follow the contours of the lure. I spray the scale color on in thin layers that I heat set well after each coat. Then I carefully and slowly peel the tulle off the lure, starting at one lower corner, and working across it and up, until the tulle is free. I drop the tulle sheet over the back of the plywood (it's hung from the top with a duct tape hinge) to get it out of the way, and again hit the lure with the hairdryer on high, to be sure the paint it really set. Then I reverse the lure so the other side is exposed, and repeat the process. It's important to make sure the scale paint is dry before you reverse the lure, so it doesn't stick. If I want to scale the top, I do it last, following the same proceedures. In the past, I've used the mesh that holds garlic, draped over the lure and held at the bottom with clothes pins, but the foam spray board is much easier to do. And it is great for holding lures when I'm spraying details on them, too. The tulle is stiff when you first start, but after a couple of coats of heat set Createx it gets more flexible and easier to work with. And the repeated coating actully makes the thin tulle a little thicker, so the lines aren't quite as fine.
-

It was cool.. then I got out the HOT PORN RED.
mark poulson commented on MR KNOW IT ALL KIND OF's gallery image in Hard Baits
 Dude, Put the pipe down and step back. I do that kind of stuff often, since I'm no painter. I've got lures with three layers of paint and finish, because I kept "improving" them just a little, and wound up hating the scheme after it was finished. Kind of adds to the ballast, but, what the hay. For what it's worth, that's a fun scheme.
 -
 You are a master with the air brush.
 -
 Looks great.
 -
I drill my hinge pin holes by hand, using a cordless drill. I use a small bit for the initial hole, and drill from both ends. That way, if there is a mis-alignment, I can correct it with the larger bit that's the actual size of the hinge pin. In my case, I use bicycle spokes for hinge pins. Once you've got the bit started, concentrate on the spot that you want the bit to hit across the hinge gap, and aim the bit for it, like shooting a pistol. You can tell pretty quickly if there is any drift, and you can correct it with the next pass with the larger bit. I've been using hand held drills all my adult life, so I may have a better aim than most, but it's not a hard skill to master. It is easier in PVC than in wood to drill by hand, since there is no grain to make the smaller bit drift. In the past, when I still made jointed lures out of wood, I used the drill press, and a jig, and drilled from both sides while the blank was still rectangular. I used only the larger pin bit when I used the drill press, since it drifted much less than the small pilot bit, and I used a hand held drill with the same bit in it to correct any mis-alignments. I found, as long as the entry and exit holes were tight, a little slop in the middle holes wasn't that critical, since the spoke wire is so stout and strong. And I used thick crazy glue to fill any really bad mistakes, and then redrilled the holes. One tip I'd recommend using is to make the hinge holes a little farther back from the joint face than you want the finished hole to be, and then sand the joint face down to get the clearance you need. A hole that's too close to the surface will ruin the entire piece, since it will not have the strength you need for a swimming lure's joints.
-
Captsully, I bet you were a terror around the station. John, I've found that I get spidering with the Wicked Colors airbrush paint by Createx if I spray the first coat too heavy. I think it might be the fact that it's water borne, and so it's molecules pull on each other strongly, trying to link up, and it's floating on the water carrier, not actually in contact with the surface until the water leaves. I've found heating the lure before I spray the first coat, and spraying a light first coat, eliminates that problem. After the first coat has been dried with a hair dryer, I can go heavier on the subsequent coats, which seem to bond to the first coat much better than to the initial primer. Craft stores sell transparent base, which is thicker and is used to thicken paints that have been overthinned to restore their film strength. Createx makes one, too, and you could try adding it to you "thin" paints to restore their film strength, so they cover better, and don't spider as much. But I think you may find that making the first coat light, and heating the lure, may solve your problem. And keeping the subsequent coats light is always a good thing, too. You'll get a stronger paint film, because each coat is thoroughly heat set, and you won't risk sags and runs.
-
You're right on, on both counts. Gunnie, If you like a little vibration in your bills, try using the divider from a Plano box for one. Especially for longer bills, they make a bill that is flexible, and will vibrate. I think that makes the bait a little less predictable, which isn't a bad thing. Plus, if you're like me, you have a ton of the lying around.
-
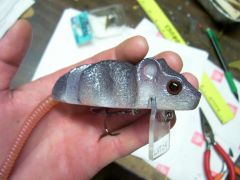
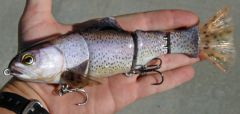
Gunnie, I just had a Doh! moment. Your bait is a two piece, and I've always had trouble getting two piece lures to swim without a lip. I just rediscovered (that's senior speak for remembered) this with a 3" bluegill bait I made last month. I added a third joint to make mine swim. Adding a tail with a hitchhiker is doing the same thing, and should have worked by itself. But I suspect your lure is so thick in comparison to length that it probably took a lot more to get it to swim, and so the long lip was necessary. I've made lures that were almost as tall as they were long, 2 1/4" to 4" length, and the swam fine, as long as they were three piece. But they were only 5/8"+- thick. I think, in order to get the rat to swim without a lip, you'll have to add a real third section, one with enough mass to create some kind of lag when the lure starts to swim. And the tail section can't be too long. I just made a 4" shad jointed bait, which, at first, had three sections. It swam at medium and fast retrieves, but not at slow speeds. The tail section was almost twice as long as the middle section, so I cut it in half and made it a four piece. Now it swims fine at all speeds. So many variables, so little time.
-
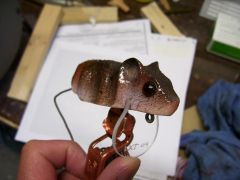 How did you finally solve the swimming issue?
 -
 Perfect!
 -
Would adding additional split rings between the first two sections, so there is a less direct connection, help cut down on the side to side movement? By this I mean each set would be, for instance, three split rings long, to put a longer flex joint between the segments. Would that dampen the side to side?
-
Balsa Butcher, I'm sure propionate has it's good qualities, too, but I haven't had any experience with it, other than the time I tried to use a plastic salsa cup to hold some acetone, and it disloved the bottom of the cup, and left a plastic circle on the piece of wood where I had it sitting. The circle's still there, two years later, so it must work, too. It may be the cat's meow. I just haven't actually used propionate, so I don't know how well it penetrates. But the wood hardeners are designed to penetrate, so that's why I use them. I first heard about the Minwax Wood Hardener from my painter, who uses it all the time on exterior wood that has begun to rot. He removes the punky part, paints the rest of the affected wood with the Minwax Hardener, and then bondo's over that, to restore the wood's surface. His company is one of the premier painting companies in Los Angeles, and he researches everything he uses, since he has to stand behind his work. People in mansions in Bel Aire don't want to hear about why the paint job failed after a year. So I let him do my research, and then I use what he uses. I've soaked wood in hardener, and it has penetrated almost all the way through a 3/4" thick piece of pine in 24 hours. The reason I don't soak lures that long is it takes a week for something with that much hardener in it to cure enough to paint. And it's not really necessary. Soaking soft wood, like pine, for 10 seconds or so, and harder wood, like poplar or fir, for 20-30 seconds, seems to let the wood soak up enough hardener to make it hard and waterproof. Hard enough to hold up to the actions of joints banging against each other, and the occasional encounter with rocks. And that's all I need. Plus it's easy to use. Premixed, and stores well in a glass salsa or pasta jar. If it starts to thicken, due to loss of solvent, I just add some acetone, and it's ready to go again. So, for me, $9 (I actually pay more here in Calif.) is a small price to pay for something that is proven and easy. Now, in the interest of total honesty, I seldom make wood baits any more. I just made a 9" glider out of paulowinia (thank you Gene), just to see how that type of wood worked, and that's the first wood bait I've made in a year. Ever since I've found AZEK PVC decking, I've stopped using wood. I don't make small cranks, or small poppers, so I can afford the small loss of buoyancy with PVC (it's as buoyant as poplar) for the hardness and total waterproofness (is that a word?) the comes with PVC. Shaping and making lure bodies is easy for me, but painting is really hard for me, so I hated it when my wood baits would swell from water intrusion. With AZEK decking, it doesn't happen any more.
-
Mainbutter, I think you're missing something here. Any crank or lure will catch fish at some point. Even lures that roll, or swim funny. There's always going to be fish that are curious, or hungry, and all they have to check out potential meals with is their mouths. And they're programmed to hit a moving object. So almost every lure we make will work at one time or another. Especially if they are different from what the fish have been conditioned to seeing, like DD22s and DT16s. Plus, there's a great feeling when you think of something you wish you had, and then go out to the shop or garage and make it, and take it fishing. We post our pictures here to share, because we're proud of what we've accomplished, and are always looking for help to improve. Not necessarily to make a better lure, although that is good, but, at least for me, to find easier, smarter, and better ways to make lures. That's why we gab so much about different materials, paints, and top coats, and the methods we use. And it's fun!
-
You have to let the primer dry for 24 hours. I use Krylon, when I can get it, and Rustoleum primer, and they both say to let them dry for 24 hours before you paint over them. I wet sand my primer after two hours, but I let it cure the full 24 before I paint over it. Then I hit the primed lure with the hair dryer, just to be sure. Otherwise, there is still solvent trapped in the paint, and it will screw with the finish paint you're putting over it.
-
As you said, there's no reason that bait shouldn't swim. It must be something in the shape. I'd thin up the front section, and see if that helps. The I round over the nose more, to give it more water resistance and force the water in wider arc around the lure. It is so beautiful as it is, I'd hate to change anything, but, once you get it to swim well, you can go back and redo your mold.