


mark poulson
-
Posts
14,726 -
Joined
-
Last visited
-
Days Won
364
Content Type
Profiles
Articles
TU Classifieds
Glossary
Website Links
Forums
Gallery
Store
Everything posted by mark poulson
-
redg8r is right. And if you post pictures of you lures in the gallery as you make them, you'll have a photo album online. You can look back from time to time, and be amazed at how far you've come. The first fish I caught on one of my swimbaits, a 6lb7oz largemouth, was in a tournament, with another boat nearby. That boater, a friend of mine, was almost as excited as I was. That lure has been refinished twice, and is now retired. There is nothing quite like catching fish on something you created.
-
I think I speak for most, if not all, of us here when I say YES, we do catch fish on lures we make. As for the fancy paint jobs and exotic finishes, "the action catches the fish, the paint job catches the fisherman". But paint schemes that are different than what the local bass are used to seeing do help.
-
 :yay: Great design and execution!
 -
 Dave, Thanks. They're so easy to make, you could knock one out in an hour. Email me if you want the specs. Dieter, The jointed trout was supposed to be a variation of a chartruese shad paint scheme. That's what he wanted, so that's what I painted. It looks lighter in the photo than it really is. Lili Man, Thanks, but, thanks goodness, I have my hands full right now. I don't have any more time to make baits in quantity. I'll keep your offer in mind.
 -
Looks great. I love how your mind works. Amazing. I would guess that, to get the snake-like swimming action of a wooden swimbait, you'd probably have to figure out some way to turn the tail section so it's at 90 degrees to the spoon. That way, the spoon would move side to side, and so would the tail. Maybe double tabs, bent both ways, would limit the movement enough to prevent hook fouling on the cast.
-
For smaller baits that I can totally immerse, I put them the bottle of hardener, shake it up, let them float up and rest on one side for a while, and then turn them over with the other side up. It's only for ten seconds a side, since the hardener I use is runny and soaks in really fast. Hardwoods don't absorb it as quickly, so I dip a little longer with them. For larger baits, I hold one end, dip the other, then reverse the bait. I usually have all the ballast holes, eye recesses, and screw eye hole drilled before I dip, so I can put a screw eye part way into the part I dip first to hold the bait while I dip the second half. I use a paper clip through the screw eye to hold the lure for the second half of the dipping, and for hanging to dry. After an hour or so, I'll take the screw eye out and move it, so the hole it was in can dry, too. I have begun making through holes at the bait's eyes, for a rattle, so I open a paper clip to 90 degrees, and stick that through the 1/4" rattle hole to hang the lure while it dries completely. The hardener has already penetrated, so handling it doesn't mess it up, like it would a top coat. I open out a part of the newspaper and spread it beneath where I'm hanging the baits. When the top page gets covered enough with dried hardener, or top coat, I just throw it way and have another page ready for more. Gloves are a good idea. That stuff sticks to skin really well. Hope this helps.
-
Brilliant! That would turn it into a 3 piece lure, which should swim better.
-
Pikester, I'm assuming all hardeners share certain characteristics, like penetrating, but, since they're made by different companies, they're bound to differ, so my experiences with Minwax Wood Hardener might not apply to your product. In general, the longer you soak the bait on the initial dipping, the deeper the hardener will penetrate, and the longer it will take the solvent to evaporate. Once you've dipped it, the wood is sealed, so another dipping is a waste, in my opinion. All it will do is soften the surface layer, since it has the same solvent as the first dipping. Minwax uses acetone, I think. At least, that's what the cleanup tip says to use. I test the wood to see if the solvent is completely gone after 24 hours by hitting it with a hair dryer on high for a minute. If there is still active solvent in the lure, it will bubble out of the end grain. Then I let it hang for another 24 hours, and heat test it again. I dip my wood lures ten seconds. I tried longer, and it took forever for the solvent to leave the wood. Your product may absorb at a different rate, so you'll have to experiment. The hardener locks the wood grain, but isn't smooth. Sand as smooth as you can before you dip, and then sand again after the hardener has cured. It penetrates the wood cells, so sanding won't make it fail. I dip in the polyacrylic a couple of times, and the wet sand with 400 grit to try to smooth the lure completely. If it still has imperfections, you can dip it again, but it's always best to sand it as smooth as possible even before you apply the hardener. And I wet sand after I spray on a few coats of rattle can white primer. I've stopped trying to get my lures perfectly smooth. By the time I get the finished paint on them, and then two or three layers of topcoat, they are fine. Imperfections aren't that noticeable, and those are what separates hand made lures from mass production stuff.
-
If this is your prototype, assemble it and water test it before you go through the trouble to paint it. Nothing more heart breaking than a beautiful lure that doesn't work. And it's much easier, emotionally, to savage an unpainted lure to do modifications than to tear into an already painted, "pretty" lure. Good luck, and post a picture when you're done.
-
When I have a jointed bait that doesn't swim, the first thing I do is remove the tail, to see if that's dampening the swimming action. In general, I try to keep the tail section as light as possible, whether it's a floater or a sinking bait. No ballast at all in the tail, so it floats. Even on sinkers, a floating tail is critical. When you retrieve a sinker, if the tail is heavy, it will drag down, and the bait will swim in an exaggerated head up position. I also try to make the last hinge joint as free as possible. You might try increasing the gap to see if that helps. I've found that two piece lures do need a lip to swim, and the angle on your first/top bait in the gallery picture looks about right. I noticed the bottom of the lure is flat. I don't think this should affect it's action, but it's something to think about if nothing else works. It also looks to me like the front section is as wide, or wider, than the bill Maybe a wider bill, since the wider the bill, the wider the wiggle. Or narrow up the hips on the front section, if that's possible. Other than trying those changes, I can't see what's wrong with your rat. It should be shaking it's tail off! Good luck. That's too pretty a lure to not work.
-
Bob, I'm just cheap. I still have all this spinner bait wire, and nothing else to use it for. When I run out, I'll order some from McMaster-Carr. 68KingFisher, Annealing is heating the metal hot enough to take away any tension/tempering in the metal. Red hot usually is enough. The red hot metal lets the molecules become random again, which their softest state. Retempering, at least for cold cheisels, from my high school metal shop days, means reheating the metal after it's shaped, and then quenching it, so the outside cools faster than the inside, and puts the metal back under tension. You dip the blade into water, then pull it out and watch the color of the metal change as it cools. It cools fastest where it's thinnest, on the cutting edge. There's a straw yellow color you look for, and the metal will cool through shades of red until it gets down to this straw yellow color. Then you redip it and let it stay in the water until it cools completel, which locks the molecules in that orientation. It has been too many years since I first did this, but that's what I remember.
-
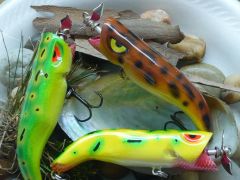
 spoopa, I made the black one for night/low light conditions. After seeing how well black frogs work at night, it seemed like a natural. Early morning, low light, it should work great. The white ones are also for off colored water, or early morning/late after noon. Bass seem to like white in low light conditions, too.
 -
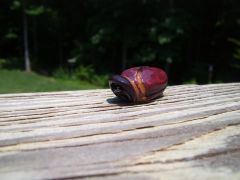 That's a clever idea. Nice looking junebug. Here in SoCal, they're still everywhere, and it's August. How much does it weigh?
 -
That idea to anneal the wire is a great tip. I don't use sst wire for through wire or hinges, but I use it to make the coil spring attachments for my soft plastic tails. I've been using spinner bait wire, and it's tempered. I wear leather gloves, and wrap it around a 5/16" lag screw to get the spiral spring shape, but it's a bear. I am going to try the annealing idea to soften it before I make the next batch. I'm sure the wire will still be strong enough to hold the tails, and I'm hoping it will be easier to bend after annealing.
-
I think you'll find that the decking was vertical grain douglas fir, which reddens as it ages. As tounge and groove material, it was used for sub-floor/underlayment in Kitchens in the early part of the 20th century, under the new miracle floor covering linoleum, because it was so strong and stable. It layed down very smooth and even. It is a little less buoyant than cedar, and less rot resistant, but much stronger. That's why it was used for decking. Take a piece to your local lumber yard to verify that. I have used VGDG decking for lures in the past, and it works great. I still have a couple of pieces from a job in the garage in case I get inspired. Just be sure to seal it well.
-
 The paint jobs look great. I'm amazed at what you achieve by hand. And you're right, the fish will tell you if it's okay. Good luck.
 -
 Very nice. Interesting paint scheme.
 -
A three piece lure will give you the most erratic action, with the tail flapping like a flag in the wind on a fast retrieve. Four piece lures swim in an S pattern, although, by leaving the tail section joint a little looser, you can still get an erratic retrieve when you bring it in fast. Most of the commercial small jointed swimbaits, like the 4" BBZ 1 shad, have one treble in the first section, to keep the stress on the small hinges to a minimum. In smaller baits, the stress on the hinges from the swimming action is minimal, so the real concern is having the lure pull apart once you've hooked the fish. In bigger baits, the joints are stressed by the swimming action more than the hooked fish, since the segments are heavier, but the hinges are more robust. JR Hopkins uses Kevlar string for hinges, which would probably work better for small lures. I've used very small sst cotter pins for the hinging on small, three inch, three piece lures, but it's very difficult to get everything to line up and work right.
-
In a pinch you can cut out a disc of prism tape the size of the eye you want, and then stick a smaller eye in the middle of it, so you still get the large eye effect.
-
 Very nice.
 -
 They look really good. I'm jealous of your hinging. What did you use for the tails?
 -
Sounds like what's called "vertical grain". That's where the growth rings are close together, and oriented so that, in a 1X4, you'd see the grain lines on both the larger 4" surfaces, and the 1" faces would be flat grain. That is a very stable, strong grain pattern in any wood. You said you got it from an old porch. Was it the decking of the porch? I ask because vertical grain douglas fir was typically used for covered porch decking, at least out here in SoCal, not cedar, which is a softer wood.
-

Few questions about swimbaits, and crankbait lips?
mark poulson replied to bassboss's topic in Hard Baits
I've never fished there but, from what I read, golden shiners are the big bass candy back there, so you can't go wrong with a shiner paint scheme. -
Good cedar can be a great lure wood. Congratulations! If the wood is strong enough, the grain won't matter on a lure. Just be sure it runs head to tail. Cross grain is weak. I'm currently making a 9" surface glider out of Paulonia (thank you Lincoya) and the grain in the blank was quartering. Other than sanding differently at the flat grain, it's fine, and floats evenly. Vertical grain on the flatter surfaces will sand out more evenly, but that's about the only difference. After you shape it, be sure to seal it real well with a penetrating sealer, and use super glue in the pilot holes for, and on the threads of, your screweyes, to strengthen the wood in that area. I sand and pre drill for everything, and then dip in Minwax Wood Hardener. I let it dry for a day, sand, and redip. After another day, I check to be sure the solvent is gone by hitting it with a hair dryer and watching for bubbles, which would mean active solvent is still in the wood. Penetrating sealers take a while to off gas. When I float test the lure after it's sealed, if I have to adjust the ballast, I reseal the new ballast hole with runny super glue. It also penetrates. Good luck, and I'm looking forward to seeing you new lures in the gallery.
-
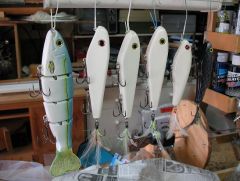
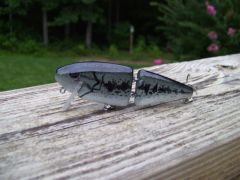
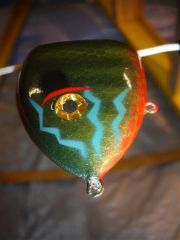
6 new baits from AZEK. The 10" trout is a floater, 137 grams, tail by CaptnSully. The 6" gliders are 70 grams. The 5" gliders are 50 grams. Originally I made the 10" trout, in the chartruese shad scheme, and 6" glider, in a bone scheme, for someone who is fishing a big fish tournament at the Delta this month. So I made some for myself while I was at it. The dark 5" is black belly, pearl silver over black scales, and transparent irridescent violet over that.