


mark poulson
-
Posts
14,726 -
Joined
-
Last visited
-
Days Won
364
Content Type
Profiles
Articles
TU Classifieds
Glossary
Website Links
Forums
Gallery
Store
Everything posted by mark poulson
-
Looks great to me. You've got it wired!
-
 Thanks guys. Snax, I know you're right about how much easier it would be to do the spots with a stencil. My problem is the lures are all hand shaped, and rounded, and I'm not sure I could get a stencil that would lay flat on the contours. Plus I put spots on the back. If you have any suggestions, I'm all ears, except the parts that'r all thumbs.
 -
Thanks Tim.
-
 That looks really good, Joe. Detailing and paint scheme are top notch. Hard to believe it's you first.
 -
The trick is to rotate the lure fast enough to make the effect of gravity on the epoxy even, but not so fast that it throws the epoxy to the outside. I often wondered if the type of lure dryer that holds the lures in a radial position, like the spokes of a wheel, would have more problems, especially at higher speeds, due to the different speeds of the lure as you travel out away from the central axis. Like the increased centrifugal force you feel on a merry go round as you move out from the center. But enough people use that method that it must not be a problem.
-
It really swims great. And I like how it rests on it's hooks when it sinks. Congratulations.
-
Dieter, You continue to amaze me! You have clever hands, and mad metal working skills, and a "scarey" ingenius mind. The fish don't stand a chance. Can't wait to see what you come up with next!
-
I've used the runny crazy glue by Zap to seal some balsa baits I'd stripped before I repainted them. After I applied the crazy glue (I may have done 2 coats of crazy glue, but I don't remember) and it dried (very quickly, which is why I used it), I sanded it with 400 grit, then primed with Krylon white primer, and painted with my waterbased airbrush colors. I don't know if I could have just used a white base without the primer. I'm used to using the Krylon primer, so I just did it the same way I'd done other lures that I'd sealed with something else, and it worked fine. I have had no problems with the lures, and I did them last summer.
-
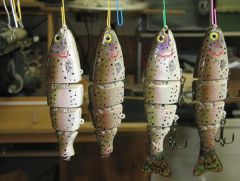
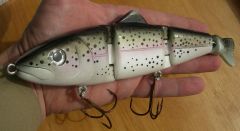
These are the last eight of the set of 12 I made to sell. 6 floaters, 6 slow sink (rate of fall 1 ft. per second). All are AZEk PVC decking. Tails by Captsully. Eyes by Pred Bass, 9mm asymetric gold/silver/black. The floaters weigh 70 grams+-, and the sinkers weigh 80 grams+-. Kryon white primer, Auto Aire Wicked white undercoat, Createx pearl silver sides, pearl white lower sides and belly, Apple Barrel mossy green with a couple of drops of Createx trans. dark brown for the shoulders and back, then light coat of straight trans. dark brown over the back. Createx irridescent violet and trans flamingo pink for the highlights on the cheeks and down the sides, red water based sharpie for the gill red. The black trout spots are Createx opaque black, applied by dipping a small drill bit and hand placing. A true pain in the.......hands. A coat of Krylon pastel fixative to help the epoxy flow evenly, then two coats of Nu Lustre 55. All the ballast is in the first/head section, for both floaters and sinkers. That way the tail really "tails" on the floaters, and the sinker dives head first, and swims level, because the tail is buoyant. There. I have no secrets now.
-
 These are the last eight of the set of 12 I made to sell. 6 floaters, 6 slow sink (rate of fall 1 ft. per second). All are AZEk PVC decking. Tails by Captsully. Eyes by Pred Bass, 9mm asymetric gold/silver/black. The floaters weigh 70 grams+-, and the sinkers weigh 80 grams+-. Kryon white primer, Auto Aire Wicked white undercoat, Createx pearl silver sides, pearl white lower sides and belly, Apple Barrel mossy green with a couple of drops of Createx trans. dark brown for the shoulders and back, then light coat of straight trans. dark brown over the back. Createx irridescent violet and trans flamingo pink for the highlights on the cheeks and down the sides, red water based sharpie for the gill red. The black trout spots are Createx opaque black, applied by dipping a small drill bit and hand placing. A true pain in the.......hands. A coat of Krylon pastel fixative to help the epoxy flow evenly, then two coats of Nu Lustre 55. All the ballast is in the first/head section, for both floaters and sinkers. That way the tail really "tails" on the floaters, and the sinker dives head first, and swims level, because the tail is buoyant. There. I have no secrets now.
 -
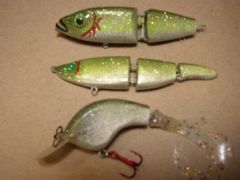 John, Glad to hear that one swims well. I had to put a bill on my two piece swimbait to get it to swim, too. I had a store bought two piece, a Giron, that swam badly, too. I think it's hard to make a two piece lipless swim. At least it is for me. That wire twister is a good idea. I'm going to have to do something like that. Twisting my sst wire for tail holders is a pain in the hands, even with leather gloves.
 -
Drat! I was afraid of that. Thanks for the warning.
-
I want to coat some jigs with vinyl lure paint, and I wonder if it will react with soft plastics. I'm asking because that happened to me with some nail polish I used to add glitter to a hard jerkbait. Any help will be appreciated, before I do a whole batch that won't work.
-
 Leroy, Sorry to take so long to answer you. It's not wood, it's a PVC decking material called AZEK. It's a mixture of plastic PVC and wood fibers. Totally waterproof, buoyant enough to float even with hinge hardware, harder than wood, works like wood, except there are some fumes, so use a dust mask and ventilation. It makes my lure finishes almost bulletproof, and, if there is a ding or chip, the finish isn't ruined by water being absorbed and lifting the finish. I just dry it, and touch up the ding with brush-on crazy glue. After it dries, it's good to go.
 -
 atrophius, Sorry to take so long to answer. PVC decking is plastic and wood fibers. It can be worked just like wood, but it tends to melt a little if you put too much pressure on it with a belt sander, or use a dull blade on a power saw to cut it. It also melts slightly if you use a dull drill bit on it. I use files, rasps, and sand paper for final shaping, and they work fine. The dust is kind of sticky, and there are faint fumes when you machine it, so be sure to use a dust mask and have good ventilation when you're working it. The upside is it's hard, and totally waterproof. It holds hardware well. I drill a small pilot hole for my screw eyes, and use brush on crazy glue on the threads when I run them in again after I've first gotten them adjusted for the right joint spacing, and run them back out for gluing. I reset the hinge screw eyes one at a time, so I always have one that's set right as a guide for the other in each pair. I've found that, once I've run them in with glue, even if I want to readjust them again, they hold really well, and I can just let the joint coating epoxy hold them after that. There's no rotational strain on a paired hinge system. It carves well, because it has no grain. I use a Dremel with a sanding cylinder to carve my gills and mouth details. Nothing too detailed, just a general impression-type thing, but I do use a carving knife to clean up the hinge recesses, and the material carves very easily. Google AZEK, and you should be able to find some.
 -
 Beautiful!
 -
 You've got nothing to worry about when it comes to airbrush skills. You've got 'em!
 -
There are also surface gliders, baits which move side to side like the sub-surface gliders, but up on top. The Megabass Dog X is an example of one, and the gold standard for them was the 8" Pupfish, which is no longer made. The new king is the Lunker Punker, by Black Dog Baits. They started out as balsa baits, but now have an injection plastic version, with rattles, that's great. They glide up to 2' side to side, depending on how you work them. I've made some that work, and I found that they have to be slightly tail waited, with the center of gravity just past the mid point on the bait, so that, when it is at rest, it's sitting horizontal in the water, with just slightly less than half the lure's back out of the water. I think the reason they glide well is that the inertia of the extra weight in the back half keeps it moving when the front is slowed by the water, so the back wants to keep going and winds up pushing the front out of the way to the side. The longer the lure, the farther lure will glide, but I've found that 9" is about the maximum lure size that's practical to work without being exhausted after the first cast. 6" seems to be a good size overall for both gliding and walking the dog with shorter pulls. I actually made some 5" that work well, and cast better into the wind, but they don't glide as far.
-
I've found that too fast defeats the purpose of the drying wheel, which is to prevent epoxy from sagging due to gravity. If the lure is rotated too fast, the centrifugal force is so strong it does the same thing as gravity, "throwing" the epoxy to the outer most side. A low speed motor, 1 rpm, is plenty, if you're making a Ferris wheel type drying wheel. The faster the motor, the smaller the diameter of the Ferris wheels, or you'll have the epoxy moving out to the outer facing sides. The same thing with single spindles and lure clamps. The faster they rotate, the stronger the force on the epoxy to throw it out to the end of the lure. When I decided to build a drying wheel, I bought a rotisserie motor and spit replacement kit from a hardware store, and the motor was 1 rpm. Happy accident. I made a Ferris wheel dryer with two 16" diameter wheels, and can coat 8 jointed lures at the same time. If I'm feeling ambitious, I could adjust the wheels far enough apart to accommodate two lures in tandem, but that's more work than I care to do. When I used to coat lures with D2T, I would turn them by hand for the first 30 minutes, and then just hang them. One thing I remember is that sagging is more common if you put on too much epoxy, no matter which method you use. Especially with D2T. It's already thick to begin with. Good luck.
-
Jamie, If you're talking about the Nu Lustre 55, you do need to rotate it just like Etex. They are both decoupage, self leveling epoxies, so they will sag and drip if you don't rotate them for at least 12 hours, and let them sit for at least 24 hours before handling. I recoat my Nu Luster after 12 hours, but I don't handle the final coated lure for 24 hours.
-
Rookie, you slay me! Actually, the cave men used an early version of your straw spraying method to spray pigment over their hands, leaving a negative impression. Like early stenciling.
-
 Ha, ha, I know the feeling. I caught a 5lb bass as our fourth fish in a bass tourney on a wind swept point, on a spinnerbait. My partner and I were in my old aluminum boat, which was being blown pretty good, and my TM batteries were going down. I threw out again, four times, until I finally got the blade where I wanted it, and, bam, I was on. A big fish. I played it carefully as my partner kept the boat off the rocks with the dying TM. After what seemed like forever, I got it to the boat and net. A ten+ pound......striper!
 -

2nd Threadfin Shad Attempt-Almost Got It
mark poulson commented on MarcDavidBaits's gallery image in Hard Baits
 Yummy!
 -
John, Nice work. The paint schemes are really alive. I can't wait to hear how the top two swim. I made the mistake of finish painting my first billed lure, a large wake bait, before I tested it, and wound up having to do major surgery to correct it's halibut-like orientation. I hope you have better luck. Where'd you get the spring for the tail screw on the first lure? Dieter, I'm glad you said that. I thought it was my eyes.