


mark poulson
-
Posts
14,726 -
Joined
-
Last visited
-
Days Won
364
Content Type
Profiles
Articles
TU Classifieds
Glossary
Website Links
Forums
Gallery
Store
Everything posted by mark poulson
-
 Looks great!
 -
I've found that the resin is the more clear of the two, but, on a new package, the hardner usually hasn't started to yellow yet, so that method isn't fool proof. It's much safer to take they syringe apart, and soak both halves in denatured alcohol. Disassembe, wipe both pieces down, and reassemble. Then reassemble, and pump fresh alcohol in and out of the syringe a few times. Last, label the syringe so you'll know which is which for next time. The whole process should take you 5 minutes, and you won't have to worry if you got it right.
-
You could also try doing a coat of opaque paint of the same color first, and then the flourescent over it.
-
You can speed up the drying process by hitting it with a hair dryer several times during the day.
-
I read it, too. Congrats. Way to go. They labeled you the Bluegill Master. Well deserved.
-
Another interesting way to skin a cat! Please keep us up to date with how it works.
-
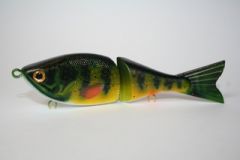
 Looks great! I really like the detailing and the paint scheme. How far into the lure body does the lip extend, and how did you attach it? Is it a through wire harness?
 -
Milia, Don't think you have to use a power tool all the time. Especially with balsa, a sharp carving knife is a very good tool for both rough and finish. As for bandsaws, I use one, and, like David said, it's far superior to a scroll saw. But it's easy to forget that the blade can cut off fingers really well. It doesn't look like a blade at all when it's running, just a smooth metal band. But there are lots of carpenters and butchers who have had their fingers evened up by bandsaws. Be careful and go slow, and it will be fine. Just make sure your hands are either at the sides of the blade, or behind it, never in front, and it's safe.
-
I think keeping it cool will lengthen the shelf life. Maybe put it in the frig. Don't freeze it!
-
Dave, Sorry I wasn't more clear. What I thought I was saying, or what I wanted to say, was that, with the lures mounted farther out from the shaft and making a bigger circle, the distance they travel on each revolution is longer, so they are actually traveling faster, but still only making 1 rpm.
-
Pete, The polyurethane itself is waterproof, so it sounds to me like all you need is something to smooth the outside, and get it ready for paint. If the prop is melting your lure, couldn't you just use a soft brush, and the straight prop solvent, and brush it onto the outside of the lure lightly to smooth it? If it melts slightly, it should fill the holes and blend everything together, and it would probably dry really fast. Just a thought. If it doesn't help, give it back. I don't have any to spare!
-
I'm like Dean, I use a 1 rpm motor for my drying wheel. Whether or not it works for you may depend on your drying wheel design. I made a Ferris wheel-type drying wheel, with two 14" diameter plywood discs mounted on the rotisserie shaft, separated about 16" (I can vary the spacing), and lined on their inner faces with matching screw eyes. I suspend my lures between the two discs, pretty close to the outside of the discs' diameter, so the actual speed of the lure as it's turning is faster than if it were mounted directly to the shaft. I built my wheel this way because I make larger lures, and can put many on the wheel at once, depending on how ambitious I'm feeling that day.
-
Pete, I'd have to sell a lot of lures to be able to justify spending that kind of money on a test tank. It's cheaper to kiss up to a couple of neighbors who have pools, or just drive a mile to the local pond.
-
 They look great. Are they foiled? Do they glide, or just walk the dog?
 -
 Very, very nice. You are an artist.
 -
If your shop has a slab floor, you can build a frame with 2X sides, and a plywood floor to hold them together, and line it with heavy plastic pool liner that you can get from a plumbing supply that has pond/pool supplies. Getting the water out of it when you're done would be the trick. I've seen setups like that in tackle shops.
-
If you heat set really well, Createx should be semi-bullet proof. If you use warm water and a soft rag to clean off a bungled paint coat gently and quickly, before you heat set it or the paint has a chance to dry, the heat set paint underneath it should be fine. You can also use Krylon pastel fixative. It's a clear from a rattle can, dries fast, and can be helped along by hitting it with a hair dryer to help it dry even faster, so you can get back to painting after an hour, instead of waiting 'till the next day. I use the fixative after I've done my scales, before I do my high lite colors. It's just a habit with me now.
-
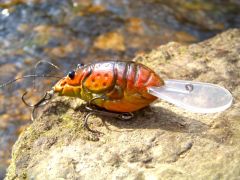
 Just a dumb, "I've never made one like that", question. Does the prop interfer with the hookset? It looks awfully big.
 -
Clamboni, I only weight a lure after it's assembled, because it acts differently assembled than when each section is separate. I put in the hinges, pins, line tie, plastic tail, and hook hangers, and then float test it in a bucket of water. I hang egg sinkers or split shot from the tines of the trebles until I get the lure to sit in the water the way I think it should. I just finished an on the lake test of a 7" floating 4 piece swimbait made of PVC instead of poplar, the hardwood I used to use. I only put ballast in the first section, because when I put ballast in the third section via a weighted hook hanger, the lures still float, but only the head is actually above the water. They hang kind of tail down, not really sinking, but more a drooping tail kind of thing. In hardwood baits of the same size and design, I have had to use the weighted hook hanger, and also ballast weight in the second section. In this case, because the PVC is less buoyant than the wood, the tail section didn't need any additional weighting, other than the split ring and 1/0 hook hanging from the third section, to keep it from rolling. I'm still learning about this material, and it's differences from wood. I made some 5" punker type lures from it, and they walk the dog well, too, plus they cast like bullets! That's what I was hoping for when I made them from PVC, because hitting busting fish from distance is crucial here in SoCal on our heavily pressured lakes. But, because they are heavier, they are a little more work to work, so to speak. It's a trade off.
-
Guys, This forum is for sharing information, and making friends, not arguing. A difference of opinion is fine. Taking it personal is not. When I'm thinking about saying something that maybe I shouldn't, I ask myself whether it's something I would want my kids or grand kids to read. A little common courtesy goes a long way. Along with a thick skin, and healthy dose of humility. "Can't we all just get along?"
-
So mixing fine glitter with Minwax Polyacrylic and painting it on over the Createx, before I epoxy, actually adds an additional layer of UV protection. Nathan, you sly devil!
-
 Even more pop? Can't wait to see that.
 -
 Thanks Nathan. And thanks to everyone whose help and advice had let me get this far this fast.
 -
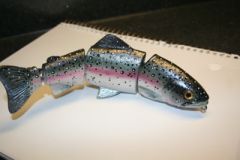
That is really nice. Interesting white on black spots.
-
I think that's probably the reason the Original Lunker Punker was made from balsa. Keeping buoyancy while eliminating roll with bottom ballast is tough. That's why injected plastic baits can achieve such great action. They're hollow, with trapped air, so they are really buoyant, and can handle lots of ballast. I tried to get around this by making some big punker knockoffs using pine. They work okay, but the pine isn't as buoyant as balsa, and the action suffers because of it. Much harder to work than the real Punker.
