


mark poulson
-
Posts
14,726 -
Joined
-
Last visited
-
Days Won
364
Content Type
Profiles
Articles
TU Classifieds
Glossary
Website Links
Forums
Gallery
Store
Everything posted by mark poulson
-
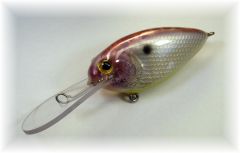
 Good looking baits. Those look like they'll get whacked! What did you use for the curved spitting face, and how did you bend it?
 -
 Beautiful.
 -
Pete, Here in SoCal fresh garlic comes in flexible net bags with really fine mesh. Stretches around lures, and makes a fine pattern. I've used produce mesh bags for scales for a while, and it works fine.
-
pikester, I don't know the chemical makeup of the dust that's created by machining PVC materials. I do know I don't smell any fumes to speak of, and the sanding dust that's created seems to be really granular, instead of a fine dust. And it sticks to your hands and the parts being machined, so it doesn't get that airborne. But I do use a homemade dust collector that creates a suction at the point of machining and collects most of whatever fumes or smell there is. I'd assume that burning the PVC would release toxic fumes, but I don't think machining it with wood working tools does. And I haven't had it burn when I've cut it or sanded it. Having said that, it would probably be a good idea to check with the manuf., in this case AZEK, for their technical information. I'm pretty sure they would know if it was hazardous, since they'd be open to lawsuits since they sell it nationwide. I do wear a dust mask when I'm sanding it, because I have bad sinuses from working with wood my whole life, and I don't need anything extra getting into my lungs. But there is less dust with PVC than with wood.
-
BobP, It's a little heavier than poplar. I've had to use less ballast for the same size lure, and no tail weight at all. I wouldn't use it in place of a really buoyant wood like cedar, or even pine. Because of it's weight, while it is still buoyant enough to make floating swimbaits, baits that need really buoyant wood to let you position the ballast low and still have lively action might have a problem with AZEK. The may be other PVC materials available that are lighter, but I am not familiar with them. Seafoam, Glad to share what I learned here.
-
Yes John. It's the head to other section ratios. I've found that 1 1/8" is about the shortest section I can make and still have room for hardware and ballast, so my smallest four piece would have a 2 1/4" head, and three 1 1/8" sections, plus the plastic tail. My 4 1/2" three piece has a 1 1/4" head and mid section, and a 2"+-tail section. I'm sure other ratios work. This is just what's worked for me, so far.
-
I have a 24" lathe that I bought from a swap meet over thirty years ago. It has a cast iron bed, and I had to make the head chuck for it, and make a table and motor mount, too. I've turned replacement parts for furniture, lures, cheisel handles, and it's worked well. But that was thirty+ years ago. I doubt I'd want to invest that much time in making a used tool work at this point in my life. So, going with the buy a good tool once theory, I'd shop around for one today. I have Grizzley stationary tool, a drill press and a 16" band saw, and they've been trouble free. But I would look local first, before I'd go to Grizzley, or some other importer. Check out the Home Depot Rigid line. I don't know if they even make a lathe, but, if they do, it will probably be rugged and affordable. I have had one of their oscillating spindle/belt sanders for ten years now, and it's a workhorse. I'm pretty sure Sears, and some of the other home improvement stores, sell a line of lathes. Check them out. It will help you in your decision making process to figure out what's the longest/fattest lure you want to make. Length of bed, plus distance from center of chuck to lathe bed, determine how long and big a lure you can turn. Last, any lathe that will hold the wood you want to use will work, provided you go slow, and USE SHARP TOOLS. I can't emphasize that last thing strongly enough. Dull tools make the lathe work harder, overheat due to friction, and can grab in the wood, and flip, causing a really dangerous situation. Be sure you have a grinder handy to touch up your lathe tools. And wear a safety shield full face protector. You can rebuild a lure, but not your eyes.
-
Guys, If you try the PVC decking materials now available from lumber yards and home centers, you'll eliminate all the sealing problems. The material itself, a blend of PVC plastic and sawdust, is totally waterproof, so it requires no sealing. And, since it doesn't absorb water, it doesn't swell from water absortion, which is what makes the paint scheme/top coat fail on wood lures once they're scratched or dinged. It is harder than most woods (think muskie teeth), but it's still buoyant. And it's consistent. No grain to fight. I'm a carpenter, I love working wood, but, since I've discovered PVC (thanks JRHopkins) the only wood baits I work on is refinishing my old ones for myself and my friends. I don't have that problem with the PVC baits I've made. Even when I've hit the rocks with them (a controlled test, of course) all that happens is that the epoxy gets scratched. Doesn't dent or chip or peel. Amazing. I use AZEK decking. The one I bought came 15/16"X 5 1/2" X 16', and cost $65. I can get almost 100 four piece lures out of one length. And I don't own stock in AZEK. But I look forward to never having to refinish another lure. Now, I'm sure Featherlite Resin has the same characteristics. I just enjoy the shaping and carving process, and it's easier for me. The only molds I've ever made are forms for concrete, and for plaster staff mouldings, and those are a whole 'nother ball game.
-
Matt, I think you'll have to "rinvent the wheel", that is, play with ballast weight and position, once you switch to the featherlite resin. Different materials had different buoyancy characteristics. As far as a wobbling head, I also have a side to side wobble in my four piece swimbaits. Weighting the front of the head cuts down on the wobble, but doesn't eliminate it. I don't think it's a bad thing for a lure. The more action, the better. My three piece lures have a much more stable head, and the tail flaps like a flag on a fast retrieve. I'm pretty sure it's due to the three piece configuration. I use a 2/1/1/1 ratio for my four piece lures, but more of a 1/1/1 1/2 ratio for the three piece lures, since they are only 4 1/2" plus the tail. This isn't scientific. I just looked at the lure bodies, layed out how much space I needed for hardware and ballast, and cut. It worked out for me. Dumb luck, plus copying the basic layout of already proven lures, like the Triple Trout. I'm in the middle of making a batch of lures for sale right now, so I don't have the mental energy to play around with segment sizes and ballast locations to try to determine a more precise answer. That's a problem for a different day.
-
Matt, Is that lure PVC? I ask because, since I've changed to PVC from poplar, and started using larger screw eyes and bicycle spokes for hinge pins, adding ballast has become a little more tricky for me. All of my first four piece PVC baits, even the floaters, sat with the tail a little lower. In those, I was using the same 1/8oz. egg sinker with a cotter pin run through it and spread as my hook hangers, first and third section. I typically shape and hinge a PVC bait, add the hooks, and float test it in a 5 gallon bucket on my driveway. Since it's waterproof, I can blow the water off afterward, hit it with a hair dryer, and be ready to proceed with either adding ballast, or priming and painting. I just made a PVC version of my 6" crappie, three piece, but I didn't weight the rear hook hanger. Instead, I put almost all the ballast in the head, and a little in the middle section. I did this to counter act the heavier PVC material and the heavier hinge hardware. The lure sits the same now as the original wood version, which swam great and caught fish. I decided to make one out of PVC because the wooden version is constantly getting splits in the top coat. I think it's because it's so tall and thin, 2 1/2" tall, that there is a lot of wood movement. Plus the carving on the head is where the splitting is occurring, so I think there's a weak spot in the film. I would play around with the weighting by adding weight to the front and back hooks, or taping it to the belly, until I was happy with how the bait swam. Then I'd drill and add the weight where it's needed. PVC is different enough from wood that I had to relearn where to add my ballast.
-

My second swimbait (better than the first ^^)
mark poulson commented on JoE_f!shEr's gallery image in Hard Baits
 I agree, nicely done. I especially like all the detail. Good job. You have very good carving skills.
 -
To keep the epoxy from gumming up the joints, I use two methods. One is to coat the insides of the joints with D2T, lapping onto the faces 1/4", while the lure is apart. Then I assemble it, put it on my wheel, and coat the faces with Nu Lustre, which has to be turned for at least 12 hours. The other is to put the individual sections on the wheel and coat them there with Nu Lustre, including inside the joints, before final assembly. Both ways work. I find coating the insides of the joints with D2T before assembling it lets me do a more thorough job of getting the epoxy into all the nooks and crannies without either missing spots, or having a hidden buildup. Either way takes time, and patience. I like the artist's frisket idea. I'm going to go to an art supply and get some to try.
-
I resemble that remark! Even my Iwata can't help my painting skills. But it does help me get by.
-
I should clarify a little. I only strip plastic lures completely if I'm going to make a ghost finish, and want the clear plastic to start with. Otherwise, I wet sand, and paint over the factory finish. I don't do well with solvents, so I use water based paints, and two thin coats of Nu Lustre 55 epoxy. I'm pretty sure the water based paints are heavier than lacquers, but I don't think it's enough to matter, and the Nu Lustre goes on so thin it weighs next to nothing on a plastic crank. Now, when you get into paint schemes for big swimbaits, the paint and topcoat can add significant weight. But I don't think it matters on cranks except for suspenders. I catch fish on my repaints.
-
If they have bills, I do a sanding, then a dip in the acetone without dipping the bill, then scrape, and repeat. The sanding breaks the skin on the clear, to let the acetone work faster. Once I start scraping, it goes pretty fast. I use the back of the blade on an exacto knife, but you can use any sharp edged blade that's rigid to do the scraping. Just watch you hands.
-
I have a glass jar with acetone in it, that I soak wood lures in to remove their topcoat and paint. I think acetone is the active ingredient in most paint strippers. I soak for ten minutes, use a rough towel and a scraper to remove whatever comes loose, then re soak and repeat, until all the paint's gone. Acetone will dissolve plastic lures, so I don't use it for them. I just scrape the paint off, sand, and to a quick wipe down with acetone to smooth them before I repaint.
-
Take some scissors with you when you test the lures. A 1/4" of length can make a big difference. Generally, the shorter the feather, the less it will affect the walking action of a lure. I generally trim mine to about 1/2" past the treble, but it varies. If the lure won't walk well, trim it a little, and try it again. And remember, a little trim goes a long way.
-
Quick Tips...take em all, but leave one of your own!
mark poulson replied to fatfingers's topic in Hard Baits
rofish, I'm not BobP, but I have a tip regarding 5 minute epoxy. Devcon 5 minute epoxy is water resistant, not water proof. Over time in the water, it will absorb water and deteriorate. Make sure the 5 minute epoxy you use is water proof. D2T, the Devcon 30 minute epoxy, is water proof. -
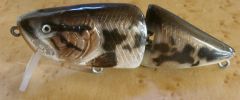
 Looks great! Is it a sinker or a floater? Do the fins lay back as it swims, or do they stick out? What did you carve it out of? So many questions, so little time!
 -
lockjaw, Thanks for posting this. I was beginning to think I just didn't know how to retrieve it, since no one else mentioned how badly they swam.
-
Createx makes both a pearl white, and a pearl silver. Try googling createx paints, and see if there is a seller near you. Or google Bear Air. They sell it online.
-
Two piece lures without lips haven't been successful for me, period. I bought a Jackall Giron, a lipless two piece jointed lure, in the ghost bluegill color a year ago, because I loved the paint scheme, and thought it would be the perfect lure for spawn and post spawn. It turned out to be more of a twitch-type lure for me. It swims really lame on a straight retrieve. Maybe it would be good on a super long cast over a bedding area, where it could swim slowly along and call up bass, but, so far, it hasn't worked that way for me. When I was fishing it parallel to a steep bank on a main lake point, I did have one big follower who swam out from under a debris mat to look at it, but she turned right around and went back. I caught fish with it by twitching it over bedding areas, but not on a swimming retrieve. I do have a few old Bass Pro jointed minnows that swim really well, but they all have lips. I even cut down the lip on one, and now it's a great wake bait!
-
Hollow, injection molded plastic swimbaits are a whole 'nother ballgame. Being hollow allows the manuf. to put lots of ballast in them, down at the belly, and that makes them roll less, or not at all. Plus the BBZ does have fins, and I'm sure they are there to add stability, as well as to make the lure more realistic. In my experience, solid lures with more rounded body sections are harder to weight properly, especially if they're floaters, and not have them roll. Even the Huddleston, the most successful soft plastic swimbait made, has a relatively thin, tall section, and they have big lead ballasts molded onto the hooks to keep them oriented correctly. In the Huddleston, the front half of the lure is held rigid by the hook and weight, which extends beyond the hook bend, and so the head is stable on the retrieve. The tall, thin tail swim with a tight wiggle. It's a great bait. I guess what I'm trying to say is that you're probably just going to have to experiment with your particular lure design and shape until you get it to work the way you want it to.
-
Every so often, about once a month, I break down my Iwata and soak the parts, including the main body, in acetone for an hour. Then I clean them the best I can with a fine brush, reassemble, and back flush a couple of times with acetone to try to clear out any paint that's been loosened, but not removed.
-
Jamie, I said front to back just to show the direction of the hole. As I understand it, you want a T shaped void, with the leg of the T, the larger hole, starting at the front of the lure and moving back to the gill area, and the smaller hole, which forms the top of the T, going side to side. I would think that aligning the cross hole would be easy, once you had the front hole in place. If I were doing it, I'd stick a long dowel into the front hole, to show it's orientation, and then, using the direction of the dowel as a guide, move to the drill press and drill the smaller, side to side hole. If you're going to do a lot of them, you can make a jig that orients the bait and drill press automatically, so the holes always line up. I offered this as an option, in case molding in a T section was too difficult. I thought making just the front hole in the mold would be simpler, and you could use a slightly tapered dowel for the front hole in the mold, which would make removal easier. But, then again, what do I know?