


mark poulson
-
Posts
14,726 -
Joined
-
Last visited
-
Days Won
364
Content Type
Profiles
Articles
TU Classifieds
Glossary
Website Links
Forums
Gallery
Store
Everything posted by mark poulson
-
Rick, The world will survive, and improve. That's what history shows us. We sometimes take steps backward, but we learn from those mistakes and grow and move forward again. We all have an exciting new year ahead, with lots of challenges, and a new President to lead us. Keep the faith. Mark
-
That's a great idea. By now, most of us have "obsolete" cordless drills whose batteries are no longer made, and it would be easy to just take the battery out and mount the drill to a piece of plywood for a base. Great fly tying vise. I'm making one for myself today.
-
I think heat setting each coat of Createx, and waiting a day after spray on glitter, will solve most of your problems. If you're using a lacquer topcoat, spray a coat of Createx clear over the glitter, and heat set it, before you spray on the lacquer. Personally, I've used spray on rattle can clear directly over both water based paint and spray on glitter. Making sure either paint is truly dry and cured is the key. Dick Nite's urethane seems to be the urethane of choice on this site for top coating, but it has a learning curve. I haven't tried DN because I have had good success with decoupage epoxies like Etex and Nu Lustre (both of which require turning for at least 12 hours) for my wood and PVC lures, but it comes highly recommended by successful builders on this site. You can try a water-cured urethane that is used for floors, like Traffic to see if it's what you need. It is a little more forgiving than Dick Nite's, and it's available in quarts. Once you see if it works for you, you can move up to DN, and deal with it's quirks. Do a search for Dick Nite's on the forum's search feature, and read up on it. If I hadn't found a good epoxy (Nu Lustre 55 with UV inhibiters) for my lures, my next move would have been to investigate DN.
-
One of the best, cheapest tips I got here (thanks Hazmail Pete) is to use disposable latex gloves. I only use one, on my left hand, to hold the lure when I'm painting, either suspended on a paper clip, held in needle nose vise grips, or held in forceps. That way, I can turn the lure however I want to without worrying about redecorating my hand. They clean up when you wash the airbrush with Windex, and I get several paint sessions from one glove.
-
lazaro, That's an ingenius rattle box, and the whole lure is very impressive. For those of you pouring stick baits, minnows, and any other longer than tall baits, you can make a rattle by cutting a section of brass tube, putting in BBs, and then pinching the ends shut. You can place the tube in the lure so that it's at an angle, lower in the lure toward the front, and higher toward the rear. I would start at the front hook hanger, and end somewhere near the tail. By angling the tube upward toward tail, the shot moves to the tail on the cast, and then runs back down to the belly on the retrieve, for proper weight distribution. The Japanese luremakers Yozuri and Zip do this with a wire, sliding weight, and magnet. It is too difficulf for me to do, since I carve my lures from wood or PVC, but it lends itself well to lures that are poured from foam. It's tricky to get the weight, length of tube, and angle right, but, once you do, you can kill two birds with one stone, or rattle chamber.
-
Don't doubt Dieter! He's the Jig Meister!!!
-
I've not dealt with them, but I've visited their website, and they seem to have a good selection.
-
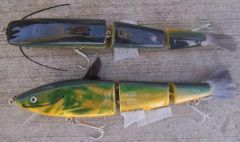
I think everyone got it a little right. Like Dave said, these things evolve for some kind of a purpose that increases survival, so the feature is passed on to the next generation. In the case of threadfin shad, and almost all schooling "baitfish" with false eye spots, the spot creates a false image, making the school appear larger and more confusing to focus an attack on. So, in that case, the spot is for survival from attack in a group. In the case of the Bream family, and other fish that don't school tightly, but do share areas as groups, it's probably a sexual display for mating. Ever notice how fishes colors get fired up during mating season? In the case of trout, which are basically a predator, the spots are for camouflage, to let them blend in with their surroundings when they're on the hunt. Same with the bars and patterns on bass, and the white bottom/dark top on almost all predator fish. There are lots of salt water reef fish that are brightly colored to advertise that they are poisonous. Or really horny! Anyway, I just try to simulate the color scheme of the local preyfish, or whatever I'm trying to imitate with my lure, not match it exactly. That kind of paint job I leave to the guys here who can really paint. My lures, even the floaters, are basically reaction baits. If the lure has a shape and size that's close to the prey, and a decent action and color scheme, it will be eaten. Fish aren't geniuses. Fishermen are far more picky than any bass.
-
 Looks really slimey! Nice job.
 -
 That's a nice looking bait. Should be killer in the spring and fall, or whenever the fish are feeding on top. I agree with Dieter. That rear hook does look kind of dwarfed by the prop. You can extend it back with a series of split rings if you can't find hooks with long enough shanks, but a larger hook will get into the fish's mouth before he hits the prop.
 -
 Great looking bait. I'm with Dieter, 6 1/2oz is a real "challenge" for me to throw all day. Is this one for fresh or salt?
 -
 Man, I'm jealous! When I think about making a 3/4" section, my hands start to ache and I get crosseyed! Nice looking stuff, for sure.
 -
 The picture is kind of hard to see clearly, but they should get bit. What weight are they, and where'd you get the heads?
 -
Too easy!
-
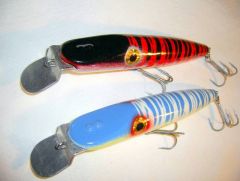
No, I didn't. I fished them just as they were for several years. I didn't realize there was anything wrong with the lip until I started making my own lures, and found this site. After reading what some of you buys posted about lip shapes and their affects on lures, the light finally went on. I never thought about telling BPS. Since I've fixed them, I fish them more often, so I'll probably lose the now.
-
I bought some Rick Clunn med. running crank baits from Bass Pro that all ran to the right, and spiraled if I burned them. I tried tuning the line tie, but it didn't work. Finally, I noticed that the bills weren't symetrical. All of them had more lip on the left of the line tie, which is in their bill. So I filed off some of the lip to make them symetrical, and they run true now.
-
The carpenter in me worries that any sealing method that projects down into the body of the lure will eventually get knocked loose by the same bb's you insert. But I've only added bb's to soft frogs. Has anyone had that experience?
-
Sorry it's taking so long. They're hanging in the garage, with a white base coat on them, waiting for me to come back out to play. I've been too busy, and it's been too cold, to work on them any more. The spirit is willing, but the body is weak. I'm going fishing today, but I hope to have them painted tomorrow, and maybe the first coat of epoxy.
-
Pred, I googled it, and came up with nothing good. Could you list a little more info? Mark
-
Dieter, Pop rivets! Genius never sleeps!
-

painting multiple colors with one airbrush
mark poulson replied to matt duarte's topic in Hard Baits
I learned early on it's better to change colors a lot than to try to compromise and not paint with the colors I want. I came up with a simple routine, copied from some of the guys here. I clean between colors with a spray bottle of Windex. I spray some Windex in my HP-C cup, back flush, spray out the residue, wipe out the cup with a rag, spray and backflush one more time, and it's ready for the next color. I have a med. sized tupperware container sitting on my bench that's half full of water, for washing out my airbrush and paint cups. If I'm using an opaque, or a pearl, I'll clean the brush quickly before I heat set the paint, and use an artist's brush that's in the water to clean the tip. It's quick and simple, once you get used to the routine. Just remember to use full air pressure and an open paint needle valve when you're cleaning the brush. Good luck. -
If you're going to laminate two pieces, buy the wood or PVC already milled to 1/2". Save time and materials. The most accurate way to split a thick piece of wood is with a table saw, but you lose the thickness of the blade. The size of the pin hole is determined by the diameter of the pin.
-
Bruce, Be a sport and post it in the Gallery for him. You're like taking your Mom to the barber shop. Hide the Playboys.
-
 You are a truly gifted lure maker, and a clever devil to boot!
 -
Good idea. I use Gorilla Glue to laminate wood for some lures, and it leaves a paint-like line that's visible until it's painted over.