


mark poulson
-
Posts
14,726 -
Joined
-
Last visited
-
Days Won
364
Content Type
Profiles
Articles
TU Classifieds
Glossary
Website Links
Forums
Gallery
Store
Everything posted by mark poulson
-
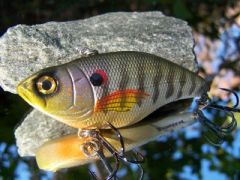
That's where I got the idea originally. I just wondered if anyone here had tried it. I threw the 4" shad for the first time Sat. am, and caught a nice fish on it. I threw the slow sink, in grey back, white sides and belly, and it swam great, slow, fast, and on the rip/pause/rip retrieve that I got bit on.
-
Make sure you swim test before you invest all that time and love in a paint job. I learned that the hard way.
-
More great stuff. I love the details.
-

Can you vent a spraybooth to charcoal filter and back into the room???
mark poulson replied to VTBasser's topic in Hard Baits
Sounds like a great setup. Pictures??? -
DUCBOS, I do the same thing between colors now, but I was trying to find a way to keep several different colors ready in several air brushes. Smokey J, I don't want to use a retarder, because I want to be able to heat set one coat or color quickly, so I can put the next one on right away. The whole idea is to speed things up by not having to wash out my brushes between colors. With multiple brushes and different colors, I could just keep refilling as I need to, and only clean up at the end. KcDano, After I posted the question, I started wondering about spraying the tip with Windex, or resting the tip in a water-soaked sponge. A cup of water makes more sense. I'll haved to rig something up and give it a try. Thanks all for the ideas.
-
Matte, I would not recommend Nu Lustre for sealing you bait. It's a waste of a good product. If you're using PVC, then there's no need to seal before painting. If you're using wood, try Minwax Wood Hardener, which you can get from Home Depot. It penetrates and seals. And makes softer woods harder and stronger. I typically pour some in a coffee can, soak my wood bait pieces in it for ten seconds, and then hang them to dry. You can see the Hardener chasing the air out of the wood as it penetrates, because little air bubbles are being forced out of the end grain. I do the soaking just before I'm ready to install the hook hangers, hinge screw eyes, line tie, and ballast. But I've already got all the holes drilled, so the Hardener goes into those holes, too. I let the Hardener dry overnight, install the hardware, and start painting. I'm pretty sure I could just wait for it to be dry to the touch to start installing the hardware, but I don't want to take any chances on there being a poor bond between the wood and the glue I'm using, or having some trapped solvents that might screw up my paint job, so I wait overnight. Save the Nu Lustre 55 for top coating the finished lure.
-
I'd stick with water based paints like Createx and Apple Barrel, until you get better at painting. Automotive solvent based paints have some nasty solvents, which require respirators, dedicated spray booths with filters, and are much more difficult to clean up, unless you know what you're doing.
-
Best & fastest way to remove the original paint from crankbait?
mark poulson replied to Wade2be's topic in Hard Baits
I scrape the majority of the paint off with the back of an exacto knife blade. Roughing it up first with some 80 grit sandpaper helps the scraper grab. Depending on the crank, I can sometimes get the point of the exacto under the paint and peel it off in bigger pieces, once I've gotten it started. After I've gotten off as much as possible with the knife, which is usually all but some small spots, I wipe the lure down with a rag dipped in acetone, to clean up any scratches, and then I start repainting. -
Has anyone tried reversing the male/female joints on a swimbait, so the concave face is on the front of each section? I'm thinking about trying it, but was hoping someone here might have some experience that would smooth out my learning curve.
-
Has anyone come up with a way to let water based paint sit in an air brush without it drying up at the tip and becoming difficult to paint with? I would like to have several colors already loaded into different brushes when I'm painting, especially scale patterns, but haven't been able to figure out how to keep the tip from drying and clogging.
-
My 1st swimbait. any advice would be great.
mark poulson replied to newcastledrew's topic in Hard Baits
I use 1/8 oz egg sinkers with sst cotter pins pushed through the hole for combination ballast and hook hangers. Bend the tabs one you've pushed the pin in as far as you can, and cut them off so they're not wider than the sinker. That way you can push the sinker into a pre drilled hole more easily. I always add my ballast in vertical holes I drill into the belly of the lure. I use 1/4" lead that I buy from Cabela's in rolls. Just straighten it out, cut it to length with an exacto knife rolled over and over at the cut, and use a 1/4" hole, reamed slightly, for the weights. I cut my joints on the table saw while the lure is still in a rectangular block. I draw the profile, layout the hinge joint locations, predrill the relief holes for the hinge screw heads and a small through hole for the eyes, so they will be centered on both sides, turn the lure upright, and drill the hinges holes, flip it over, and predrill the hook hanger, ballast, and rattle holes. I don't worry about losing the saw blade width, since that's about 1/8", and I need that much clearance for my hinges anyway. I cut my hinges at a 12 1/2 degree angle to begin with, and leave an uncut section in the middle so I can shape and finish sand the lure while all the sections are still connected. After I've finished shaping and sanding, I finish the cuts with a small hand saw, called a dove tail saw. I steepen the angle on the "male" part, the front of each section that has the relief holes and slots and the hinge pin holes, on the belt sander by hand. Be careful. PVC gets hot and sticks if you use too much pressure on the sander, and the smaller pieces can go flying. Not to mention hurting your hand. No problem with the typing. Spelling is another story. Thank goodness for spell check! -
 Amazing paint skills! I can't even imagine how you did it. Great job.
 -
 Looks like you got it right. What method did you use to hold the fibers while you glued them in?
 -
My 1st swimbait. any advice would be great.
mark poulson replied to newcastledrew's topic in Hard Baits
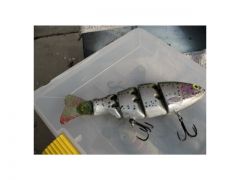
I've found that, in order to have a slow sinking lure, you have to add enough weight in the initial weighting so that the lure sinks the way you want it to in the finished state. The paint scheme and top coat will add about 4 grams if you do two coats of epoxy, and will add additional weighting. I test weight my lures until they sink the way I want them to, and then subtract 4 grams of ballast weight when I'm install the ballast, to allow for the finish. If it doesn't fall fast enough after two coats, add a third, or drill a whole in the belly and epoxy in more weight. The nice part about using PVC is you don't have to worry about water intrusion when you drill after it's finished. Just use epoxy to glue in the additional weights, leaving it a little below the finished surface, add some belly paint, and put a little more epoxy over that to bring it to flush. You'll notice the patch, but the fish won't. If you're trying to add just a little more weight without drilling, stick on lead, lie suspend dots, or fly tying lead wire wrapped around the treble hook shanks will do the trick without affecting the lure's swimming action. -
My 1st swimbait. any advice would be great.
mark poulson replied to newcastledrew's topic in Hard Baits
I got some PVC decking from Stock Bldg. Matl., a local SoCal lumber yard. It melts slightly when you drill it or saw it, so I'd be leery about melting in lead. That high temp. might ruin your lure. Do a test melting with some scrap before you do the lure. I just drill holes and glue in 1/4" lead. -
I used to get those "dry" spots, too, from time to time. I think it has to do with finger print oil and dirt getting on the lure before I put on the top coat. Or maybe a small part of the mix that wasn't as complete as the rest, so the surface tension as the epoxy flowed out was able to pull it off the spot where the bad mix was. I still watch my lures when they're on the wheel, checking every few minutes for the first half hour, so see if any bad spots are developing. The batch of epoxy I used to top coat is still soft enough to "touch up" bad spots up to that point. But you have to be careful not to put too much on, or it will sag into a drip, even on a drying wheel. I use disposable latex gloves when I'm painting now, and handling the lure when I'm putting it on the drying wheel, and put my top coat epoxy on when the lure is already on the wheel, so I don't touch it any more than necessary. I put a second coat on my swimbaits after 24 hours+-, so, if there are any thin spots, I wipe the lure down with denatured alcohol, hit it with the hair dryer to make sure all the dn alcohol is gone, and put on the second coat.
-
I try to put as little ballast weight in the rear sections as possible. I start out by test floating my lures until they sit upright and level in the water, and then add additional weight as needed. I just hang egg sinkers or split shot on the trebles, evenly, until I get the floating or sinking action I want. I incorporate an 1/8oz egg sinker in my hook hangers, so that's my initial ballast, which goes into the head and third section. I also put a rattle in the head and third sections. After that, I put the ballast in the head, and only start putting more in the next section if I find the lure doesn't fall fast enough. Even with almost all the ballast in the first section, the lures hang horizontal, if they're floaters, and sink horizontal, landing on their hooks in my test bucket, if they're sinkers. On the lake, the tail sections always seem to sag just a little on slow retrieves, just from the weight of the hinges, tail screw, hook, and hook hanger. The actual soft or hard plastic tails are neutrally buoyant.
-
 Thanks for the nice replies. Spoopa, At forty lures, you're way ahead of me. I've probably made thirty, tops. I don't really know, because I have given so many away to friends. I've been making lures for two years. First I made big surface gliders, and painted them with rattle cans. Then I bought an Iwata air brush at the end of the summer of '07, and started painting with it. I started making jointed lures about the same time. Trial and error has been my best teacher, and not being afraid to copy another lure that works. My first swimbaits were attempts to copy the two Triple Trout lures my buddy lost on successive weekends. I figured I could make the same thing, since it was made of wood, and I'm a carpenter. Because I did copy the design, more or less, of a very successful lure, my first lures actually worked and caught fish. That encouraged me to do more, and now I'm hooked. I recently did a batch of six, and kept a log of my time on them, to see how much time each lure would take. It takes about 2 1/2 hours per lure, start to finish. I say about, because every time I make a new lure, like the 7" trout, I try new stuff, and play with the paint schemes. More basic paint schemes, like on the original Triple Trout lures by Scott Whitmer, cut the time down to 2 hours. But even he has made his paint schemes more complicated, due to angler demand. Being deliberate and repetitive in my lure making process helps. I follow the same steps that have worked in the past, so I don't have to reinvent the process each time, and can concentrate on new detailing. I also learned that using cheaper components doesn't help if they require more prep time. The materials in one of my jointed swimbaits, including Owner hooks and spit rings, runs about $15. The labor, my time, is where the real expense lies, and anything I can do to cut that down, while still keeping the quality, is worth doing, even if it ends up adding $1 to each lure's cost. I use 1/8 oz egg sinkers with cotter pins run through them as hook hangers. That way, my ballast is already started when I install the hook hangers. So I buy my egg sinkers from Cabela's, even though I can find them cheaper other places, because the castings are clean and consistent. Same thing with my sst cotter pins, from Small Parts, and my sst screw eyes, from Stamina. I can assemble the hardware I need for a lure in ten minutes using these components, while I'd have to spend extra time drilling out the hole in cheaper egg sinkers to accept the sst cotter pins. And I use 1/4" lead from Cabela's for any additional ballast weighting I might need. It's easy to cut into lengths with an exacto knife by rolling it back and forth, and it weighs about 1/8 oz per 5/8" of lead rod, so I can quickly cut the amount of ballast I need without weighing it. I just use a scale I marked on my work bench. It's all about simplifying the process, once you've figured out how to make a lure work like you want it to. Same with painting. I'm no artist, but I do enjoy the painting, and am not afraid to try something new. And, most important, I asked a million questions here on TU, and used the search feature to look up and read everything I could. I think you'll find that, once you've made the commitment and are serious, lots of the people here will happily take the time to help you. I know they did that for me, and still do.
 -
Can you vent a spraybooth to charcoal filter and back into the room???
mark poulson replied to VTBasser's topic in Hard Baits
If all you're spraying is water based Createx, Travis' setup is perfect. Just be sure you don't get tempted to try a little sovent based paints, like rattle cans. I know I'd be tempted, because I use pastel fixative between coats sometimes when I want to try something new for the next coat and I don't want to ruin what I've already painted. If you spray clear Createx, heat set it well, and let it dry overnight, you can probably still do the same thing, but I think you'd have to be real quick deciding if you liked the experiment, so that you could still wipe off the experiment without messing up the previous paint. -
I would be very hesitant to use a fiberglass resin as a clear coat. In my experience, they yellow, and are brittle. D2T is also brittle, as it is designed as a glue. I've found I need a clear coat with some give, so when the wood or whatever I've used to make my lure expands and contracts, the top coat moves with it. And being more flexible means it will be more forgiving of accidental encounters with rocks. Dent, not chip or flake off. I've found decopage type clear coats, like Etex or Nu Lustre 55, both of which are designed to be applied over large wood areas, work much better for top coating lures. Others use Dick Nite's urethane coating. I haven't, so I can't comment on it.
-
Great beginning. You're on your way. Of course, where you wind up may be the loonie bin, like the rest of us, but you've made a great start.
-
I use deer hair for buck tail jigs all the time, and haven't had a problem with it breaking. Of course, buck tail jigs aren't fished like jointed swimbaits. If the tail does get worn, it will just look like a shad that's been attacked and beat up, and more vulnerable.
-
 Two line tie options. Not meant for women anglers. They'd never be able to choose! ) Great looking lure.
 -
 Beautiful.
 -
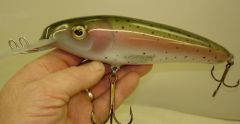
 Dave, I'm taking it out for a test drive Sat. morning. I'll let you know how I do. Funny thing is the original lure had already been repainted by someone in a weird shad pattern. I scraped and sanded the old finish off, wiped it down with acetone, and painted right over the plastic with no primer. I'm anxious to see how the finish holds up.