


mark poulson
-
Posts
14,726 -
Joined
-
Last visited
-
Days Won
364
Content Type
Profiles
Articles
TU Classifieds
Glossary
Website Links
Forums
Gallery
Store
Everything posted by mark poulson
-
If you solve the problem of glue seepage into the swivel itself, and use a swivel with two split rings, then setting the swivel in a semi snug hole with epoxy will hold it forever. No need to through wire it. Swivels with welded rings are stronger, and you can cut off the welded ring on the outside to put on your own split ring and hook. Just be sure to use a swivel that's strong enough for the hook, and whose holes are big enough for the split ring you plan to use. If you want to use a smaller swivel, leave the welded ring on both ends, and just attach your split ring through that. It will make the hook swing a little more, but it will be strong. P.S. If you solve the glue seepage problem, let us know how.
-
21xdc, Two rpms should be fine. Just watch it the first couple of times to see if the epoxy has a tendency/sag to run toward the outside of the wheel. I don't put on too much to avoid this. Two thinner coats works best for me. I used screw eyes for the permanent attachments to the plywood (lots of people use cup hooks), and I use paper clips that I straighten out and rebend to whatever length I need. Cheap, easy to bend, and small enough to easily fit through lure line ties and hook holders. The spring idea looks interesting, but my lures are heavy, so I don't want them sagging as they turn. I leave them on the wheel for 12 hours, so I don't want to worry about what's going on while I'm gone. I do enough of that with my youngest daughter and her dog!
-
Jimbo, I should have said the greater the actual speed, since, at one rpm, a lure set on the outside edge of a 16" wheel will travel farther in one rpm than one set at the midpoint. The diameter is larger, the farther out from the center you go, so the fast the lure has to travel in the same one rpm. That's why you get better gas mileage from larger tires, because the car travels farther in one revolution of the wheel. Sorry for the sloppy wording. Too many paint fumes! I'm getting the Rookie Syndrome!
-
 Thanks Dave. The tail makes the ...err... man.
 -
 I've always been a tail man myself!
 -
 MT, It actually is easy. The hardest part is getting all the old paint off a clear plastic lure. After I get the paint off, I brush it down with a qtip dipped in acetone, and then spray on several coats of Wildlife Colors I-790 Iridescent Violet paint. It's transparent, and subtle, so it's hard to see the violet color as you're spraying, but it really shines in the water. Then a coat of the NYC 101 nail polish, to add a blueish glitter. I've found that the blue glitter gets bit out here in SoCal where a green won't. The polish actually has other colors, too, but the blue is the dominant flake. I topcoat with Nu Lustre 55 UV Inhibited epoxy, one coat. Hard to see in the photos, but it's almost transparent in the water, and really looks ghost-like in low light. Happy accident I found when I was trying to repaint a Norman DD22 with glow in the dark eyes.
 -
 Do you make a 13"? That's the minimum length in our tournaments here in SoCal! Niiiiice!!!!!!!!!
 -
 I'm always amazed at what turners can produce on a lathe. Good looking lures.
 -
rj, That's fan-"f"ing-tastic! What a beautiful lure! Is it hard to do the foil application?
-
Matt, If you want more that two discs on the wheel, you'll probably have to go with two pair, and a bearing block at midspan of the shaft for the extra weight. That can be just a simple plywood T with two nails in the top to keep the spit from wandering. If you're going to suspend lures and parts between two discs, alligator clips probably won't work as well as cup hooks or screw eyes and paper clips for attachment. If you're drying light pieces, the alligator clips would be find. Remember, the larger the diameter of the plywood discs, the greater the turning speed at the outer edges, so don't get a motor that's fast. 1 rpm is plenty. Good luck. Mark
-
matt, What kind of lures are you drying? How long, how heavy? I have a couple of pictures of my wheel in the gallery. Easy to make, cheap, works. Based on a rotisserie motor and spit with two plywood discs.
-
That WASCO site is amazing! I don't do foiling (yet) but that scale roller looks like it would be perfect for embossing scales in foil. And all the stuff there is tops. Thanks for the site.
-
Thanks Dieter. I'm still playing around with the tails for the bait. I am excited about how well the paint scheme worked out.
-
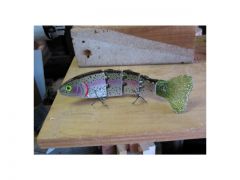
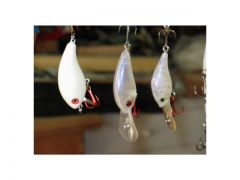
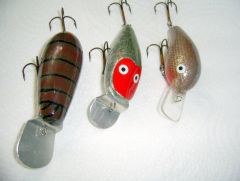
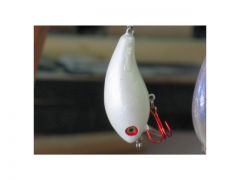
The first photo is my newest 8" trout, two 6" crappie body lures, and three cranks I repainted. The second is one of the cranks, a Mann's square bill shallow runner that I repainted in a sparkle white, to throw in place of a spinnerbait first thing and in off colored water. The last one is the white crank, plus two others that I scraped, sanded, and acetoned down to clear, then hit with irridescent violet and a coat of #101 NYC $.99 nail polish. It takes me about 15 minutes to get a lure clean, and another 15 to repaint it. The ghost really looks like ghost in low light, and has enough profile in better light to give the bass a look, but not a good luck. I've found it's a dynamite scheme for jerkbaits, so I decided to try it on cranks, too. All are topcoated with Nu Lustre 55 UV inhibited epoxy. The swimbaits have two coats.
-
 The first photo is my newest 8" trout, two 6" crappie body lures, and three cranks I repainted. The second is one of the cranks, a Mann's square bill shallow runner that I repainted in a sparkle white, to throw in place of a spinnerbait first thing and in off colored water. The last one is the white crank, plus two others that I scraped, sanded, and acetoned down to clear, then hit with irridescent violet and a coat of #101 NYC $.99 nail polish. It takes me about 15 minutes to get a lure clean, and another 15 to repaint it. The ghost really looks like ghost in low light, and has enough profile in better light to give the bass a look, but not a good luck. I've found it's a dynamite scheme for jerkbaits, so I decided to try it on cranks, too. All are topcoated with Nu Lustre 55 UV inhibited epoxy. The swimbaits have two coats.
 -
The first photo is my newest 8" trout, two 6" crappie body lures, and three cranks I repainted. The second is one of the cranks, a Mann's square bill shallow runner that I repainted in a sparkle white, to throw in place of a spinnerbait first thing and in off colored water. The last one is the white crank, plus two others that I scraped, sanded, and acetoned down to clear, then hit with irridescent violet and a coat of #101 NYC $.99 nail polish. It takes me about 15 minutes to get a lure clean, and another 15 to repaint it. The ghost really looks like ghost in low light, and has enough profile in better light to give the bass a look, but not a good luck. I've found it's a dynamite scheme for jerkbaits, so I decided to try it on cranks, too. All are topcoated with Nu Lustre 55 UV inhibited epoxy. The swimbaits have two coats.
-
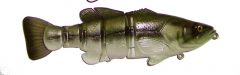
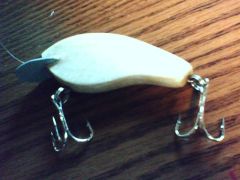
 I decided I wanted to try another version of the 4 piece trout I'd made before. This is out of pine, the wood body is 6" long, the plastic tail (thank you Capnscully) is another 2". It weights 3oz with the #1 Owner in the back, and a 1/0 Owner in the front. It's a surface bait.
 -
 I decided I wanted to try another version of the 4 piece trout I'd made before. This is out of pine, the wood body is 6" long, the plastic tail (thank you Capnscully) is another 2". It weights 3oz with the #1 Owner in the back, and a 1/0 Owner in the front. It's a surface bait.
 -
I decided I wanted to try another version of the 4 piece trout I'd made before. This is out of pine, the wood body is 6" long, the plastic tail (thank you Capnscully) is another 2". It weights 3oz with the #1 Owner in the back, and a 1/0 Owner in the front. It's a surface bait.
-
 That's outstanding, especially for a first swimbait. Great foil job, paint scheme, and fin/tail. I also had that problem with Etex getting into the joints, and me having to use a sst wire in a drill to remove it and restore the movement in the joint. I got around the joint coating problem by coating the insides of the joints with D2T first, and letting it set, before I assemble the lure and put it on my wheel to topcoat. It gets hard enough in two hours to redrill the pin holes and assemble the lure. The D2T is stiffer, so I can just brush it into the joints and onto the joint faces, and lap it onto the face of the lure about 1/4", so the topcoat epoxy has a good lap onto it.
 -
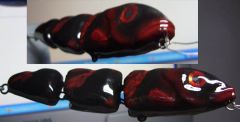 Interesting. I'm not sure where you fish, so I assume the color scheme is specific to what you fish for (pike?). I've never seen that deep a red scheme on a swimbait, but the lure is beautiful. How deep does it swim, and how is the action? Is the body's cross section triangular, or is that just the photo?
 -
 Awesome paint scheme.
 -
 You really have painting skills. Nice job.
 -
 A beautiful lure!
 -
 Good job!
