


mark poulson
-
Posts
14,726 -
Joined
-
Last visited
-
Days Won
364
Content Type
Profiles
Articles
TU Classifieds
Glossary
Website Links
Forums
Gallery
Store
Everything posted by mark poulson
-
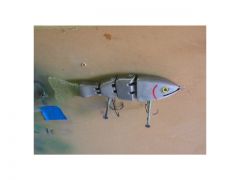 I reworked the 12" trout, which started out as a 12" punker that I jointed. It didn't swim, so I opened up the joints, and repainted it. It swims better now, but it's still more subtle than I would like. The 8" silver four piece is a repaint to get a more generic silver trout color, which works well all year out here in SoCal.
 -
Try rubbercal.com
-
I just coated my first lure with it. Actually, I just put on the second coat. I did notice that it seems to hold tiny bubbles longer, and has a tendency to make bubbles as I brushed it on, but they mostly go away. Otherwise, it works just like Etex, and the first coat was clear and beautiful. I just want the extra protection of a second coat. I wiped the lure down with denatured alcohol before I recoated it. Is that necessary?
-
bb, The beauty of using wood dowel pins is that you can glue the hinge sections in place, and then drill right through the hinge cylinder into the lure, so everything lines up perfectly. Just be sure to relieve the dowel pin enough, either by sanding it flat on several faces, or sanding it slightly smaller where it enters the lure body, so you don't have it so tight that it won't go in, and won't make a glue starved joint. Myself, I'd sand three flats on the dowel, make the hole a little sloppy, and then rotate the dowel in the hole after I'd put it in. You have to apply glue to both the dowel and in the hole, so there is no dry area, and the dowel should force the excess glue back out along the flats you've sanded onto the length of the dowels. If you don't have some kind of a relief or play, like the grooves in store bought dowels, the pressure of the trapped glue, hydraulic pressure, will split the lure body, sure as shootin', or it will just freeze part way in and you'll have to drill it out and start all over.
-
Dieter, You made me laugh at myself. I'm a carpenter, I worked with dowels at lot years ago, I have a couple of doweling jigs in my garage and a bag full of wood dowels, and I never thought of using wood dowels for this, which would make perfect sense. Talk about, "Can't see the forest for the trees". Wood dowel glued into wood makes the most sense of all! That joint would probably outlast the fisherman.
-
I don't see why it wouldn't. Twist wires hold for hinges and hook hangers, so they should work for this, too. All we're trying to get is a "steel reinforced" glue joint, so we get the benefits of both the rigid glue and the flexible sst wire. Kind of like steel reinforced concrete, where the concrete is strong in compression, and the steel is strong in tension, and the two work together to make a material that has both characteristics. Another thing that might work is cutting vertical grooves in the curved face of the lure body before the hinge is glued in, so there is some kind of a mechanical connection into the body of the lure. But I think some kind of sst wired reinforcing is important. The idea of cutting a small groove around the hinge cylinder, and then looping sst wire around in the groove, twisting the tag ends and cutting them off with enough left for good penetration into the lure body "dowel holes" is probably the best idea so far, since it answers all the concerns in the most simple way, as long as it's not too hard to hide the wire for cosmetics. Although that might not be an issue if it's done neatly. You could probably use a tubing cutter to score the cylinder deeply enough to make the wire flush.
-
The problem is that you're glueing to end grain on the lure itself. End grain is usually closed, so there's no way for a good mechanical penetration. But the hinge method is too nice to give up on. And the dowel stock is probably birch, since that's what most lumber yards stock. One thing you might do is some oval sst wires, like an elongated C, that would embed in epoxy in the lure body, and in the face of the hinge. It's a little more work but it would provide a good penetration into the lure body, instead of just a face glueing situation. I think it would be relatively simple to embed them into the hinge first, making sure there is not overflow onto the round hinge face. After it sets, sand again, and put the epoxy on the lure body, filling the holes where the sst wires will seat. Then put it together, tape it, and clean the excess with alcohol. I think it might be too hard to get it right if you try to do it all at once.
-
Having a good paint job go yellow sucks!
-
Rokie, You'd be a cinch for the gold in the "painting while under the influence, dangerous solvents division".
-
rlcam, You'd win the rattle can division gold, hands down! And Snax would have to compete in his own Paint Gods division.
-
Is that like Scotch neat instead of with water?
-
I only airbrush with water based, and use Createx, Auto Air, Wildlife, and Apple Barrel. That's because those are the only ones I know about, so far. I topcoat with epoxy, and I use Krylon white primer, pastel fixative, spray glitter, and gloss topcoat with UV protection, although I'm going to coat my first lure with Nu Lustre 55 today, so the gloss topcoat may be a thing of the past.
-
borderbass, Try using masking tape to hold the parts until the glue sets. Or duct tape, or scotch tape, or any tape that will hold them. Masking tape is just cheap, and easier to handle than the other types. If you have a close fitting joint, the wood glues mentioned will have enough strength to hold, and the joint will fail in the wood itself, not at the glue joint. Do you drill the female part of you hinge slot after you've shaped everything as one? You do some nice carving, and that's a clever hinging method.
-
The video is great. I notice the roll, too. Do you have any low ballast weights in the front section? For my jointed lures, that seems to be the key to limiting roll.
-
Great minds think alike! Good luck.
-
e551, I made a coil of spinnerbait sst wire, about 3/8" diameter and 3/4" long, by winding it around a 5/16" diameter lag screw I locked in a vise. I used channel locks to hold the starting end of the wire and just used my hand to wrap the wire around the lag. I drill a 3/8" hole in the back of the rear section, again about 3/8" deep, and epoxy in the coil with D2T 30. Then I "screw" on my tail. Like a large version of the Hitch Hiker.
-
And great video production. You're mutli talented.
-
I've found that Apple Barrel mossy green is a good starter color for mixing a greenish brown for the backs and shoulders of my trout lures. After I thin it some with Windex, I add enough transparent dark brown to get the color I want. I was going to call it muddy brown, but it isn't that dull. Instead, it's like a crisp darker brown with a hint of green. I think the opaque mossy green makes a good base for darker green mixes for backs of lures, since I'm not worried about transparency there. A side note for you. One of the local anglers who speaks to my bass club, and who fishes the same lakes we do, is Carol Martens, Aaron Marten's mom. She told us that Aaron is color blind, and he's a pretty successful angler! She said he chooses lure colors by contrast, and by shading. If you look at the Aaron's Magic color of Robo worms, you'll see the contrasting colors in it.
-
Man, that lure looks great! Everything about it works. Good job. I can't wait to see it painted and finished! As for weighting, you've already determined how much and where. Try drilling ballast holes just behind the front hook hanger, and as close as possible to the rear hanger, without weakening either. It looks like you used screw eyes, and are tight for space on the rear hanger. I would consider removing the screw eye and weighting the hanger itself. That way, you can get the ballast exactly where you have it now. I learned a tip early on here to use weighted hook hangers, since all of my lures need some weight anyway, and the location of the hook hangers seemed to be the best place for the initial weight. There used to be an outfit that sold weighed hangers, but they don't return my calls anymore, so I make my own, again with a tip I learned here. I push a sst cotter pin through an 1/8oz egg sinker, and then bend the ends out 90 degrees and clip them off even with the outside diameter of the sinker. That way, I can slowly push the entire setup into a 5/16" hole that's half filled with D2T 30 minute epoxy, and the epoxy pushes back up past the weight, and also up through the pin hole. If the 1/8oz weight is too much, you can pinch the split shot around the shank of the cotter pin, and then bend it and cut it off. I bet, if your screw eyes are long enough, you could do the same thing with screw eyes instead of cotter pins. I found it's an easy way to start the weighting process on jointed wooden lures, and makes weighting smaller sections easier. After that, I float test just like you with #5 split shots pinched onto the trebles until I get the floatation I want, and drill and set them in epoxy, too. Hope this helps.
-
BW, Just remember, you're trying to fool the fish, not impress anyone here. We all know it's a crap shoot and a lot of dumb luck. You're already ahead of the game because you're willing to give it a shot. Look forward to seeing whatever you come up with.
-
I think it's kind of a cross between D2T and Etex in working time. Thicker than Etex. I am trying it because it has UV blockers, and I'm tired of my silver baits turning a golden hue after I've used them for a while. It's hard enough to get the paint scheme right the first time, at least for me, without Mr. Golden Sun putting in his two cents! If it's easy to use, I'm going to re coat my other silver baits to give them the additional UV protection. Plus another coat of epoxy can't hurt!
-
I just got an order of the Nu Lustre 55 UV protected epoxy in the mail. The instructions don't address things like lure coating. They also only recommend their own solvent for cleanup. Does anyone here know what solvent I should use? I am too cheap to mix some up just to play with it. Also, can I use it just like Etex, with Createx water based paints, and Krylon solvent based spray glitter? As usual, any help will be deeply appreciated.
-
I haven't tried Dick Nite's yet, so I can't comment on it. I put my eyes on after I've finished the paint job, just before I clear coat with epoxy. On a repaint and re coat, I mask the eyes with blue painter's tape to keep the paint off, and then uncover them before I top coat. If I'm redoing the bait down to the sealer (like when I screw up the top coat ), I pull the eyes off, and put on new ones when I'm done.
-
Depends on what kind of swimbaits you're making. A sketch or pic, or at least a description, would help.
