


mark poulson
-
Posts
14,726 -
Joined
-
Last visited
-
Days Won
364
Content Type
Profiles
Articles
TU Classifieds
Glossary
Website Links
Forums
Gallery
Store
Everything posted by mark poulson
-
Dude, When you've got the head phones on, but they're not plugged in, and you can still HEAR Jimmy, it's time to open a window.
-
I thought I'd get away without having to admit this, but I was really trying to strip an epoxy top coat that didn't set up, and stayed sticky. So, there's the ugly truth. My name is Mark, and I am a top coat screwer upper sometimes. Next time, I won't be in such a hurry, and will mix it more thoroughly and let it sit for a minute, like I know I should. at myself.
-
They do, but I never put 2 and 2 together. I guess all those math classes I slept through finally came back to bite me.
-
Acetone dissolves the plastic that Norman DD22s are made out of. I found out when I tried to speed up the old paint stripping process by soaking a lure in acetone. Kind of funny, really. I had scraped and sanded the paint, but I figured I'd just dip the lure in acetone to get the last of the paint off. Well, the paint came off, and the lure that was left was crystal clear, but sticky. I hung it to dry, and the bill and head clouded up kind of milky white, but the plastic is still hard. I don't know how much of the actual lure body I dissolved, or whether is has been weakened significantly, but it is still hard and solid feeling, so I'll just paint it and coat it, and see what happens. Funny the things I took for granted, like that the plastic wouldn't be affected by acetone. Live and learn.
-
I'm not familiar with House of Kolor paints, so I'll talk about brushes that work with Createx, Wildlife, and Apple Barrel paints, which I have used. I have an Iwata dual action C brush, which has an air flow control built into the trigger, and a separate paint flow control at the rear. It's a good all around brush, but it was expensive. I also have a Master airbrush with a MAC valve (micro air control) and a smaller tip, which I use for detail work. The smaller tip lets me make smaller lines, and the MAC valve gives me the ability to do finer work at lower air pressure, but it has it's limitations. It doesn't spray pearls or thicker paints like opaques very well. I have to thin them with Windex if I want to use them with this gun. Practice using stencils for details, and, if you're only going to buy one airbrush, get one with a .35 or larger tip, so you can spray all kinds of paints. The Iwata revolution is a good all around affordable air brush that can do just about anything, once you've learned how to airbrush. And there are a lot of Iwata knockoffs, like Master, that work and are cheaper in price. If you put an in-line air valve after your pressure regulator/water separator, you can adjust the air down on most airbrushes for fine detail work. Just be sure to thin the paint so it will still spray at low pressure. And you're right. Practice. Nothing teaches like doing.
-
Pete, lipless jointed baits are a lot easier than lipped lures. If you can do lipped cranks, you can build anything!
-
Been there, done that. Let the epoxy set and cure on both the lure and your arm. Then lightly sand the rough epoxy, to smooth it, but not enough to go through into the paint, and recoat. The stuff on your arm will come off by itself due to the oils and sweat in your skin. Or you can peel it, and all the hair under it off. Ouch! Weighting a two piece lure so it swims is tricky. I weight the rear of the front section, which I make longer than the rear section, in a 3/2 ratio. The rear weighting makes the head unstable, because the back of the head wants to keep moving straight while the front moves to one side or the other as water passes over it. I only weight the front of the rear section, or not at all if it's a floater. I haven't had good success with two piece lures except as twitch baits. The Giron doesn't have a radical swimming action. It just kind of sways from side to side. And the Shell Cracker, a two piece surface lure by Black Dog, the same guy who invented the Lunker Punker, also swims with a very gentle action, and is more of a twitch bait. I toyed with the idea of reversing the angle on the joints, so the V of the rear section would catch the water and start the rear wiggling, but I moved on into three and four piece lures instead. They are much easier get to swim. If you like the lure, but want more action, you might try adding a bill. A wake bait bill might give it more action. The water trapped by the shallow bill takes turns dumping off one side and then the other, causing the head to shake, and wiggling the tail. But if you like the action as it is, recoat it and go fishing!
-
Good call Jamie. You can always make more lures, but you can't make more time, once it's gone. "Too soon old, too late smart".
-
Tater, You Dah Man!!!! Stay away from any Rambo or Die Hard movies.
-

How do we rid U.S. waters of Asian carp and Northern Snakeheads???
mark poulson replied to Spike-A-Pike's topic in The Docks
There's too much common sense in your post for the Govt. to ever follow you suggestions. -
Jamie, Don't beat yourself up too badly about it. I've found we all learn best from our own mistakes. Part of learing to control my temper came with realizing the consequences, so just think of this as a learning experience. And try not to get too pissed thinking of the trash man catching big fish on you bait!
-
The hinge clearance holes are from the side. Once I've cut out the rectangular block, I trace the lure shape on the sides, and then put the hinge locations on in pencil. I locate where I'm going to place my weighted hook hangers, and ballast weights, and make them on the lure outline, too. Then I can see how much wood I have left in each section to put my hinges without running into anything else. Once I've decided where I'm putting the hinges, I mark horizontal lines, parallel to the bottom of the lure, on the sides at each hinge location. I then eyeball how much back from the marked joint I think the screw eye going to project back from the first section into the second, and mark that point. That becomes the center of my 5/16" hole, which I drill from side to side. I mark a center line on the top and bottoms of the blanks, and project the hook hanger, ballast, and hinge cut locations up and down, and mark them on the blank. I then move to the drill press, and drill the 5/16" holes for the hangers and ballast, and the appropriate size hole for the hinge pins, which are located centered in the screw eye clearance holes. I try to get the holes started straight at the drill press, knowing that, once I've shaped the lure and cut out the joints, I can finish any of the holes by hand, either at the drill press in the case of the 5/16" holes, or while I hold the sections in my hand, in the case of the hinge pin holes. This sounds really complicated, but, once you've done it, you can make a couple of layout templates for all the joints and holes, and it's simple. Otherwise I couldn't do it! )
-
That swam great! It looked like the pool sweep was ready to attack it! Hope you post the pics in the gallery.
-
While the blank is still rectangular, and after I've cut out the joints on both sides, but not all the way through, I decide where the slots are going to be for the eyes, and drill a 5/16" hole there. Then, after I've shaped the lure at the sander, and cut the joints all the way through, I cut out the wood leading to the top and bottom of the hinge clearance hole on the bandsaw. Then I use a file to remove the saw marks, and sand. That leaves plenty of room for the paint and epoxy. I make the hole 1/4" on smaller lures, but no smaller than that. It's too hard for me to finish the lure cleanly with smaller holes. The epoxy top coat takes up too much space. If you use a thinner top coat, like Dick Nite's, you might get away with smaller holes still.
-
 Great looking baits. Does the rough glitter coat catch the air more than a smooth coat when it's cast?
 -
 Dieter, the best part is it catches fish. I see some of the art work here, and I'm amazed at their beauty. But I think the art is more to catch the fisherman, not the fish.
 -
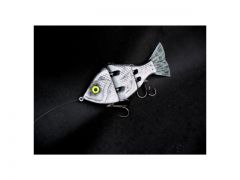 Same lures, different (better?) pictures.
 -
 Same lures, different (better?) pictures.
 -
 Same lures, different (better?) pictures.
 -
I read somewhere on this site that you can get a clear decal made with your signature, so you can apply it over the paint, and then top coat.
-
 I thought they were poured from a mold. Great carving job, and great paint jobs.
 -
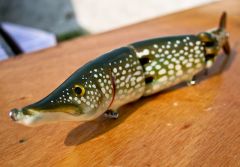 Beautiful.
 -
New Shad Design.. with a New Pattern
mark poulson commented on MR KNOW IT ALL KIND OF's gallery image in Hard Baits
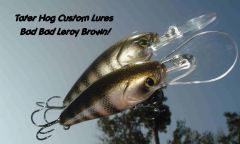 Nice looking baits. Those eyes look like something from Men in Black. Where'd you find them?
 -
Use a water based maker. Hobby stores sell them.
-
booman, I put them in the gallery, along with a description of what I did.