


mark poulson
-
Posts
14,725 -
Joined
-
Last visited
-
Days Won
364
Content Type
Profiles
Articles
TU Classifieds
Glossary
Website Links
Forums
Gallery
Store
Everything posted by mark poulson
-
Looking good!
-
So how'd you do at Perris?
-
Looks like it swims great. Can't wait to see the finished product, hanging from a fish's mouth.
-
You can use a green scotch pad.
-
Back in '93, my wife and I stripped and repainted our garage door a beatiful gloss white. Sanded and stripped down to bare wood, oil based white primer, caulked all the t&g joints, two coats of high gloss enamel. The last coat went on in the morning, and then, about mid-day, the Med Fly truck came by, releasing sterile males. You all remember the California Med Fly invasion. Well, those flies went straight for my new white paint! Something in the enamel said come hither. My wife and I were sick when we saw a living coating of those little buggers, stuck to our newly finished door. My wife wanted to get them off right then, but I convinced her to let the paint dry, and then we'd clean them off as best we could without further damaging the paint. The next morning, a Saturday, I went out first thing to see how the paint was drying, and, lo and behold, there was sweet revenge. All of the spiders that lived up above my garage door had dropped down, and were feasting on the trapped Med Flies. I never did try to clean them off. The spiders did it for me.
-
I got a cheap fly tying vice from Cabela's. Walmart carries Devcon 2 Ton epoxy, which is probably what you want to use. I would recommend a little research into the paints you're using, particularly how they are affected by sunlight. I've used a spray on glitter before I topcoat, and it yellowed. My silver trout now look like light brown trout. I also use a pastel fixative between coats, and it doesn't seem to yellow. I use Envirotex Lite as my epoxy top coat, and it is really clear and doesn't yellow. But it lets all of the sunlight through, so anything underneath it that can yellow will. In my experience, oil based paints have a tendency to yellow, at least the varnishes and urethanes.
-

help on painting bluegill or redear or sunfish
mark poulson replied to CL Rods's topic in Hard Baits
Red with underwear. That's bad. Good, but bad. -
help on painting bluegill or redear or sunfish
mark poulson replied to CL Rods's topic in Hard Baits
Color blind folk, take heart. Aaron Martens, of BASS fame, is color blind. And he does okay for himself. He and his mother, Carol Martens, were members of the Castaic Bass Club when he was younger, and she still comes to talk to us once or twice a year. So you shouldn't feel alone. Carol said he matches shades, and trys for contrast. If you look at the Roboworm color Aaron's Magic, you'll see it has contrasts between greens, browns, and reds. He thinks the contrast catches the attention of the bass, more than specific color. -
Hope you can manage a picture or two. Anyway, since it's a plastic lure, it has to be the solvent in the rattle can paint hasn't all evaporated. If the paint is stable, with no solvent left, even if the bond to the paint isn't great, the epoxy should just make a seamless shell over the lure. All I can figure is the solvent must have interfered with the curing process in the epoxy from the inside out.
-
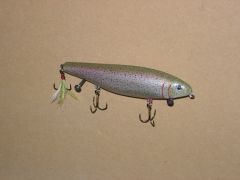 BASS13, Sorry to take so long to answer you. I forget about the posting on the gallery. The bait is wood, pine, and it's a topwater, lunker punker type lure. It's middle and back weighted, so it sits horizontal, but with 1/3 to 1/2 of the front out of the water. The trout where I fish, SoCal lakes, tend to be more silver, so I made this, and a couple of others, in this lighter scheme.
 -
Those look good enough to eat!
-
The rubber bands are a great idea. Thanks.
-
Bass caught on work time don't count! Nah, nah, nah. Congrats. At least you know that part of the day was productive. And you're right about the lure. I have a Splash-it tied on right now, waiting to get wet tomorrow morning. Now get back to work! Don't make me go all Donald Trump on you.
-
Try spraying a sealer coat of clear pastel fixative over your water based paint, and drying that with a hair dryer, before you epoxy.
-
Are they bubbles, or blisters? It's not clear to me which you have. Blisters are bubbles under the clear coat/paint that break the bond of the clear coat to the lure, and cause the surface finish to lift up in a blister. In my experience, those are caused by some sort of solvent being activated by heat under the clear coat. I think that is the result of not curing the paint well enough before top coating. Bubbles are within the clear coat. Again, in my experience, they are caused by air trapped during mixing. They won't get bigger after the epoxy is set, because the epoxy is semi-rigid, and too strong to be expanded by the trapped air. The final choice is a badly mixed clear coat, with unmixed materials beneath the finished clear coat. If the bubble spots aren't tacky to the touch, there may be uncured epoxy trapped within the layer of properly cured epoxy. Again, if the uncured portion is under the clear, it could cause a blister. If the uncured portion is within the top coat layer, the bubble wouldn't expand due to the strength of the cured material around it. I've never had an epoxy lure bubble pop once it's formed and cured. And I've had what looked like blisters form beneath the epoxy after a few trips, but they didn't raise the surface of the epoxy. Instead, they looked like a starburst pattern under the unbroken epoxy. I thought they might be due to micro fractures of the epoxy, so I brushed on some crazy glue to "seal" the spots again, and let it go at that. Soooo.......are they bubbles or blisters?
-
What kind of glitter coat did you use?
-
Devcon topcoat still tacky after 24 hrs...any ideas?
mark poulson replied to ChampionBoatGuy's topic in Hard Baits
One last idea. If you have tacky spots, or the whole lure still feels tacky, you can coat it with brush-on crazy glue, the kind that comes in a bottle with a brush. For some reason, this makes the epoxy harden. I've save a few lures this way. -
If it is a decal under clear, you might be able to scuff sand the clear, and then use some acetone to remove the decal. I've had some Lucky Craft decal finishes, on the Ghost Pointers and Craw cranks, wrinkle when I applied nail polish, so acetone should work.
-
Jamie, I think you hit on something really deep. Tool making/problem solving is probably deeply ingrained in our minds/DNA from the time we dropped down out of the trees (or, at least, some of us did Rookie ). I know, for me, that's the best part of any construction job I am on, or any lure I'm making. And making lures, and setting up my garage shop for painting and lure making is fun, but I'd still rather be fishing, solving that puzzle.
-
You can mix and match, too. I use Michael's spray glitter over Createx water based paints all the time. If you want to, you can "recoat" most rattle can paints after a short length of time, so you can build and blend colors relatively quickly. Just be sure to do it outside, or with good ventilation and a solvent respirator mask. The fumes are really bad for you.
-
You can make a bait by hand, and use rasps, files, sandpaper, and a dovetail saw or dremel tool to cut slots and drill holes, but, to make four or five at a time, power tools are the only way to go. A lot depends on what kind of lures you're making. If you're making poppers and cylindrical lures, a lathe is probably all you'd need, along with a cordless drill. For cranks and swimbaits, it gets a little more complicated. If you're rough cutting blank stock and cutting joints and lip slots, a small table saw. You could use a radial arm saw, but a table saw is much safer for most things. If you're predrilling for hook hangers, weighting, and hinge joints, a drill press. A cordless drill would work, but a drill press is much more accurate. If you're rough cutting to shape, a small bandsaw. This is to cut down on sanding. If you're refining the shape, to get to ready to paint, an oscillating sander. I have a combo spindle/belt sander. I only use the belt part. Depending on the belt, I can rough out a blank in about two minutes, and refine the shape and finish sand in another two minutes. I use a dust collector with my sander, and it's still dusty work. A mask and back fan are essential for me. Choose your poison.
-
rlcam, When I used to use rattle cans, I'd spray a clear coat between coats and let it cure for two days. Then I could do detail work, and wipe it off with paint thinner if I didn't like it or made a mistake, and not ruin the earlier coats.
-
If you want to just paint, then do like Pred says, and buy and repaint. That way, you have lures that you know work, and you can concentrate on learning how to paint. If you're eventually going to make your own lures, then get some lures you like, and try to copy them to start. Yours will be different enough that you don't have to worry about "knocking off" someone else's lures, and nothing teaches like trial and error. Plus, you will have a big, friendly "family" here for support. We've made enough mistakes between us that, if you read carefully and learn from our mistakes, you will make the perfect lure the first time! Good luck.
-
diemai, Did you use a wet grinder to shape that, and how long did it take? File steel is HARD!
-
CM, I don't have a clue. The guys who know, like Tater or Bruce, are probably in church, or out fishing.