


mark poulson
-
Posts
14,745 -
Joined
-
Last visited
-
Days Won
365
Content Type
Profiles
Articles
TU Classifieds
Glossary
Website Links
Forums
Gallery
Store
Everything posted by mark poulson
-
Do yourself a favor and talk to an accountant who specializes in small businesses, to get the info you really need, before you start. Even if you wind up having to pay them for their time (that's fair), you will save yourself a lot of headaches, and go into business with your eyes open, so there are no nasty surprises. If you let them know you are going to need an accountant, they may give you a price break if you agree to use them if and when you do go into business.
-
Be sure it gets up to 350 degrees Fahrenheit, or it won't cook your plastic properly.
-
I can tell you that, for me, I am no Ted Cadman magician when it comes to multiple powder coat colors. I still marvel at how much detail you can achieve!
-
I've found that building a lure with a V cross section, so there is less buoyant material at the thinner belly than at the thicker back and shoulders, helps with keeping a bait upright with minimal ballasting, depending on the material used.
-
I never used back to back screw eyes, because I wanted to be able to adjust the joint spacing before I finish painted my jointed swim baits. Plus the closing of the opened screw eye once it was installed was beyond my abilities. If you use the screw eye/hinge pin method, you can adjust your joint after you've sealed the bait for testing, so you can get the action you want before you do your painting. Just be sure to seal the screw eye holes with runny super glue before you run in your screw eyes, to prevent water intrusion. I suppose, once you get the optimum joint spacing on your first bait, you can just measure the amount of screw eye protruding, and the make all of your subsequent baits have the same spacing, but I have never been that clever.
-
KBS don't thin Titebond 3 haven't tried it. I have used Titebond 2, and I thin it 25% water, or until it's thin enough to be absorbed. Devcon 2 Ton 25% denatured alcohol AFTER the two epoxy component are thoroughly mixed I have some left over E tex and NuLuster epoxy, and they both wiil work when thinned the same way. Super glue don't thin I'm not sure you can even thin it before it sets. The runny stuff is so thin to begin with, I think there's no need to thin it.
-

Recommendations for Wire Looping Pliers
mark poulson replied to Michael Apostoliuk's topic in Wire Baits
You Dah Man! Hahaha -
First of all, welcome, and good luck. If you use the search feature under the Activity drop down on the upper left of this page, you can find a ton of advice on painting. It's worth taking the time to read as much as you can. Youtube had lots of air brushing videos that are helpful. Buy some cheap blue nitril gloves for painting. I only use one, on my left hand, since I'm right handed. It makes painting and cleanup a lot easier and faster. There are also Youtube videos on cleaning your air brush. Learn to do it, before you start painting, and make it a thing you do after each color. I keep a tupperware tub behind my paint station, so I can backflush easily between colors, and when I'm done for the day. Nothing frustrates me more than an airbrush that won't shoot right because it's got old paint in it, clogging up the paint passages and nozzle. And a dirty brush will take all the fun out of painting. Buy some Createx Air Brush Restorer, and use it to clean your air brush thoroughly every month if you're painting a lot. And never forget to clean the paint out of your air brush after you finish a session, or you'll be cursing yourself when you have to take it all apart and soak it overnight in the Restorer. Don't ask me how I know this. Hahaha Seriously, we've all done it, but try not to, because it's a pain the neck. And if you do have a problem, don't hesitate to post your problem here. The people here are not judgmental, and love to help each other.
-
As a hobby builder, I agree with you. But, if I were selling baits I think $270 wouldn't be a lot to spend on a machine that works, when I think of all the things I could be doing with the time it would take to make a successful bed. When I was in business for myself, I figured out pretty quickly that my time is my most valuable commodity. Ted (Cadman), you don't count. You're a magician.
-
I had not heard of this before. Please let us all know your results if you decide to try it.
-
Very nice work. Lousy pun. Hahaha
-
I used Sculpey clay, the one that bakes hard, and seal it with a clear acrylic before I pour my silicone around it. I'm sure there are lots of other choices. This just what I used "back in the day".
-
Beautiful bait! You are a really talented carver! The material you cast it from is probably of a different buoyancy than your wood master, so the two sections may have different fall rates, and may not fall level. That would put a bind into the hinge joint. I found that a really free moving joint is essential, since the water moving over the bait is not creating huge vortices (thank you Vodkaman Dave) at the speeds I typically swim a glide bait. I found those two things were key for me to get my glide baits to glide in an S pattern.
-
I use clear weed eater string, and it works. I even drill a hole and use it to make my spinnerbait to swimjig heads weedless, so I can throw them up into the tules and grass. I make these when a spinnerbait has been used so often, and caught so many fish, that I think the wire is tired and weak at the R bend. I clip the wire at the R bend, make a loop near the head, and then put the loop into a vise and use a pair of vise grips to twist the tag end back around the shaft toward the head. Even one+ twists is enough to make a solid bait, but I usually try for at least two.
-
It really is a thrill every time! Thanks.
-
This is what I found last Saturday. Fish are in the tules around flooded islands in shallower areas. Green pumpkin and black/blue wacky rig 6" senkos, fat 7" roboworms drop shot (MM3, Oxblood red flake), chatterbaits (GP Zako) and spinnerbaits (bluegill), 2.5 squarebills ( (delta red, bluegill) whopper plopper early, or at high tide near through spots with current. I'm going out again Monday. Hit me up after that.
-
How buoyant is it?
-
Feel better fast!
-
Dumb question time. I've dipped to make tubes a few times, but not a lot. I always used a rod, and dipped them vertically into my plastic. How is horizontal dipping different from how Roger Linnell does it?
-
Recommendations for Wire Looping Pliers
mark poulson replied to Michael Apostoliuk's topic in Wire Baits
I have a pair of 7" knipex pliers, and they bend up to .051 wire fine. I struggle with bend .062 wire with them. -
That's a great video! Thanks.
-
TW has them: https://www.tacklewarehouse.com/Owner_CPS_Centering_Pin_Spring/descpage-OCPSS.html
-
Hahaha That "great minds" thing is a stretch. I was pleasantly surprised when my first plopper, three years ago, actually plopped more loudly, and outfished my factory made ones, so, of course, I set about building them like crazy. I've learned enough now to be able to shape one in an hour, but fine tuning the plopping tail still involves test swimming, so it's far from an exact science. I did learn that having the tail just slightly down is key for me, because the PVC I carve it from is so buoyant that it won't plop at low speeds if it sits level. The original hangs down at more than a 45 degree angle, so it's tail is already turning by the time it gets up to even with the water's surface. A combination of a thinner "shaft" for the tail, with less buoyant material, plus additional belly weighting in the back part of the front section, allows me to adjust the angle of float at rest, and to get a good plop at low speeds. The actual cupped fins on my PVC tails are thin, so they do not have enough tensile strength to take impacts with hard objects, but fish up to seven pounds have eaten them with no breakage or damage. I typically coat them with gap filling super glue to provide some reinforcement, but I don't throw them around rocks.
-
I just posted a picture with build dimensions of a 4" PVC plopper I made a month ago. I let a 13 year old fish with it in a teen tournament I boated for, and he caught his three biggest keepers on it. I gave him my setup, warned him that my reel was set really loose, and he proceeded to put on a casting clinic, outfishing his 17 year old buddy from the back of the boat. I was blown away. He never backlashed once! I used it last Saturday to catch the big fish, 4.85#, in my club's tournament. It plops loudly, even on a slow retrieve, and lays almost level on the pause, so it doesn't pick up as many weeds when it lands. I carved the tail using a dremel with a small sanding drum. The paints are Createx, Wicked, and Folk Art, and the silver dots are "Big Silver Balls" nail polish.
-
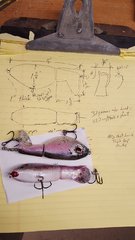 I wanted a smaller plopper that still had a deep, loud plop and cast well, so I made this. It weighs 32 grams, but is only 4" long. I made the front section with a deeper belly, so I could add more ballast lower, to make up for the shorter 2 1/2" front section. It worked, along with giving the front a V shaped profile, so there wasn't as much buoyant PVC in the belly. I also made the tail thinner from front to back, so it hangs just slightly tail down, and the helps it to plop at low speeds.

