


gunnie3035
-
Posts
648 -
Joined
-
Last visited
Content Type
Profiles
Articles
TU Classifieds
Glossary
Website Links
Forums
Gallery
Store
Everything posted by gunnie3035
-
They take 1/4" eyes, not sure what the mm conversion is......
-
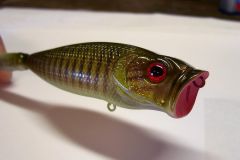
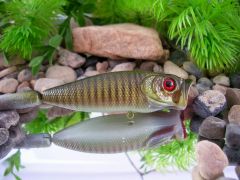
I've found if you go with a 50/50 mix of pearl copper & gold it will darken up the gold enough to see it better under the white. A tiny bit of black in the gold will darken it up nice too.
-
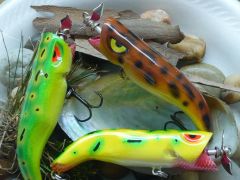
Here are the colors I use all transparent createx unless otherwise stated: plain white - cover the bait pearl gold -paint stripes down the laterial line using a hair comb, mist around eye, and paint straight down the back. light brown - paint stripes right next too the gold stripes using comb to cover the gold. dark brown - re-paint the top half of the light brown stripes only. sky blue [cant remember the official name] paint gill plates, tail section, light mist down the lower half of the bait. violet- mist down center of bait just below the laterial line and around the eye. chartreuse - paint breast orange - paint breast [over the chartreuse] shimmering gold [Wasco] - dust entire bait. med bass green [Wasco] - paint back and sides about 2/3 rds down the bait. dark bass green [Wasco] - paint back and shoulders shimmer green [Wasco] - dust all green areas You can get much more creative with scale material and so forth, but these are the colors and steps I use. PS: I do basically the same colors for perch and smallies too.
-
 I don't have the tail attached yet and the bill is not permanently glued in yet. I know my rat/mouse painting skills need some improvement.
 -
 I don't have the tail attached yet and the bill is not permanently glued in yet. I know my rat/mouse painting skills need some improvement.
 -
Ok boys, I finally got this thing to swim. I had to add 6 grams of lead to the tail section. I put a hook hanger for a tail mount and used a hitch-hiker screw-loc to attach the tail rather than gluing [Thanks Gator]. As Diemai suggested I had to add length to the bill. The first bill I tried was basically a long rectangle shape. I changed the shape just for eye apeal and its still a little bigger than I would like, but it kicks really nice. Width made little difference for some reason, but once you got more length it came to life. I built a couple for testing and I'm sure there will be more modifications in the future, but I would like to thank everyone for helping me out!!! I will post a picture in a few minutes......
-
 Sweet!!
 -
 Oustanding!!
 -
 resin
resin -
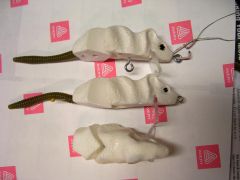
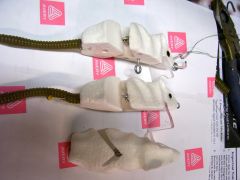
Its a work in progress, made out of allumilite rewsin
-
I took the tail off last night and it had little effect on the action of the bait. However, the tail did dampen the action of the bait so it is something to watch for. I moved the line tie undeneath the nose with little effect, but I didn't move it all the way back to the bill as suggested, that might just work. The tail section has no weight and is super bouyant, so I added a bunch of weight to where the the bait rested with the nose up and the tail just below the surface. I removed the bill and got a slight side to side wobble, not enough, but at least it was a sign of life. I also increased the distance between the joints, which should have helped, but it didn't. If possible I would like the bait to have no bill at all, this way I could add a rear hook and it wouldnt foul w/the front one. The jointed tail as suggested by Gator is a grand idea, I will try it out tonight. All I need is a little wobble from the front half and the tail action would be great. After staring at the bait for hours, I think the main problem is the shape. The flat bottom and streamline shape doesn't allow enough resistance from the water to enter the joint for a good kick. I may have to grind a little off the bottom to get a concave shape and maybe a little lip on the bottom rear. I still see no reason why this stupid thing shouldnt swim with a flat bill. If a guy wanted a twitch bait with 180 degree turn this is the bait. I may cut an old spoon in half and see if the cupped bill will make a difference.
-
Which model of Bob's 5" SB do you have? Doesnt it already have the rods to hold the insert?
-
Yes, I'm still using the worm as a tail. I just posted some new pictures of the ones I've been working on. Its probably an easy fix, but I'm stumped......
-
Any suggestions would be appreciated......
-
 Any suggestions would be appreciated......
 -
I built this 2 piece rat swimbait out of clay [see in my gallery pics]. I made the RTV molds and poured it out of resin. I got the resin mixture to exactly how I want it to sit/float in the water. But I cannot get this darn thing to swim at all. It would be a great twitch bait, but I'm after side to side wobble at slow speed. I've tried everything I can think of; ie, different sized bills, different bill angles, and added weight to all different parts of the bait. I've built a few wooden swims before and never had such a problem getting them to swim. This one is perfect and one of a kind. Any ideas other than the obvious ones I've already tried?? The only other ideas I've had is maybe a cupped bill or perhaps a different location on the line tie. P.S. I have a single hook near the joint on the front section of the bait. The line tie is straight out of the nose. And I've tried single screw eye joints as well as double screw eye joints. There has got to be a way to make this thing swim. Maybe the design/shape of the bait is just wrong?? I can post another picture if someone has an idea to make this work.
-
I made one of a Huddleston shad 2-3 years ago. It took a few trys, but the hook thing isn't really the problem. The problem comes when you pour the plastic over the weighted hook. You either get incomplete pours or dents from over heating the plastic. I vented the mold in several places and tried different types of plastic and never could come up with one I liked. It could probably be done using a hand-injector, but I wasn't really interested in taking it that far.. The mold I made was a simple 2 piece POP mold. If you place it just right on the first half of the mold you can get the hook to hold in place no problem. Making a weighted hook for these can be done faily easy using the clay stuff available from alumilite.
-
Where to get started making my own wooden lures?
gunnie3035 replied to mainbutter's topic in Hard Baits
Before you go spending big money on tools and such, why not just buy a few pre-made lure kits for $5-$6ea. Basically the same thing as building your own w/o all the shapping and sanding. It comes with all the hardware you need. If you decide it isn't for you then no big loss. -
I've seen it at Michael's by the gallon....
-
 I use a Iwata HPC Plus and an Iwata Hi-line brush. Since I don't have a quick change conection I get lazy and use the Plus most of the time. I used the PS900's for a while, but the hi-line brush is a way better tool. On this bait I only used the Plus.......
 -
 ..............
 -
..............
-
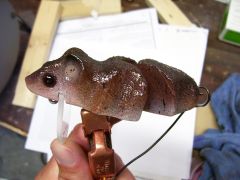
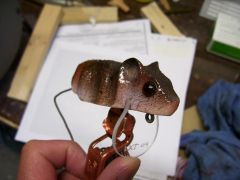
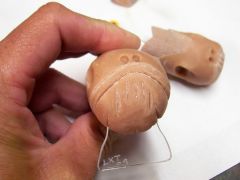
 Yup, Tater inspired me to carve this thing up. The only difference; Tater's is about 20x's better!! This moldels are made out of clay.
 -
Hard Tail on this one....
-
 Hard Tail on this one....