hillbilly1
TU Member-
Posts
179 -
Joined
-
Last visited
-
Days Won
3
Content Type
Profiles
Articles
TU Classifieds
Glossary
Website Links
Forums
Gallery
Store
Everything posted by hillbilly1
-
IMHO I would go with the small model enamel cans for models you can get a wide assortment of colors from pearls and candys to transparent's and can be picked up a wally-world. For the most used colors(white,black and green) I used krylon indoor out door then the normal D2T top coat. As for a dip Dick nite or you can use polyclearic from the local Hardware just dip and let stand I do 3 coats with a 30min set in between.
-
I keep my SI ducer on the bottom right of the transom with the center line even with the bottom. g3 1652 dk Im not sure if that the best place but it works for me
-
Is this the one AIR ERASER looks like it would work but the only draw back i see is the hopper size. IMHO I would go a little bigger if you have the PSI to push a larger SPOT BLASTER.
-
I use krylon indoor/outdoor after I wipe them down with DA Iv poured de-molded primed and painted all in an hour before but on average about 24hrs from de-mold to prime.
-
Boy aint that the truth
-
On the ones I pour I use a normal rattle can primer to help bond the base to the lure. If you want to do a createx base coat do a thin coat heat set and repeat till you get the coverage you want if you do a thick coat it will gum up and roll off with your fingers.
-
The burrs are the way to go. If you want a different profile use a forstner bit wile the balsa is still square and drill a large hole just a little below the center line then put the cup in it will give you a pop-r type profile on the face
-
-
-
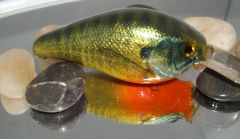
Foiled Photofinish Bluegill LC Fat CB MR
hillbilly1 commented on Big Bass Man's gallery image in Hard Baits
-
I think this is where occam's razor comes in
-
I see no reason to change if its what you have handy but a lot of guys twist their own screw eyes from SS wire which works real well. I use cotter pins a lot in my swimbaits i just pinch in some score lineson the shank to give them a little more holding power. super glue, Iv been weary of it for terminal connection points imho I would move up to a epoxy never know when a wall hanger will hit.
-
on a 4 segment bait I try to make the head at least 1/3 the length of the bait with the following 2 segments totaling a 1/4 of the overall length then back 1/3 for the tail seams to work. Like TT long head short waste and a long tail BBZ1 are the same. On a 3 segment bait same as the 4 a short waste. Then iv done some were they get shorter from nose to tail that worked. But over all the shape and profile of the segments will determine if it will swim or not iv made some really nice paper weights in my time.
-
Iv use any thing i can get my hands on from milk jugs to tape and lots of natural stuff iv used blades of grass to pine needles sometimes i can see the forest through the trees my problem is just seeing the trees.
-
Ah we are like peas in a pod Im with you on the split worked for me but it also has to do a lot with the lure its self IMHO the bigger and flatter the bait the easier it is or it may be my eyes
-
That is the way its done ben the cut of wheel will leave a smoother line than a knife any day also they will split the line ties and hook hangers to keep the seams strait
-
-
-
They only problem I see is the seams the may not line up after the repair and may have defects. I see one of 2 ways 1 cut the broken part from the top and CA glue it back to the bottom you will wind up with a hair line but this is just short term sooner or later it will break on that same hair line or 2 hold out for more oomoo then cut the broken peace off the top as strait as possible then make the top the bottom reset the master release then pour a new top this will be your best bet it will give youu a better seal and seam over all
-
First of all welcome aboard, Second the search function will be your big brother a lot of the answers you seek will be there, its quicker than a post that could take a day for a reply. IMHO dont try to out pace yourself just take your time measurements and notes as often as you can. Do as much R&D as you can stand. Theirs a ton of info and vids.on the web about air brushing, carving and just about any other aspect of the art "I mean art some of the guys here just blow my mind" The main thing is have fun and dont get discouraged after all 90% of us on here are still learning ourselves. Ok now down to brass tacks Q "What Dimensions and specifications" A "a google search will give you a lot of the info on certain type baits from length to weight" Q "What should I start to think about buying? An airbrush?" A "That will be determined by you if you want to go all in and get a air brush or do rattle can to start off with Iv seen a lot of good work done out of a can" second any compressor that will hold air will work just be sure to install (if not installed) a pressure regulator between the compressor and the air hose with the right fittings of course. Q "How should I attach the hooks" A "a lot of guys use the screw eyes some bend or twist wire and I use cotter pins that I doctor with score marks to hold them in" Q "Bill: How do I install this on the lure?" A "Some use slots cut in to the bait and glued in some use metal lips with screw" for the slot or any other peace of hard ware cut or drill it before you round it, it make keeping everything strait and true. As for when IMHO that is the last thing I do no paint on the lip and no tape to remove. Q "Carving: How much is actually required? I know to get the basic shape you need to but how hard is that to do? Could it also be done by a power sanding machine and round it? How do you even carve wood?" A "That will be determined buy the bait profile you want, a flat side crank bait is just that flat with rounded edges or a DT type that dosent have any flat surfaces, Its not hard, the sub strait will determine the difficulty Balsa being the easy est to shape it can be done with a sharp knife and sand paper Basswood being next then pine and on and on. The weight of the wood will help you decide, if its lite its a softer wood if its heavy (with all being the same dimensions of the block) leave it alone its more work than you need but iv seen nice baits made from oak and maple. IMHO one of the best things to own is a hand held belt sander (clamped to a table) it makes the profiling of a bait easy just go slow and remember you can all ways take a little more off but its hard as a dickens to put it back. In closing just be safe and have fun
-
the only ones that come to mind are the spot tail wounded flash and the gilmore jumper but that was way back when
-
Castin'Craft Casting Resin is good and water clear but durability is an issue if your wanting strong and clear clear polyester resin is the way to go but beware the fumes are hazardous I get a twitch every time I look at a can Alumilite all so has a clear casting resin
-
-
I think I read some where that it was a dis-continued machine from Rapala but dont hold me to it.
-
Melting Plastics In Acetone - Not Propionate Pellets
hillbilly1 replied to Ken-Spin's topic in Hard Baits
MMMMMMMM 5 guys Any who I tried the SOLO cups mix and got the same glob but I found out something I can extract the glob and make crank body but it takes a 2 days for it to fully cure.


