


hillbilly1
-
Posts
179 -
Joined
-
Last visited
-
Days Won
3
Content Type
Profiles
Articles
TU Classifieds
Glossary
Website Links
Forums
Gallery
Store
Everything posted by hillbilly1
-
Azek Pvc Cranks, Made One Day And Fished The Next
hillbilly1 replied to mark poulson's topic in Hard Baits
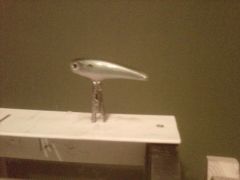
Nice Mark, Iv bean using the tuffboard (celled PVC) for most of my carved baits. Im still in the air about durability but so far Iv had now slipping in the line tie or the hook hangers so far so good. The one I posted for the HF airbrush thread is a tuffboard bait. I love using it just carve, foil, paint and top coat then its off to the races Still a great job -
 WOW pail wight zombie baits with glowing eyes I's Likes It's
 -
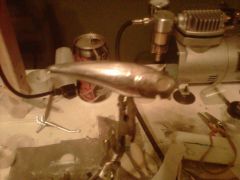
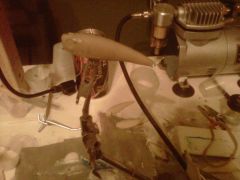
 Before top coat
 -
I second that Rayburn not trying to sound like a high school heath class but "protection protection protection" Any way I play with my HF brush a lot and this is what I done last night with the right stencil anything can happen

-
-
 This was done with a cheap Harbor Freight $15 airbrush with the right stencil its possible to get the pattern you are looking for just be creative an try to see the forest trough the trees. The stencil was made just using a pair of craft zig-zag scissors when cutting you will get a positive and a negative just take two positives or negatives and tape them with an angle wide at the head and thin at the tail that way you can get a tapered look and not just a wavy line
 -
Sorry for the late reply just thin the D2T with denatured alcohol dont use acetone if you have a leak it will destroy the seals in the brush or at least it did mine
-
Iv had one of the HF Deluxe air brush about 5 months now and I like it. I picked mine up for just top coating with epoxy and now I use it for just about every thing except fine lines and detail. for 15 bucks how can you go wrong if your like me just a disposable air brush if I screw it up im not out any cha-ching
-
Thanks guys for the reply's Im still tinkerin with it. Dave The rig together i made dose turn it in a figure 8 kind of with the full rotation looking more like an hour glass. Full rotation from top to bottom while raising and lowering opposing ends. I will tey to get a vid posted this weekend work permitting of course. redg8r Im keeping my resin cool to all most cold to give me a little more work time and to help with the plugging and starting the rotation steps.
-
For starters Love this place and all the info, so on with the show. I was casting some crankbaits the other day when I had a blow out on a mold. I thought to myself "What in the blue bloody blazes is going on". So I picked up the mold and demolded it before it had cured (first mistake) well resin was a drippin all over the place so I started rocking the molds to keep the resin from making a mess. In my distraught frame of mind I noticed that the resin had set with a concave profile. I took a solid bait mold and poured half of the normal amount of resin and plugged the fill hole with petroleum jelly and began to turn it off axis to coat the inside of the mold till it set. So low and behold I made a ! peace hollow body. So I started a new mold that has a solid plug with a modular type bill slot that can be inserted for cranks or removed for top water baits and a pin system to keep the line tie and hook hangers in place. The line tie pins are in 3 differant angles so I can adjust whether a crank chugger or a stick bait. I built a lure turner type rig that spins the mold in an off axis fashion to flow the resin evenly in the mold. Has any one had any luck with this type of spin casting? A enquiring mind wants to know
-
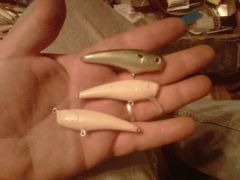 3 different prototype models a walk the dawg (top) a shallow crank (mid) and a chugger (bottom). All 3 are Alumilit based and hollow 1 peace from a modular mold that I made the has a removable slot for the bill. The hollow comes from an off axis spin casting rig that I came up with by accident. The mold is mounted in a lure turner type rig that I came up with.
 -
-
-
-
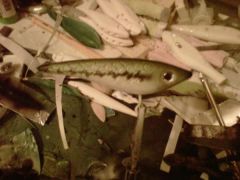
The original "Stick" bait what would you catch on that a stem bream may be.
-
Well as for a top coat I dont think it will work if i remember right PVC cement has a realty strong solvent in it so it would pro. just wipe the paint off. But for sealing wood it may work might have to give it a try myself. "While it is recommended that the cement be applied between 40-100 degrees F, weather conditions may not make this feasible. A strong solvent welded joint can be made at temperatures below freezing, as long as the cement is fluid, cure times are extended and other handling precautions are followed. Cements are available which are designed for temperatures outside of this temperature range – consult manufacturer’s web sites for more use and proper storage information." http://www.ppfahome.org/cements/faqcements.html It welds the pvc, I couldnt remember what it did
-
Got My Lure Turner Finished And Working But Have A
hillbilly1 replied to maachuu's topic in Hard Baits
I always just set the mixing cup I used by the turner and when it is stiff (30 min give or take for D2T) I switch it off and let dry for 24hrs. The mix cup will give you a good indicator when the epoxy has set it will differ from time to time the warmer it is the faster it will set up and the colder it is it will take a little longer. -
Walmart, ACE hardware, Homedepot and lowes carris it and I think Hobby Lobby has it As for the D2T Ace will order if you ask takes about 3 days but to me its worth the wait. Hobby Town USA also sells a 30min epoxy IMHO just as good as D2T.
-
Hope this helps
-
A couple of questions about the mold, is the pour hole on the top of the bait or at the ends and sometime if the mix is not mixed well the micro balloons can settle to one side or the other in clumps. Microballons can sometime float up through the resin if the A&B sides are really warm and thin I try to keep mine around 60f. Plus the direction of the pour can make a difference to. With some of my sold body cranks I pour tail first that way a lot of the microballons will settle around 2/3rds of the way back from the lip slot and give a good hard body at the belly weight area and give the bait a little more weight in the front for a nose down effect. For top water baits you want to do the opposite and pour from the nose down and some of the micros well settle closer to the the mid to nose area giving the bait a tail down effect with a little more weight in the rear than the nose. If you pour from the top of the bait the micros wont flow and shift as good and settle in different areas with a little more on one side or the other that will give you a roll or a bait when not moving to laying on its side which sometime is good for a good dead stick. When doing a top pour I plug the pour hole with petroleum jelly and turn the mold on its long axis until the resins sets up that way the micros wont settle in one spot and be allmost uniform through out the entire bait. Or you could do a mold like I made instead of the mold haves being on the vertical plane of the bait its on the horizontal plane that way I can pour the bottom with out micros. and the top with microballoons that way all the buoyancy will be at the top and the bait sets upright in the water.
-
Moron lure company
-
That has to be one of the best replies Iv read in a long time
-
That is one nice gill
-
The TAP clear is what I had on hand for making lips for crank bait that was the main reason for me to use it I haven't tried alumilite clear but when I run out of the Tap Im going to give it a shot. When playing around with resins trying different thicknesses and what not I all ways start out with small amounts I buy the smallest bottle of what ever I think might work and if it dosent I move to anther type and use what I had left over from the first on minor stuff like gluing body halves together or what ever I can think of (molds for soft plastics) or the prototype Im working on now that has Alumilite bottom and a balsa wood top to give the bait a low center of gravity and a good solid base for hook eyes. Microballons can be mixed into clear polyester resins (TAP clear lite) with ease just like regular Alumilite. Microballons after all they are just spun glass just like fiber glass. When using microballons and or polyester resins just one word "Respirator" the catalyst for the polyester resins can cause nervous system break down and microballons can cause silicosis when inhaled. Be safe and have fun
-
If you use a good RTV silly cone for the 2 piece molds it should be fine if the molds are to ridged then you run the risk of breaking both mold and lure. The best way that I have found is just like the vid say lay down a bed of modeling clay then inset the lure about half way in the clay then spray with release agent then pour your RTV over the lure let stand till cured. Remove clay with out moving the lure then spray with release agent and pour other half it gets to be quite simple after 2 or 3 molds. dont forget your key ways in the molding I did on my first and is all most imposable to get the halves to line up P.S. Alumilite white should be fine if its going to be a solid bait if its going to have chambers look for TAP Clear-Lite Casting Resin or some other Polyester Casting Resin

