

JSC
-
Posts
1,195 -
Joined
-
Last visited
-
Days Won
5
Content Type
Profiles
Articles
TU Classifieds
Glossary
Website Links
Forums
Gallery
Store
Everything posted by JSC
-
I don't know the area you are in ... But contact the following to find a Wholesaler in the area you are seeking service ... I thought that their web site would have the directory on it ?? JSC ---------------- Fishing Tackle Retailer serves the fishing tackle industry, and is the industry's only business-to-business sportfishing publication. Published 11 times a year, Fishing Tackle Retailer is available free only to qualified retailers, manufacturers, wholesalers, manufacturers' representatives, and other marketers of fishing tackle and related sportfishing products and services. The editorial focus is on retailers, providing to them valuable information for managing their businesses and increasing profits. Among the magazine's many regular features are industry statistics, market and sales trend analyses, reviews of new products, profiles of successful retailers, industry news, and how-to stories that offer merchandising tips and tactics. To contact the editor, call (407) 566-2277. For advertising information please contact our sales offices at: (407) 566-2459, or advertising@bassmaster.com
-
Hi have not used the anise star but had there website as a reference. Any one help out as to the difference ??? JSC
-
Turkey Let us know some more about the "Color Block" JSC
-
I have not purchased from this company but .... they have 16 oz for 18.91 ... the other is 43.29 ... daveh you might want to check this out ... Anise, Star Oil ... if different in composition ?? let us know/ JSC
-
Oldschoolbasser I agree 100% that the Ambassadors were the first major change to the old Bait Casters. (Coxe and another Co.? had a model that you disengaged the spool by pulling out on the handle) But Lew did Change to the "Low Profile", and as you mentioned the handles, was a mjor improvement, The disengage of the level wind on the cast and the narrow spool... We are back to "Knock Offs" but with improvements.. so I must have used the wrong term when I said "first major chages" sorry about that you are correct. KcDano The way I understand it Shakespeare built Fiberglass Anteneas at the last part of WWII and the rods were a "Spin Off" of that .... I remember an article or ad about that in relation to the "Howell Process" "Wonder Rods" ... Wish I had all the details ... I know I am not Old just getting Older and some things don't jump back real fast ... Ghost Sorry we hijacked your thread but some of this trivia can get some of us carried away. The advice King B gave you from getting his thumb and educating his Daughters thumb should give you a little more on getting Your "Thumb Educated" ... "Professional Over Runs" (BACKLASHES) are just a fact of life .. you just have to live with it and learn the art of bait casting by playing the wind and etc. Good Luck JSC
-
The "Inspired By" is an assumption of Mine (gotta watch words like that ) Shag Shaid carved the first of Lews Rod Handles and that was when he went to work with Lew ... Shag had mentioned the Hurd Supercaster to me before he went with Lew and if You add it all up it gave me the assumption (there is that word again) and I think it is accurate that this is where all of the basic design came from. Have tried to make a cast or 2 with mine but it is tough ... I purchased it from a customer of mine ... he had it to sell for a customer of his in Opp Alabama. I have some old fishin books and etc and I actualy have an ad for the Supercaster. Don't know about the tank antenas on the supercaster but do know that the Shakespeare "Wonder Rods" were made from them .. these were some of the first fiberglass rods. The supercaster was a steel one as you & I know .... wonder if any one else has an encounter with this combo ?? Later JSC
-
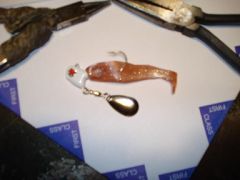 I had been asked about how it was completed. This is with a "Swim Bait" body and Indiana Blade. JSC
 -
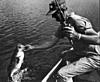
Ghost check and see the model number for the Lews Reel ... They were made first by Shamono then by Ryobi ... As suggested make sure it is clean and well lubed .. an excellent reel to learn with (and to use) I still use a couple (would be 3 but one of them was sent to the deep by a bush 10 ft of water with logs and limbs ) AD4000V Ryobi which was another number in Lews Reel. Lews BB1 was the first major change in bait casting reels (really it was inspired by the "Hurd Super Caster" as was the Lews Speed Sticks (originals with one handle and several "Blades" to change to for the kind of fishing you are doing). Attached is Pix for anyone who mite be intrested in this bit of Trivia. JSC
-
At the present it is the only kind of scent I am using .... tried most of the others and have not seen much diff in them ... at least it is not as messy. JSC
-
Nope its no spin cast reel ...... Revolving Spool ... is the name. A full spool cast better than a partial filled one ... I have been using them for the past 68 + or - years and I still get "Back Lashes" (or over runs or what have you) ... It is worth it for the accuracy that you get .. that being the number one plus ... use at least 12 lb. to start with. I have tried smaller but for me it does not do the job ... If I need smaller line I go the spinning route ... 12 to 17 lb. in monofiliment is my range ... Super braids is another story .. Get a 3/8 oz weight and practice then practice some more ..... later start changing the weight. Bassducer gave some good instructions and there is some literature out there that shows some diagrams ...... get some of that dollar a mile line and get with it. Good Luck JSC
-
Don't give up on one of the best tools we have. JSC
-
ottoman have you tried using the stirrer from the time you pour the plastic in ??? I have found it to be faster ... KBC .... I would kick that pot up and stir an ..... hour to cure is too long for me .. JSC
-
KBC I have not found a setting standard to Lees Pots ... The instructions on Del's site along with the use of a "dimmer" control is the best advice I have seen... when I use the Lee Pot I heat it up before any Plastic is added (I cure the Plastisol for this ops in the Micro Wave) and with glitter you have to keep stiring (I do not pour glitter in the Lees Pot ... use the Presto Cooker Route complete with stirer motor) ... I just saw a note somewhere as to not use below a certain point as it it subject to scorch or burn .. I have noticed if slow pouring that this will happen .. As you can see I have been just "Winging It " with the Lees pot .. It is constant Pour, Stir and adust heat ... You can not beat it for pouring small detail which is the only time I use them (I have 2 for 2 color pouring). Hope this helps a little. JSC
-
Great looking ... but one thing that caught my eye was the good old Red 5000 and the the good ol black one (the bearings on the black one were the first ball bearings on the Ambassador series and they were bad .. replaced them with Red bushings and you were in business) ... I "Palmed" them and have a permeanent calouse from the tension knob. JSC
-
Glad you got it .... But thank the guys on this forum that put me onto the exchange deal. Have A Good One JSC
-
jimcline I had quite a number of jigs that had been primed for painting and I had about 60% of them to "Bubble" on baking. JSC
-
dar3 This has been posted several times and I belive I got it off of Del's Site. JSC --------------------------------- Using Lee Production Pots By: Shawn Carnahan May 08, 2007 Pouring plastic with pots can be effectively accomplished, providing one simple rule is followed: The user must control the heat in each pot to keep the plastic at the correct temperature without over-heating. To accomplish this, the user must understand how the pot works and what accessories are needed for proper monitoring. How the Pot Works Production pots are heated using a heating coil similar to an electric stove element. This coil is located inside the casing of the pot, about one inch from the bottom. Power to the heating coil is controlled by a thermostatic switch which is located in the case behind the pot, and attached to a user control switch. A common misconception is that the thermostat switch adjusts the power level ( and thus the heat ) supplied to the heating coil. It does not. It simply turns full power on or off to the coil. The control knob on top of the thermostat is used to find the point at which electrical contact is made to supply full power to the coil. The numerical level of the knob for electrical contact can vary from pot to pot. The thermostat senses the radiant heat of the pot and opens or closes the electrical contacts depending on this radiant heat. This is important to understand if the pots are located in a very cold or hot location, as the surrounding air temperature can affect the temperature being sensed by the thermostat, and cause power to be supplied or turned off at incorrect pot temperatures. Having wind or a fan blowing directly on the pots can also affect thermostat operation. The biggest problem facing the user is that he has no way to tell when full power to the heating coil is on or off. Thus, he is always in danger of over-heating the plastic and burning it. With this in mind, I have developed several accessories and procedures to help keep plastic at the correct pouring temperature. Temperature Control Accessories Thermostat Power Light Adding a light to the thermostat power wire will enable the user to always tell whether the pot’s heat coil is on or off. The electrical wiring in the pot is very simple and can be seen by removing the cover plate the thermostat switch is mounted on. ( four ¼” hex-head screws ) I use a small 1” round night light with flat face for the thermostat light. These night lights can be found a Lowes. While at the store, also purchase four wire connectors ( per pot ) similar to the ones you will see attaching the wires to the heating coil, some electrical wire and superglue. Cut two 5” wires and attach one to each prong on the night light using the new wire connectors. Now, pull the wire connector leading from the thermostat to the heat coil ( at the thermostat side ), clip the connector off and attach a new connector which contains the original wire and one of the wires attached to the light. Re-attach the connector to the thermostat. Be very careful, the thermostat is fragile. Next, pull the power cord wire which attaches directly to the other side of the heating coil. Clip the connector off and attach a new connector containing the power cord wire and the remaining wire from the light. Re-attach the connector to the heat coil. Drill a 3/8” hole in the thermostat cover plate, centered and about ¾” from the existing mounting plate screw hole on the right side of the cover plate. Now, using superglue, attach the flat top side of the light to the underside of the cover plate over the hole you drilled, making sure it does not extend close to the cover plate edge where it might interfere with re-assembly. Once dry, re-assemble the cover plate, making sure none of the internal wires touch the thermostat or heating coil. If done correctly, the light will be on anytime power to the heat coil is on. Thermometers Thermometers must be used in each pot to monitor the actual heat of the plastic. Candy thermometers with a temperature range up to 400 degrees can be purchased at most local grocery stores. To get accurate readings, the thermometer should be suspended in the pot without touching the sides or bottom. I accomplish this by attaching a holder to each pot. Get a heavy gauge paper-clip and straighten it out. Bend a small loop at one end and then bend the loop 90 degrees from the straight wire. Attach the loop to the top of the pot with the paperclip wire pointing straight up, by removing one of the ¼” hex head screws holding down the weighted pouring bar. Now, bend the top of the wire down past 90 degrees towards the pot at a height that will allow your thermometer to hang in the pot , just out of contact with the side and bottom. Bend the last ¼” of the wire back upward to hold the thermometer in place. With the light and thermometer in place, you will have very precise control over the heat of your plastic. Here are some other tips to successful production pot use. Use a small diameter, 8” long wooden dowel in each pot to keep your plastic stirred. Do not use the glass thermometer for stirring unless you like glass in your worms. Plastic should be stirred every few minutes throughout the initial heating process, and between each mold pouring to ensure uniform color and flake mixtures. Pots should be kept filled above the level that the heating element is located to ensure uniform heating. I keep at least half the pot full when possible. As you start to empty out a pot during pouring, you will need to monitor the heat more closely. All plastics will begin to burn if they reach a sustained heat of over 375 degrees for more than a few minutes. CPC Plastic pours best at a sustained temperature of 340 - 350 degrees. LureCraft and MF Plastic pours best at a sustained temperature of 330 - 340 degrees. Make sure you pour in an area with good ventilation. Heated plastic is not good to breathe. I have a range hood with an exhaust fan above my pots in the garage with a vent pipe leading outside. I also use several box fans to keep air circulating, and I wear a dust mask. Do not pour indoors. The plastic smell permeates, and your non-fishing friends will not understand. To clean pots after use, allow the remaining plastic to cure completely. Remove the two screws holding the pouring bar on and set aside the bar and plunger. The plastic can usually be removed in one piece and stored for re-use when that color is needed again. Wipe out the inside of the pot with a paper towel and re-install the plunger and pouring bar. A small amount of WD-40 sprayed into the pot will keep it from rusting and also add some natural fish oil scent to your next pouring project.
-
DAR3 It is a job to cook the plastisol in a small Lees Pot ... Pouring with it is a lot easier but temp control on all of them (as others will testify) will vary a lot from pot to pot. I prefer when using the Lees Pot is to Micro Wave then use the Pot to pour ... Everyone to what works the best for you .. I will look up the tutorial on using a Lees Pot ... JSC
-
I noticed the note about "Core Shot" have not tried this as yet -- trying to set up pots to make multi color pours --- but I understand that "Mister Twister" discovered it when one of the "pourers" shot the color at the wrong time ... partialy fill the mold with one color then pour the core in last .... the way they poured it the lower came up the sides .. ?? Some of you that have done more of this what do you think ? Just a thought . JSC
-
Sounds Like a Flippin Stick to me ... FS but also from the way it is built. JSC
-
Thanks for the Tip Mike .. I gotta check out if they have a clear paint .. JSC
-
Jerry If You really want to build one ... pull a "Serach" in plastics for production pot (or other associated names) and you will find all kinds of information on this subject. JSC
-
Hey Del U do what the Dr. Say ..... Phenomia is nothing to mess with. JSC
-
KBC I too hope "river jigin" makes a bundle ... all I try to make is enough to keep me fishing. JSC
-
Just 2 cents worth. Bronze Back You guys do some really great work with wood & paint. JSC
