-
Posts
833 -
Joined
-
Last visited
-
Days Won
6
Content Type
Profiles
Articles
TU Classifieds
Glossary
Website Links
Forums
Gallery
Store
Everything posted by A-Mac
-
-
never worked w/ pvc, but on my swimbaits w wood i check boyancy after i first seal. i reckon w/ pvc you can throw it in at anytime. I mess w/ putting weight on the front and middle until it sits correctly. most important if it sits straight in the water. symetry helps w/ propper action... every lure has mistakes though and sometimes that one lure thats a little off is money for big sowbellies.
-
thanks, thats a good idea! never made the connection (especially since my multi colored sharpies are in the same drawer as my fibetts!).
-
as of right now i still buy some micro fibbetts to use as fins when i need specific colors. however, hobby lobby sells paintbrushes (white) that are nylon and practically the same thing as micro fibetts... for about a 20th the cost in comparison. has anyone tried painting these fibers? what about dyeing? any info appreciated
-
I think you guys locked into something more than just 3 vs. 4 sections. here is a simplified diagram of general fish swimming forms http://i270.photobucket.com/albums/jj100/amcalexa/fishforms.jpg I will say this before anything, your lure def has awsome action as a 4 section... But is this the right action? By changing from 3 to 4 sections you didn't make a sucker more realistic, you changed the actual fish that it could be percieved as (not saying that 3 or 4 sections is right or wrong, this is for the fish to decide). Look at the diagram, a blue fin tuna has thunniform swimming action while at the other end of the spectrum the sea lamprey has anguilliform. So here are some things to consider (just to make lure designing that much harder for everyone!) What is the swimming form of a gizzard shad to a cisco? What about a perch to a bluegill? Bass to a walleye? Another thing to consider. Say swimming action of a sucker is suppose to be like snax's 3 section lure. By changing is to a 4 section does this signal to the predator fish that the fish is injured (thus making the bait more vulnerable to predation and increasing chances of strikes) or does this change what the fish is actually percieved to be (which means that big o musky is just laughing at a sucker trying to swim like a lamprey?) -i am definately not putting your bait down w/ this post, just giving a new perspective (yours just happened to be a good one to critique for this). i definately want to hear a fishing report comparing each lure! i'm also interested to see what some of these guys can create w/ propper swimming forms of fish in mind.
-
yeah, don't waste your time with e-tex unless you are going to do it right. definately get some 1 or 3ml suringes. i work in an aquaculture lab facility so its a little bit easier to get larger needles. Otherwise, just take the needle off. I used to buy them at wally-world. Its an interesting circumstance when you describe your use for the needles as "mixing paints w/ it" and get an intriguing look from the cashier, like your cooking up a lil more than crankbaits in your basement. new paint scheme to come: icy meth: just take any createx color and add everything else in you house to it!... especially thin w/ windex!
-
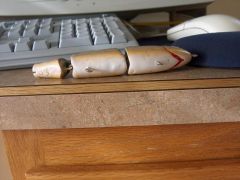
http://i270.photobucket.com/albums/jj100/amcalexa/IMG00077.jpg this is about what the lure looks like after both sides have been cut. Timed myself this time. It took about 35min to cut both sides, which is longer than I had expected. As you can see in the pics, lots of sand work still needs to be done. The only advantage of this machine is giving me guidlines to cut the defined portions of the bait and I don't have to use a saw for anything more than hacking off a chunk of wood. Overall, I wouldn't waste time building this one. I can see where it would be cool to do something big and just use a router bit that is more coarse. Like I said, the guy that did the plans to build this machine does larger replica fish mounts and not 5" bluegills.
-
hobby lobby has nylon brushes for pretty cheap... in comparison to micro fibetts. you can get white and a rust brown in there brushes and about 20 times the amount for the price of one pack of micros. also, has anyone tried painting micro fibetts? what should I use?
-
oops. my bad. didn't see that it was oversized 'til after i had posted.
-
this is my blank that i bolt to the table of the machine http://i270.photobucket.com/albums/jj100/amcalexa/IMG00075.jpg
-
here is my copy carver ------------------------------ moderator: Images oversized, linked instead ------------------------------ Image: http://i270.photobucket.com/albums/jj100/amcalexa/IMG00074.jpg Image: http://i270.photobucket.com/albums/jj100/amcalexa/IMG00073.jpg
-
-
Don't think I could have said it any better myself... Theres a lot of hype about cheap but quality airbrushes going around (airbrushcity). Some well respected guys have given these pretty good reviews. I am personally looking to check these out myself, especially since there are claims that these brushes are better than the high dollar ones. As for repaints, I personally like Enviro Tex gloss. This is a thinner coat than D2T and has less action alterations. You can find this at ACE and True Value hardwares (the stuff is used for tables and bar tops). Not to bash D2T. I use this stuff on my own cranks. The thicker coat gives the lure more durability and helps to smooth out the surface a little more than E-Tex. Good thing to apply these clear coats is just some cheap plastic brushes you get in the hundred packs from Hobby Lobby. I haven't had too many problems w/ loosing bristles and the price is right. Welcome to our addiction... and your wife's worst nightmare!
-
you can get balsa in most hardware shops (ACE) and hobby stores in a variety of lengths widths and depths. as for the lip punchout, i wish I had one of those. I cut my lips out w/ a fine tooth bandsaw. The hard part is getting that perfect arc... don't worry after a few dozen you start gettin good at it my recommendation for cutting lips out is to lay a template on your lexan. Since it comes w/ that plastic sheeting you can spray glue a sheet of crankbait lip outlines down. I had a buddy make some for me on his computer so that they are perfect. The more accurate your outline, the less sanding you will have to do.
-
-
All I can say is wow. Now those are some bluegill baits. Not only some of the best details on a mold I've ever seen, but some of the wildest paint schemes out there. Amazing work.
-
I paint my bait first. However, on my hinges I have just one set of eye screws (twisted wire) for each section. I cut my slots into the bait and run a wire up throught the eyes. I paint and clear before ever putting the bait together though. I learned my lesson the first time when I got epoxy on my hinges. Its also much easier to paint each section separate(especially when doing scale patterns). After clearing, I put the bait together (run my wire up through the eye screws) and put a dot of epoxy over the wire hole. It blends in pretty good and you don't have the risk of ruining a bait and wasting the several hours it takes to get to that stage. Thats my worth. Hope this helps.
-
-
Wish I could even consider selling a bait for only $25. Especially after you go through the hoops on just tryin to get one to work! Each bait design seems to have its own riddle to figure out. Plus, as soon as you make one good, you get another idea... all of a sudden your obsessed w/ making the perfect bait! then before too long, your in 5 times more money than what your first bait was... ITS MADNESS! AND IT NEVER STOPS!
-
those are killer!!! How do they swim? Reason why I ask, my bluegill (avatar) has the hard plast dorsal and ventral fins replaced w/ micro fibetts now. However, I experimented w/ pectorl fins and the bait didn't swim at all. I chopped off the pectorals and it swam perfect. nevertheless, amazing looking baits. Oh yeah, microfibetts are avail at sportmans warehouse. However, a nylon paint brush is the same and costs far less than buying individual microfibetts. I think the microfibetts were about 2 bucks apiece at sportsmans, which means that one of Marks lures has about 3-4 packs. You get about 30X that amount if you buy the brush packs from hobby lobby for about 5 bucks. However, your color is limited.
-
I did fail to mention that that timespan included inserting wire and weight which are quite time consuming too but are not necessary for a blank. So that was a poor choice of wording and an incorrect discription of a blank. However, making a blank to mount requres its own engineering for the machine (further down describes the blank). Nevertheless, if you can cut/carve/and sand smooth a 3 segment bait (without wires and weight) in 20 min you are pretty darn good and very efficient. My bluegill has 2 V shaped hinges and a hinge for the tail section. The hardest thing I encountered when doing this bait by hand is cutting these V hinge areas into the lure, just being barely off on these cuts causes a bait to lack perfect angles. Each hinge is made using 2 twisted wires (like what is shown for the hook placement). I was also using aspen, which is quite hard. The bulging belly of my gill holds weight/ rattle (so this section is cut in half, borred out, glued and resanded). The head of the bait has similar weighting. This bait has more definition then what meets the eye on the picture (defined gill plates) , which makes replicating by hand quite time consuming. The beauty of the copycarver is that it gives me a rough start on all the definition of this bait. My blank is actually the same size as the block of wood I start with and each segment of the lure is spaced with iron rods (so that instead of mounting each section and only cutting one segment at a time, I cut all 3 without re-mounting the blank more than twice (1 for each side). I'm mounting the blank right now w/ those insert nuts (that you pound into the wood base) so that it doesn't wobbled when cutting. Any imperfection in mounting of either the blank or the wood block results in an imperfect replica. The guy that designed the copycarver actually does fish replica mounts, which is why I thought it would be perfect. Its easier to make details on a 25" salmon than it is on a 4.5" bluegill using this machine. As much as I hate to admit it, I'm going to convert this bait to a plastic mold. I figure by doing this, I'll achieve a smooth surface (ready for paint), have my weight/rattle and wire for each section poured in. Haven't messed w/ plastic mold stuff yet, so thats a separate adventure. I hope to get pics of this soon.
-
i've been cramped w/ tryin to graduate from purdue lately (and studyin for GRE) so haven't done much w/ the copy carver. I will say this, IT WORKS! The bluegill as my avatar is what I've been making w/ it. The avatar isn't a copycarver fish; however, it's identical to ones I have made. This is not an easy machine to build though! Unless you have access to EXTREMELY precise tools this machine will not perform perfectly. The hardest thing I have encountered is making my blank (raw form of the bluegill bait) perfectly centered and alligned w/ raw piece of wood. The way it works is that you "carve" your lure using the machine and then flip the blank and the peice of wood over in order to cut the other side. The problem you will find is that if you have any wood block mounting errors the sides of the bait will not be symetrical. The copy carver does NOT cut a clean smooth surface, rough sanding is required. What the copy carver is good for is duplicating your bait. After sanding, your bait is identical to the one you copied. My gill takes about 4 hours to cut/carve/ sand/ by hand. With the copycarver, it takes about 30min to cut/carve and about 10min to sand smooth. Fun toy though, I have a feeling it has better places elsewhere than fishing lures. Still dangerous too! The router I had mounted first shot a blue flame 2ft into the air and was too hot to touch for over an hour!
-
I purposely encapsulate my crank lips with epoxy (in close proximity to the bait that is). However, I use balsa for my cranks and the area in which the lip is attached has constant strain. I typically don't worry too much about a little bit of epoxy getting away from me on the lip. It's clear and the fish don't seem to mind. However, fingerprinted epoxy is a different story.
-
hey nova! checked out your website. I mus say, your "Buzz the Mouse" buzzbait looks pretty cool. Figured I'd point that one out cause it definately caught my eye.


