

diemai
-
Posts
3,867 -
Joined
-
Last visited
-
Days Won
23
Content Type
Profiles
Articles
TU Classifieds
Glossary
Website Links
Forums
Gallery
Store
Everything posted by diemai
-
 Absolutely ingenious , Pete ! I have cracked my brain ocassionally on a similar hinge , made some brief sketches , but could not get a clue of it(haven't even tried to build one for testing) . If the hinge is moved sideward , does one part not move up,-or downward according to the pitch of the coils ? And I suppose , that you just interlock the two parts by pushing them together in the position shown , the pitched coils are sufficiently accurate to accommodate one another ? A truly great design , hats off to you:yes: ! greetz:yay: , diemai
 -
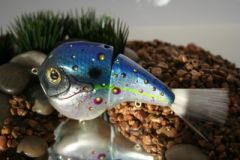
 I like the foil scale texture on this one , very nice lure:yes: ! greetz , diemai
 -
 What a BIGGGG nuisance:pissed: .........hope you'll still get it back:yes:! good luck , diemai
 -
 I do as well , very unique paint design ! Also the shape of body is one of it's own ! Well done lure:yay: , greetz , diemai
 -
 I love this color combiation , excellent for cold water over here ! .........and this sparkle on its belly......just marvellous:yes: ! Greetz , diemai
 -
@ LaPala Thanks for your explanation about the eyes , I have thought about something similar , but now you have provided details about how to make such eyes , thanks a lot , also for your hint about the screweye connection , one should really look closer ! @ SmokeyJ We can buy these jigs as well over here , I even have some as well , but never tried to build them at home . That "V" shaped tailfin causes them to sink down in circular movements , not just drop straight . Truly , that translation sucks , worst one , I've ever seen:( ! But I guess , no one speaks Finnish except the Finnish people themselves , its a language of its own , only slightly related to Hungarian , but to no other European language , not the Latin-based ones , nor the German/Scandinavian/English language family . I have a few of such lures with those typical Finnish "saddle lips"(translated from a German term) , hard for me to tell about their action , probably one would need two equal lures with different lips to be able to compare and figure out about subtle differences . As far as I can say , these lips do not provide deeper diving , I guess , 7 to 9 feet would be the absolute limit , depending on size and buoancy of the lure . The baits equipped with these lips are most likely of slender body shape and have a more or less oval cross-section , but some are also flat and curved , a little bit shaped like flounders . But what this lip actually does , is to prevent too much sideward roll of the bait around its lenght axis , they would rather move their heads/tails left and right , also these flat ones do that . This is the only significance , that I can tell on a short term, and just only due to your question , haven't even thought over it before ! greetz , diemai
-

Been a while, figured I'd put on a bluegill and golden shiner!!
diemai commented on b75nweav's gallery image in Hard Baits
 I like that bluegill pattern:yes:..........and.....not just a monkey , but a mature gorilla ! greetz , diemai
 -
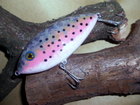
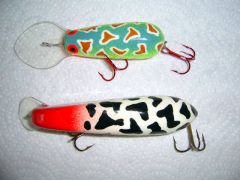
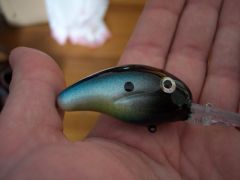
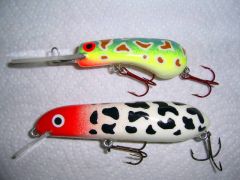 Here are two experiments basically turned on a lathe from broom handles . Only tried them in my bath tub so far , since local ponds are still iced up and we also have predators closing time locally . The smaller lure is 2 3/5" long(without lip) , a small lead sheet weight glued into its very rear causes it to float up horizontally at rest with only its back sticking out , and hopefully also provides better casting . It obviously digs straight down with a tight , high frequency roll of body around its length axis , it also slightly breaks out sideward and ocassionally tipping its nose downward . I guess , that I should have placed the line tie a little more forward to achieve a more regular swimming pattern , but I shall see and wait for first field-testing , I could always shave the lip a bit at its tip . The second lure I kept fatter at its rear , thus more buoyant and therefore able to carry its ballast weight(approx. 1/3 ounce) also in the rear . I did this for better casting performance;) , since I often fish from the bank , no boating allowed everywhere over here . The lure floats up nicely , and on a slow and medium retrieve it dives down and swings about 45
 -
@ rofish I am sure , that he took picture 10 only to display the way of connection . I have made two or three lures so far connected this way , and I did it as you have described in your statement #2 , so glueing in the eyes before , leaving them open in one section and bending them close with narrow pliers after connecting the sections . I can truly say , that this is quite finacky , and also requires very accurate positioning of the opposing pilot holes for widest possible swing of the hinge without binding . But since the eyes here appear to be a bit countersunk(thus the sections get closer together) , I also wonder , whether he did it this way , since you need a certain space between the sections to get inbetween with the pliers ! So it can also be possible , that he has done it like your option #1 , and if it should be so , I wonder , whether the bond would hold up just epoxying the screweyes into bigger holes ? And you cannot connect one pair of eyes and try to close the open eye of the second pair inside the opposing one , since there is not enough play in the first connection to poke through the second open eye , I've tried this before ! Probably he has only epoxied ONE eye in , but I haven't tried this before either . There might the problem again to guide it inside it's hole due to unsufficient play of the already connected sections(with first pair of eyes) . But I really can't tell , and there hardly would be different possibilities , I guess ? You are a good observer , this problem hasn't crossed my mind so far ! @ hazmail There are indeed some fine examples of Finnish luremaking displayed in there ! Most of these are not made for pike , but for trout and salmon . Finland has a lot of forrests and lakes and only about 4,5 millions citizens , the landscape and climate you could compare to Canada . One German angling magazine once stated , that , just by numbers , every citizen would have one fishing water for himself , a bit over the top , though , but much truth in it ! greetz , diemai
-
@ Milia B I order from Welcome to Moore's Lures , a smaller business in Wisconsin . Things seem to be a bit cheaper there , also smaller amounts of stuff may be ordered , and shipping overseas (as an European especially my concern) is often also cheaper since the bigger shops take certain fixed charges , no matter what you buy , Dick Moore only the real costs for postage . But right now he's having is annual winter shut down February thru March ! Greetz:yay: , diemai
-
@ Boogie1 I have been making 100's of spoons and spinnerblades(1 1/2" to 4 1/2" in length) through many years , I cut these out of sheet metal , that I gather from the scrabyard of my work . For spinnerblades I most likely use 0,5 millimetre thick stainless steel sheet , also 1,0 mm aluminium is possible , but not as versatile , since it can't be shiny polished . All blades can be painted or decorated with decal foil , stainless steel blades also can be heated to red glow after polishing to achieve a dark blue/purple/brownish color . Copper and brass sheet of 0,5 mm would be too soft and easily lose their cupped shape due to bending , but for small blades it should work out . Thicker blades of those materials would be too heavy and spin at a quite slow speed . Those 0,5 millimetre and 1,0 millimetre aluminium sheets can still be cut out with shears , previously marking their outer shape on the sheets by means of a metal marking template and a marker needle . After initial cutting out they are ground to final outer shape(filing in a vise takes a lot longer) . To put them into the cupped shape , I utilize a smaller ballpeen hammer and a plane steelplate/anvil . Well , this was all in very brief , feel free to call back in for more detailed info , if you're interested ! greetz , diemai PS: After reading again , I guess , that I may be at a wrong topic with this kind of blades , I am sorry to have misunderstood , but though , I'm not quite sure ! But if it should be so , just ignore my post !
-
 Mark , there is really a certain grade of "evolution" to be observed in these baits............wonder , what's up next:)! great lures:yay: , Dieter
 -
@ BrianB I am sorry about having misunderstood about that "Bob's Bobber" , such thing is almost unknown over here in Europe , I suppose:huh: . We only use similar devices , that are to be filled with water , but don't have internal weights . But these are most likely meant as casting weights , for smaller and/or shy fish you can rig a so-called "pilot float" between that bubble float and the hook , which would indicate a strike before the fish has to move the entire weight of the water-filled bubble float . These floats come in different shapes and sizes , elongated , round and oval , transparent and bright-clored , and you can rig them in a few different ways , sliding on the mainline or fixed , thru center or on their ends . Onto some you can even mount chemical lights for nightfishing . Well , sorry again about the little confusion , but thanks for the info , anyway ! greetz:yay: , diemai
-
@ JBlaze This looks pretty cool ! As it seems to me , one don't have to paint over it too much(only for smooth transitions of back and belly) , it surely looks good like this:yes: ! Certainly those round holographic pieces would also add flash to a lure , so I would not neccessarely try to remove them , at least not on all lures plated that way , even though it might not exactly resemble a living fish:wink: . And a few topcoats would surely achieve a smooth surface on the lures . Guess , that you have opened a new field for experiments with that clothing stuff;) ! good luck with it:yay: , diemai
-
 I'd second to that.....pretty much detail for 4 1/2" , ......and four sections plus tail , must have been a very tricky job ! Well done lure:yay:, diemai
 -
@ BrianB Don't know type , size and purpose of that mentioned "Bob's Bobber" , but I am sure , if it is not too tiny , you could turn it down with sandpaper in a drillpress . Made dozens and dozens of balsa floats that way , but cork or buoyant hard foam material might work out either , it really depends on the desired size . Smallest I have made this way were balsa pilot beads of approx. 1/2" diameter , carved out of square balsa dowels , but this gets quite finacky:yes: ! Basicly the proccess is done by fixing one end of the balsa dowel into the chuck of the drillpress and push the bottom end over a nail , clamped vertically in a fixed machine vise , acting as a center tip . With the drill running at high speed you can now cut the shape of your floats and bobbers with coarse and fine sandpaper . After drill a centered hole for the line to pass through . Another method to fix your material is to drill a small hole lengthwise through it , put some kind of metal rod(threaded one to fix with nuts either side of workpiece or plain one , slightly bigger than hole to fix just by tension) . That metal rod would be fixed into the chuck of the drillpress , the bottom end of it would be secured by a sufficiently sized bore in a piece of hardwood , clamped either into a rigid machine vise or directly fixed to the drillpress' table . Now you can shape the bobber/float again with sandpaper . After getting done with the shaping , you might glue a piece of plastic tubing into the center hole to reinforce it and to minor it's diameter for the potruding line . You can view some of my floats made this way here in the gallery under "Terminal Tackle" . OK , this was just in brief , for further info you may post again , a picture of that bobber and info on it's size would be fine , so that I could figure out better , whether knock-offs would be possible in that manner at all , that I've tried to describe . good luck , diemai
-
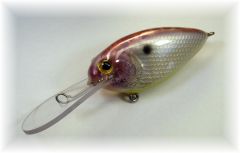
 @ pikester Thanks for your kind words . Actually I have at first tried it the way , that you described , but as pressing the foil against the lure , the texture has vanished:( ! Guess , the pressure of my fingers was too hard to keep the pattern in the foil ! So , after that I did it this way , very elaborate . By now I have found a video , watch it in the thread "seems that simple the Finnish way" , I think , the sponge method for foiling shown in there is the best and easiest way , I will definately try it ! But you can't go without topcoating , no way , paint won't stick on the bare foil ! greetz:yay: , diemai
 -
Hi , folks , here is another nice one from Finland , not a video this time , though . Came across it yesterday , it is a step-by-step picture sequence showing the construction of a fine , wooden swimbait . The author/builder hit it very smart , there is no text involved requiring translation , and still the single working steps are clear to follow(OK , maybe not about the eyes , I don't quite understand that:huh:) . He really did a good job on this one:yes: ! KALAMIES.COM :: N
-
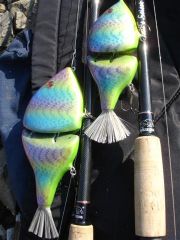
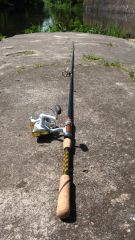 Very beautiful detailing of the grip and reel seat portion , turned out very nice ! And obviously it can handle those fierce fighting asp with ease ! well done:yay: , diemai
 -
@ MiliaB Wow , that's a big one , put pretty much versatile , as it seems ! Do 15 feet big white sharks go for 30" lures:huh: ? good luck:yay: , diemai
-
 @ 76gator I absolutely love this two baits , you have done a superbe job , such a great alikeness in paint pattern , wow :yay:! And thanks a lot about the mini-tut about bending the lip of the popper , I have planned on similar lures for years , but didn't know how to get such a cupped lip.... I was thinking , whether it would be possible to cut such a shape out of the bottom of some beverage clear plastic bottles:huh: ! greetz , diemai
 -
 I also like such patterns with a contrasting head portion , looks nice:yes: ! greetz:yay: , diemai
 -
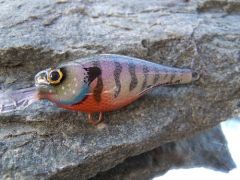
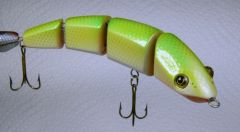
 It is somehow unlike the other swimbaits posted in here , a distinctive style of it's own:yes: ! The way of joining the sections , the attachement of the tail and also the "stepped" transitions between the single sections really make this bait very unique . I also like the way , that it is painted , especially the lateral line perfectly aligned section for section:yes: . But please forgive me , the tail fin pattern look reminded me somehow of an ancient dinosaur fossil at the very first glance:huh:.........but this surely only adds to the lures unique look . You have really achieved something special , it's a great lure ! greetz , diemai
 -
 Great foiling , especially fond of that embossed detail at the gill plates.......outstanding work , great lure ! greetz:yay: , diemai