

diemai
-
Posts
3,867 -
Joined
-
Last visited
-
Days Won
23
Content Type
Profiles
Articles
TU Classifieds
Glossary
Website Links
Forums
Gallery
Store
Everything posted by diemai
-
I own a few "Rapala Super Shad Rap's" , an excellent lure for pike . After some tinkerers had frequently weighted that originally floating lure to sink , Rapala came out with a sinking version a couple of years ago . Both versions do look absolutely identical , both are made of balsa , but the sinking version is weighted to be about 1,75 times heavier than the floating version . But if you work them , you will find , that the lighter floater is very "lively" , it kicks to wobble instantly , whereas the sinker acts rather sluggish , it takes about 2 feet of retrieve , before it makes the first sideward move , and its frequency of wobble and sideward moves are also not as pronounced as with the unweighted version . But still they do catch fish , I'd use the floaters in the warm season to work the shallows and the sinkers in fall , slowly worked along the bottom at up to 45 feet . greetz , diemai
-
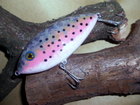
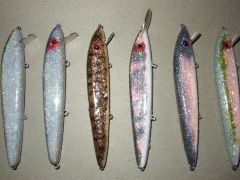
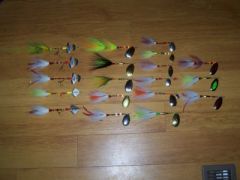 Not much to see on this pic , sadly , how about a close view of some single lures , in particular the double bladed baits:huh: ? greetz , diemai
 -
@ ricam I don't think , that glitter mixed right into the topcoat laquer would leave any pits and bumps , though I haven't done it before . I think , that this much depends on the amount of glitter mixed into it , if it is not too much , the single flakes would be entirely surrounded by the paint and set well with it on the lure . If there are more flakes in the laquer , they probably might stick together and make up for bumps on the surface . I utilize a water-based glitter jelly , that I smear on the lure with my finger , this way I can do different colors at different locations , but this sometimes also leaves bumps , but I don't bother too much . I guess , that these occur , when some particles come loose while brushing on epoxy , somehow bind upright between the other flakes and get epoxied in this position . Guess , one could sand or better file(very fine small file) such spots smooth , and apply a second coat of pure epoxy , but haven't tried this before . good luck , diemai
-
 This is cool , very nice and unusual idea ! Is it even rigid enough to hold those screws and eyes ? Or you have treated it in some ways in advance ? Reminds of an occasion , when they dug out a small feeder of my favourite swim , roots of lilypads , almost thick as a leg , came drifting by . Thought about drying it to try it for lure carving , but my wife was strictly against taking that crap home in our car , so I still don't know , wether it is suitable:( ? greetz , diemai
 -
My friend Jio has recently used pieces of window curtain , these provide an quite unusual pattern , but this really depends on the one , that you can get a hold on(but make sure , not straight off the bedroom window:huh:) . I get my netting from sewing and textile stores , I guess in English the stuff is called "tulle"(at least in my dictionary:huh:) . greetz:yay: , diemai
-
@ Snax Your definitions are just as we consider the bait styles around here , obviously there are big differences in classification between Europe and America , which really adds more to confusion ! greetz , diemai
-
@ red sox 58 I do it the same way like maverick , in addition I'd also cut some grooves into the base of the lip with a small "Dremel" router bit . good luck , diemai
-
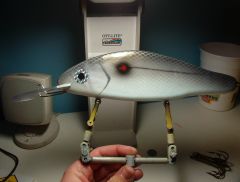
 Another nice trout pattern ! Obviously this is a plastic lure , so no thorough coating(inside the hinges) neccessary . To paint and coat jointed lures I have made myself a jig consisting of a narrow rectangular wood dowel piece and two large longshaft open eyescrews(the kind to hang heavier things on the wall) . The eyescrews are mounted on either end of the dowel , the openings facing toward the ends of it . I'd now take a wire double hook and attach the lure to one eyescrew with its linetie . For the rear hookeye I'd take a piece of thin , rigid cord(for kite flying), poke it through the eye and close the cord loop with two knots . The cord loop should just fit over open eye on the dowel , then I take a piece of rigid wire , put it through the cords loop and twist it up to get the lures sections under highest possible tension between the two open eyescrews , now I'd bend the wire in a way to engage into the eyescrew under the tension to prevent the cord from untwisting . This way you have attained the best possible space between the sections of the lure for a smaller brush to pass into . Though you should avoid putting clearcoat on the hinges , otherwise they would inavoidably bind . Since it's not a wood lure , it won't be neccessary to clearcoat in there , anyway . The wood dowel has to be narrow(more higher than wide) , to have free access to paint the belly/back, depending how you rig the lure into that jig . To keep it from falling aside , I fix one or two carpenter's clamps crosswise onto the dowel . I don't utilize a lure rotator , since my topcoats cure rather fast , otherwise you'd have to think about a way to fix that dowel with the lure attached into a rotator . good luck , diemai
 -
 Two sinking gliders , approx. 4" in length(without tail fin) , turned on a lathe . Weighted fore and aft to sink in about horizontally , the lure with the tail fin sinks about 6" , the other one one foot per second . Never know about the action of the tail fin glider , can't try it presently , sine all ponds in my vicinity are iced up . The other lure model works pretty fine , I have already made a few of these in the past , it tends to dart to either direction on subtle jerks . But no matter how much weight is placed into them , they'd always have a tendency to rise to the surface , to fish them deeper one always has to let them sink back again for some time inbetween the rod movements . My gratitude goes to FishPA for his input and advice about that tail fin bait:) ! greetz , diemai
 -
 Here are three more first attempts on foiling lures . The aluminium tape also has some netting mesh stuck underneath to achieve the scale pattern . The little "chunky" looking bait has been turned on a lathe and afterwards the flanks were cut flat and tapered towards the rear . Has a 1/2 ounce ballast weight located between lip and belly hook , but is still quite buoyant . Approx. 3 1/2" in length . The other two baits are carved from abachewood and sport an internal wire harness and "Finnish style" saddle lips , they are 4" in length without lip . I have estimated the ballast and glued in some roofing lead sheet together with the harness , so they hang quite deep on the surface at rest , but even with a wire leader attached they would not sink ! Tested all of them in my bathroom prior to painting with rattle cans , they all do work to my satisfaction . greetz , diemai
 -
 sorry , double post !
 -
:).............it's this certain sparkle ! greetz:yay: , diemai
-
@ MUSKY Have you called Dick Moore and asked about it , or just checked his (web) catalog ? He does try to obtain items , that are not listed in his catalog , you are even invited to contact him in such cases on the front leaf entry page of his(printed) catalog . I did this years ago , and he got the two ounce spoon blanks for me , that I'd been looking for:) ! Just give him a ring , but hurry , his annual vacation February thru March is at door ! good luck:yay: , diemai
-
 Here are my first baits , that I have covered with aluminium tape . The scale pattern I have made by first sticking some netting mesh onto the blanks with spray glue , someone on the forums in here wrote about it(sorry , I don't remember , who it was:huh:) , my gratitude goes to him;) ! Also I have shaped the lureblanks in a little different way , these are turned on a lathe and afterwards the sides have been cut flat on a routing machine . To cut them accurately and symetrical , I have left one of the square dowel ends on the turned blank , so I could utilize it for fixing it into the machine vise of the routing machine . I also furnished the lipslots that way . The baits are a sinking glider , 4" long , and two crankbaits , the striped one is 3 3/5" and the smallest one is 2 2/5" . The glider is weigthed fore and aft to sink level(with leader attached) at approx. 1 foot per second , the small crank has a leadshot in its rear for balance . The larger crank has a 1/4 ounce sinker in its belly between hook and lip , both lipped lures are floating . Painted with rattle cans and clear model making paint by "Revell" . Tried the cranks prior to painting , they work nicely , the glider is a downscaled version of a bigger lure , that I have made before , so I don't have any doubt , that it would also perform well . Thanks , TU , for my progress:wink: ! greetz , diemai
 -
 Very nicely colored and especially smooth surfaced glitter coats , you have done a good job on these , I really like their sparkle:) ! greetz:yay: , diemai
 -
@ keith combs Seems , that you won't need that much help anymore , at least not for jig making , lol:) ! Welcome aboard:wink: ! greetz , diemai
-
 I like that high bodied shape and also the lip configuration , and off course the paint job only adds to its beauty ! Kinda unique bait:yes: , greetz:yay: , diemai
 -
Quite funny , on a German site there was also a discussion on the same topic just about one or two weeks ago ! Most opinions in there were also saying , that this really depends on whether the lure painter is a left ,-or right handed person , resulting into which side of the lure would turn out better . greetz:yay: , diemai
-
 Hi , Mark , good to see , that you're back in business after your PC jammed ! Out of all your recent uploads I like this one best , the scales seem to be somehow textured , I remember, that you wrote about it somewhere before , achieving this by a certain paint method . Also I am fond of the way , that you have painted the tail , all in all a very good looking trout pattern . greetz:yay: , Dieter
 -
Back in school art lessons we have made some paintings with watercolors by putting dried leaves on a paper sheet as templates , then taking old tooth brushes full with paint rubbing it over a framed wire mesh(maybe 1/4" mesh), holding it a few inches above the paper sheet. Multiple passes with different colors and leave positions on the sheet made up for a nice visual effect . The distance and angle to the paper and the intensity of the rubbing alters the size and amount of released paintdrops , I guess . If my memory serves me right(was 35 years ago) , it was quite messy , lots of paint came to drip next to the paper sheet , not just on it:) ! Just an idea........... ! good luck:yay: , diemai
-
Congrats , Tater , now you obviously have your foot in the door to make it big some day ! all the best:yay: , diemai
-
 man , what a pike ..........thank God , that I am not kinda envious guy:huh: ! Congratulations:yay: ,diemai
