

diemai
-
Posts
3,867 -
Joined
-
Last visited
-
Days Won
23
Content Type
Profiles
Articles
TU Classifieds
Glossary
Website Links
Forums
Gallery
Store
Everything posted by diemai
-
 I like these baits , they look like our native bream in Europe ! Really nice work:yes: , greetz:yay: , diemai
 -
@ seafoam Don't know , whether you'd come to even read this again , but I just mean to advise you to think over your attitude concerning social behaviour . I may sometimes not know , what is going on(in this case I'd really tend to keep my "pie hole" shut , as you have stated in your obviously common terminology) but I surely do know , that with your abusive language you have offended the serious members of this site in a certain way . I won't add more to this ! diemai
-
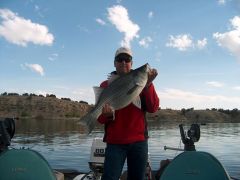 Hahaha , the basic rule is..........always leave the decision about a lure's quality to the fish ! Nice fish , greetz , diemai
 -
@ seafoam You have guts , man ! After having violated the forum rules you'd still come up with some kinda abusive language ! Probably you'd really better think about displaying your work elsewhere , since this is not a vanity playground ! diemai
-
 Somehow reminds of pop art styles from the late 60's and early 70's:huh: ! greets , diemai
 -
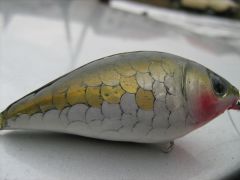 Seems , that you have foiled that lure by sticking on a lot of round foil punch-outs to achieve that scale pattern , must be very elaborate , but turned out pretty well , also with the two different colors ! welldone:yay: , greetz , diemai
 -
@ BrettD Check Lure Fishing UK , on their startsite click on the yellow lure for "links" . There are many , many suppliers and fishing-related sites listed there , worldwide . good luck:yay: , diemai
-
@ hazmail I really don't like spending time on making jigs , but I remember many years ago I have made just a handful of knock-offs of an obviously short-lived "Mann's" lure named "Dancer" . It is a vibrating lure with a leadweight on on it's nose(but unlike a "Cicada" the blade sits crosswise the retrieve direction) , so I cut out a jig , in fact a mold , from solid aluminium , that would accomodate the sheer blade firmly and same time I could cast the lead weight onto it , held by two holes through the blade filled up with lead , too . I used three days or so for that jig alone , only made maybe eight lures , by now lost all but two or three and haven't caught a single fish on them , maybe except one little perch , mut have been during the mid 90's ! But if I can't avoid it and no other chance , I would make jigs , no way , lol:lol: ! good luck with your hinges:yay: , diemai
-
@ hazmail Certainly with any kind of jigs working processes like that become easier , faster and more accurate , no doubt about it . I don't use them a lot , since any kind of mass production is too boring to me , have enough of that at my work:huh: ! I just always like to try out and design new and different lures , that's what excites me most about it , so I have never bothered about making a lot of jigs . greetz , diemai
-
@ gunnie3035 When a Belgian friend has sent me Etex years ago(was my first time using it) , he has clearly warned me to mix the stuff thorougly , also not using up the last remainder in the mixing cup , since the stuff would be easily prone to de-mixing . I haven't had proplems with it like you have now , but I did with different kinds of epoxy topcoat . There are also threads about it around , also on German sites , some say , that it happens due to touching the lure with fingers , since the skin emits small amounts of moisture or grease leaving it on the lures surface preventing proper adhesion on certain spots. Others say , that this happens , because the epoxy was not mixed in exactly required relations or it did not set a bit straight after mixing . I strongly believe in the latter statement , since the epoxy that I use , does that sometimes as well , but only with the first one or two lures out of a bunch of six to eight . I'd start to apply it fast after mixing , since it starts to cure pretty soon , if I notice , this de-mixing occurs on the first lures , I just take a little more epoxy and quickly brush the lures over before my mixture has turned too much to a jelly-like consistency , at this stage now it won't de-mix anymore . But I guess , that it really depends on the brand , that one is using ! good luck:yay: , diemai
-
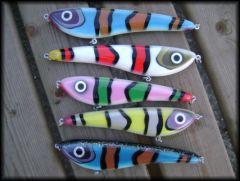 GEE , I just love these fancy colors:yes: ! Hippie lures ! very unique paint jobs:yay: , greets , diemai
 -
@ justwannafish Years ago I tried my hand on one "Reef Hawg" knock-off , just because I was curious about how to do that mouth and how the lure would act ! Well , I have a wood lathe and a small hobby routing machine with a crosswise moving table and a machine vise on it . That machine is quite inaccurate in its measurement and angles settings , so what I did is to fix the readily shaped blank in that vise(had to use wooden wedges due to the body taper for firm sit) with its head pointing slightly upward to make up for the angle of the mouth cut-out in reference of the length axis of lure(vieved from the side of lure) . The vise edges and the lure were in set in alignment(parallel) to the routers table . Since the mouth cut-out of the "Reef Hawg" is somewhat "V"-shaped as well(viewed from top or belly) , I had to unscrew the vise with the lure in it and set it at a certain angle in reference to the axis of the routing machines table . I have used an angle gauge , refering it to the edge of the table and the base edge of the vise . After now fixing the vise again onto the machines table I utilized a special disc router bit , that can cut slots approx. 1/5" X 3/5" deep , and cut the mouth on one side of the lure , bit by bit , refering to marked pencil lines at center and circumferrence of lure . A sawblade on a shaft fixed in the chuck would certainly do as well , but requires multiple passes always placed a little lower , since it's too thin to cut out the entire height of the groove at once . After I was done with one side , I losened the vise again from the table and swung it to the opposite direction , using the angle gauge again to set it correctly . Off course the workpiece must NOT be moved from its sit in the vise , nor the depth setting of the router bit must NOT be altered ! Now I could cut the other side of the mouth slot in the same manner as the first one . It was an interesting challenge for me , but still kinda PITA:huh: . I guess with only handtools , you could not go as accurate at all , its even difficult to clamb the tapered blank for saw cuts without causing blemishes in the wood . I think , a freehanded "Dremel" with cutting discs , saw blade and routers would be the only second option(plus files , sandpaper and stuff) , but requires extremly accurate pencil marking and cutting , also high grade eyeballing . good luck:yay: , diemai PS: hope , my stats are a bit understandable , since I lack approbiate knowledge in technical English:( !
-
 Have you tried whether your lure does swim well ? I may be wrong and I surely don't mean to make bad critics on your work:nuhuh: , just trying to help a bit:yes: . It's hard to tell on a distance , but I guess , that this lure would not work . In my opinion it seems to be quite flat-sided and thus probably does not have sufficient sideward stability to encounter the pressure on the big lip causing the lure to break out sideward too much . Every crankbait has to break out sideward , but the force of the retrieved line also has to cause it to track back every time , thus the lure wiggles . I assume , that your lure would just flip over on it's back and come back on the surface belly up . Also the pointing downward tail adds to this tendency. You may try to put some weight into the deepest part of it's belly to balance it , but I am afraid , that you cannot put enough weight and still keep the bait afloat . I've been there , done that , a bigger deep diving lip and a curved downward tail on a flat lurebody don't match easily , they cause problems . As you have stated , at first try making baits with their line tie on the body and with smaller shallow diving lips pointing more downward , these are easier to get to perform well . To answer your questions about topcoating your lures , just do a search through the forums in here , utilizing the search option on top right side of page , there are tons of info around . Just type in terms like "top coat" , "clear gloss" , "etex" , etc ........., for infos about beginner's luremaking type in "beginner" , "newbie" , "new to luremaking" ,etc..... , you will definetly find some discussions on those topics . good luck , diemai
 -
The exhaling on the freshly applied Etex really does work ! good luck , diemai
-
@ mark poulson Mark , though you might possibly not read this immediately due to your PC problems , I'd just like to say thanks for sharing your results and experiences ! I am sure , a lotta people(including myself) would certainly benefit from these for their own luremaking . greetz , Dieter
-
@ zisoua Not much to see on those pictures , suppose , that you mean a duplicating machine . Utilize the search function in here , use term "machine" or "duplicating machine" , or similar , there are definately threads and posts even containing videos around in here ! good luck , diemai
-
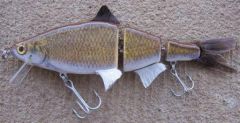
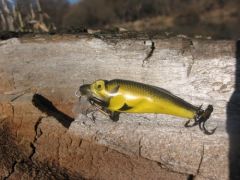 All of your latest lures in here have a unique outer shape , I always like such ! greetz , diemai
 -
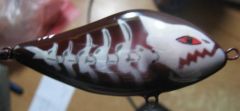 Must have swam in heavily polluted water:) ! Nice paintwork:yes: ! greetz , diemai
 -
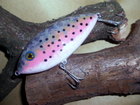
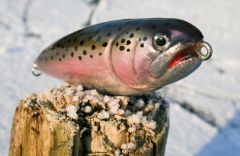 Another realistic and beautiful trout pattern:yes: ! I love such lures for summer evening piking ! well done , diemai
 -
 Rather a nightmare than a dream:eek:........but still very nice ! greetz:yay: , diemai
 -
@ cadman If I would mind sharing , I would not have posted at all ! And I guess , I won't even hijack this thread too much , since the subject is about the topic of the thread , I guess . Alright , but the problem is , that I am in Germany and I purchase the glitter flakes and topcoat from a local component mail order shop . So I can't give you any hints where to buy such in the United States . The cleargloss is described in their catalog as being origined from the auto industry and free from any solvents . And I remember to have read about such stuff here on TU recently before . It is quite smelly once mixed . The stuff is mixed 2:1(resin:hardener) and is much more fluid than epoxy , but provides a thinner coat . It does not drip , since it sets quite fast once it#s applied on a surface . Even in the mixing bin it starts to set to a jelly like consistency after approx. 20 min , you can still brush it at this stage , but you must apply more not to leave brush marks on your surface , since it starts to stick to previously applied strokes at this stage . I apply it also onto my wooden lures on top of two epoxy coats , since it cures a little harder than my epoxy does . Those glitter flakes come in different colors , I don't know any US mail order , that offers such , but you can check shops for home crafting , glass painting , sculpturing model clay , jewelry making , etc . , those craft things , that most likely ladies do . These shops should have such dry glitter chips and also the previously mentioned "glitter jelly" in multiple colors . The shop's site , where I get the stuff , is : HAKUMA ihr Spezialist für Köder, Kunstköder, Meeresangeln, Raubfisch angeln, Pilker, Wobbler, Fischen, Bleiguss, Formen, Ruten, Rollen, Dorsch angeln, Leng angeln in Norwegen, Dänemark, Hitra . Sorry , no English version available , I guess . To coat my homemade spoons (always do top side only) , I'd first buff the surface to clean off all corrosion layers(often use scrap metal) and to roughen up for better adhesion . Works with a rotating steel bristle brush , coarse sandpaper or even fine sandblasting alike . Apply one layer of top gloss and sprinkle on glitter flakes instantly , do this over a clean and kinked piece of paper , so that you gan gather remainder of chips again . After curing gently knock on workpiece , all lose particles would fall off , gather these again to re-use . If coverage is not sufficient , repeat process once more , but this is most likely not neccessary ! After paint over 2 to 4 times , this "bakes" the glitter particles together and makes the surface a bit more smooth(the smaller your particles are , the smoother the surface becomes) . This glitter/topgloss layer is quite resistant against abuse , of course at frequent rock , - or mussel contact it would come off in small chips at the edge of the spoon , but won't fail in larger portions . When mounting splitrings , try keeping these open with pliers , so they won't scratch over the finish . You can also paint patterns on top of the glitter coat , off course you need to re-coat in this case over the paint to protect it . Sorry , that I can't provide more assistance in terms of purchasing the material , especially the topcoat , try making a search in here , it was definately mentioned in here somewhere . For further questions feel free to contact me . good luck , diemai PS : Just an idea ....maybe the plastic pouring folks would know as well about sources for glitter flakes , since I guess , it is much of the same stuff embedded into their lures ?
-
@ GOONSDAD Thanks for converting......next time time your wife complains ...it's "zwei Bier , bitte" . After my experiences the first words foreign guys need to learn over here:tipsy: ! German is such a difficult language , even to Germans ! greetz:yay: , diemai
-
@ huntnxs Here are some pics about plating my homemade spoons with glitter chips , I just sprinkle these onto wet top gloss . Using 2 component clear gloss used in the auto industry , which starts to set on the workpiece within minutes , so no dripping , just leaving them laying on an old kitchen board to dry thorougly . Requires 2 to 4 coats on top of the glitter to finally bond them firmly , provides quite a resistant surface , but is also quite rough . If you only want a few flakes to "sparkle" on the blade , take some "glitter jelly" or "glitter glue"(a waterbased jelly containing metal flakes) and apply with your finger , after curing topcoat it . Don't think , that it bonds very well on polished metal surfaces , painted or somehow buffed blades would hold up better , I guess . good luck:yay: , diemai
-
@ allstate48 Just checked the Dutch mailorder site www.lureparts.nl (English version available) , there are 4 different pack sizes sold there , 60 , 118 , 473 and 944 millilitres . But don't ask me , what this is in fluid ounces ! But someone has posted a conversion link in here somewhere recently:wink: ! greetz , diemai
-
@ akjohno I 100% join in Pete's statement , you're finally hooked ! You've have gone through your first trial and error steps and you have succeeded ! I bet that you already have some new or different lure , or at least lip styles on your mind , that urge you to put to practice ! Congratulations , surely you have already learned quite a bit about the crankbait dynamics , and yet more lessons to come ! PS : I often make aluminium bibs for my lures as well , they don't look as professional as transparent ones , but they have the advantage to carefully bend them up/down to alter the lures action or bend them straight , if the lipslot should have turned out to be not accurately 90


