

diemai
-
Posts
3,867 -
Joined
-
Last visited
-
Days Won
23
Content Type
Profiles
Articles
TU Classifieds
Glossary
Website Links
Forums
Gallery
Store
Everything posted by diemai
-
@ Pallet Sorry , I can't help you in details , but you can find a lot of different suppliers links under Lure Fishing UK , on the startpage there just click on "links"(yellow lure) . Probably you need to look for musky spinnerbaits , since these are stronger made . good luck:yay: , diemai
-
 Always a great pleasure looking at your beauties:yes: ! greetz , diemai
 -
 Thanks for sharing:) ! greetz , diemai
 -
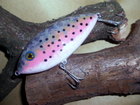
 I like the natural minnow look of the paint design ! I would switch the rear hook to a bigger , longshanked one , since the tips of the prop are potruding too much over the hookpoints , could result into less hook ups like this ! greetz , diemai
 -
 Welldone bunch of gliders , nice perch patterns ! greetz , diemai
 -
@ 76gator As far , as I can see by your pics , the silver , well performing lure has a different shape of lip , looking like somehow its corners are 45° cut off ? The other troubling lure has a fully rounded lip , as far as I can recognize . Also it seems to me , that the lip points slighly more forward(angle more pointed) and is also a tad longer . Very pointing forward lips and nose attachement do'nt match , it seems , that the lip sits at less than 45° to the center length axis ! With a lip like this I would have placed the linetie further downward the chin to reduce the leverage around the towpoint . Also a lip placed further towards the nose of a lure produces a higher frequency of wiggle as a same shaped and angled lip placed more to the rear , whereas the action pattern does not have to be neccessarely the same . At least this is stated in my literature ! The easiest way to cure your problem is to reduce the plane at the tip of the lip , thus shave it a bit and try for action again , it can't be that much material to be removed ! Maybe just grind the halfround shape to a triangle at first by making two equal straight edges on either side without even already shortening the overall length of lip ? You could also try to wrap some solder wire around the belly hook shank , if the lure is still buoyant enough and the looks won't disturb you ! I know by own experience , that it might just be possible , that two or more almost equal looking lures perform different or some not well at all , there are certain designs like that , only functioning within limited boundaries ! Whereas there are other "good-natured" designs , that forgive any possible mistake or altering without losing their fish-attracting appeal ! good luck:yay:, diemai
-
@ LooksLikeSinbad Years ago I have made a few knock-offs of a small commercial topwater , that is supposed to attract the fish simply by rocking it on the surface to get the skirt pulsating . Since the lurebody was turned on a lathe , I simply shaped a small round extension on the rear to push on the skirt and it worked pretty well . If my memory serves me right , the old "Hula Popper" , that 21xdc mentioned , has such an extension on its tail as well . When using screweyes(longest ones possible) to attach the rear hook , you might as well assemble a pop rivet head(eventually extend bore for the screweye to pass , when using smaller rivet) with the sreweye passing through , I have thought about that before , but never put it to practice . After the lure is completely done , you can just push on your skirt onto that rivet head before hook assembly. Make sure , that the potruding portion of the rivet head is long enough for your skirt to fit on . You may cut the rivet shank to approbiate length or either countersink it a bit into the lurebody , glue in screweye and rivet with epoxy glue thoroughly ! The skirt won't fit over the wide rim of the rivet head , to minor its diameter just firmly chuck the rivets shank(before eventually shortening it !) into a drillpress and take a smaller file to remove a good portion of the outer diameter of that rim , just leaving it sufficiently small to prevent the skirt from sliding down . File against turning direction , smoothen with a fine file and sandpaper . good luck:yay: , diemai
-
I have once swapped a "Swimwhizz" style plastic lure , that has been filled with BB's by someone . That guy obviously simply used a fitting brass wood screw(roundhead) , cut off most of the shank and epoxied it into the small hole , where he had inserted the BB's before . greetz , diemai
-
@ heinzc Welcome to Moore's Lures sells such a scale foil as well , in copper , gold and silver , I think 1 1/2" or 2" wide and you pay per foot ! greetz , diemai
-
@ MuskyGary They used to sell such ready-made holoform tape cut-outs for certain biggger saltwater pirk models at the German supplier HAKUMA ihr Spezialist f
-
I always like this deep-bellied shape of your cranks , gotta try my hand on one as well some day:yes: ! If you don't mind sharing ......, where is the bellyweight located , always at deepest part of belly or you even lead the belly screweye through a weight ? PS : You won't be able to spill as much booze in the water , anyway:sauced: , the fish would also eat that lure staying sober:yes: ! greetz , diemai
-
@ 21xdc I can imagine that , since making willowleaf blades at home gave me the biggest poblems , these are tricky , many a times they won't spin nicely . Try using so called "swing blades" , these are also elongated , but with rounded-off ends , these always kick to spin on a breeze . greetz , diemai
-
@ The_Rookie What a great kinda poetry:lol:! Merry Xmas , diemai
-
 What an ingeneous idea , I really like such different features on a lure , great design ! Good luck to you for further experiments:yay: ! Greetz , diemai
 -
 Thank you for your kind words , guys ! Mark , that weight is only a small piece of lead sheet , not more than probably 2 grams . Haven't tried the lure without that balance weight , probably it does minor the wiggle a bit , but trust me , that wobble is still very strong .
 -
 Thank you guys for your kind word , I really do appreciate them ! @ rofish Absolutely true , I wrote these statements before , it was about sinking jerks , if my memory serves me right . These lure here are made of medium buoyant wood , their shape is kinda "good natured"(meaning they are most likely working well)and I already had a little experience working with these materials and shapes . Actually there was no weight problem to solve , I just estimated , and I am almost sure , that these lures would also have worked without any extra weight as well . But since a little balance weight most likely lets a lure run more stable , I just added some , not much space in that slot anyway , the lead sheet pieces are only a few millimetres in size , maybe 7 X 3 X 1 mm , so not too heavy at all , just balance ! I intended to leave the lures buoyant from the start , if I wanted them to be deeper diving , I would maybe have used more dense wood for them , but in this case I would have faced weighting problems , indeed ! I guess , in this case I would have weighted them by drilling holes left AND right of the already assembled wire harness . greetz , Dieter
 -
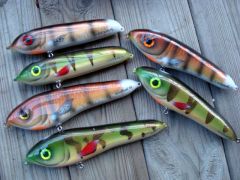
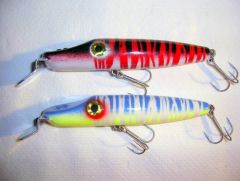
 Here are two model versions of the old "Pikie" , exactly 5" in length(without lip) . The baits are rigged with screw eyes , the homemade lip of aluminium sheet is glued and secured to the body with two small screws . The way , that I did the linetie , is more reliable , as you may think , provided , that lip and wire are thick and rigid sufficiently . Learned this method from the German translation of a Swedish lurebuilding book . I have caught a 47" pike , a friend of a friend a 66" silure with my lures rigged that way , no problem about durability ! Tried different "rubber-O-ring" rattlecan paint schemes on these , I like the looks of the white/blue/neonyellow one better , I'd surely get back to this combination one day . Both lures are weighted with a 4 grams lead shot behind their belly hook , and featured a lazier kind of wobble in my bath tub tests prior to painting . greetz , diemai
 -
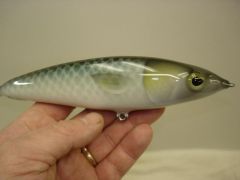
 Here are two lures glued together out of two halves of halfround pinewood dowels , with an internal wireharness inbetween . Both lures are painted with rattlecans , the jackpike pattern I sprayed trough slid over rubber-O-rings . I have uploaded a very similar lure months ago , but that one found his final rest on the bottom of the lake recently:( ! The one pictured here turned out to look very much alike to that lost one , but the lip is a bit different , this one won't run as deep(thus hopefully never keep the first one company:wink:) . greetz , diemai
 -
 @ bbduc Thanks a lot , that tube is just slid over the two open shanks of the wire eye , only the linetie eye is closed by a coil wrapped all the way down to the tubing , so it can't slide up anmore . I have found it easier that way than also wrapping a coil to close the lip-attaching eye , though it was a PITA to slide over the tubing over the very short shank !
 -
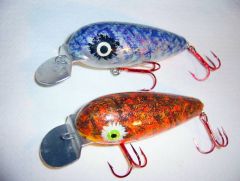
 Turned these two out of a lightwood broom handle and after sanded the rear portion of the round spindle-shaped blanks to their unsymetrical shape . The smaller deep diver is about 2 1/2" in length(without lip) , the other one a bit more than 3" . I find the outer shape of the longer lure just ugly somehow ! I even had doubt , whether this lure shape would provide good action at all , but during my bath tub tests prior to painting it did ! Only balanced the lures with some lead sheet pieces glued into the belly slot accomodating the internal wire harness , so the bigger lure turned out to be very buoyant , won't dive that deep , I suppose . I am pretty much satisfied with the smaller crankbait , a proven shape anyway , it features a tight wobble of a high frequency , almost kinda vibrating . Thanks to the guys here on TU that have encouraged me with their work to try out this certain lip/wireharness configuration for deep diving lures , it really took me further ! Both lures are rattlecan painted and covered with glitter jelly before topcoating . greetz , diemai
 -
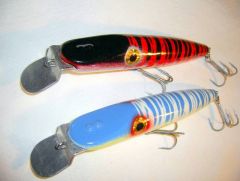
 Here are two model versions of a "Bomber" , that I've made after a member submitted tutorial here on TU . Thanks to Terrydabassman for having it provided for us:yay: ! These are unweighted , and , against my habit , just like in the tut I did not rig the hooks with splitrings but straight to open screweyes , so they can't tangle . But unlike described in the tutorial I have secured the lip with an extra internal woodscrew , right ahead of the front eyescrew(also passing through the lip internally) and countersunk into the body . Since I don't have those special line attachement links in stock , and I can't buy'em over here , I have made a wire connector to rig to the lip , was a bit finacky to bend it on the finished lures(yet without hooks) , but not a real problem . Tried them prior to painting , they do work allright , no overturning nor breaking out sideward , no complaints ! Painted this two with my rattlecans , also plated them with some glitter-jelly in matching colors prior to topcoating . greetz , diemai
 -
Here are two model versions of a "Bomber" , that I've made after a member submitted tutorial here on TU . Thanks to Terrydabassman for having it provided for us:yay: ! These are unweighted , and , against my habit , just like in the tut I did not rig the hooks with splitrings but straight to open screweyes , so they can't tangle . But unlike described in the tutorial I have secured the lip with an extra internal woodscrew , right ahead of the front eyescrew(also passing through the lip internally) and countersunk into the body . Since I don't have those special line attachement links in stock , and I can't buy'em over here , I have made a wire connector to rig to the lip , was a bit finacky to bend it on the finished lures(yet without hooks) , but not a real problem . Tried them prior to painting , they do work allright , no overturning nor breaking out sideward , no complaints ! Painted this two with my rattlecans , also plated them with some glitter-jelly in matching colors prior to topcoating . greetz , diemai
-
 Two more model versions of that lure , this time made with a deeply cupped tail portion . The lures are approx. 2 1/3" in length(without lip) , a small lead sheet weight has been glued into their belly slot as far to the front of lure as possible to assure a head-down swimming position at rest . Though this results into minor casting performance , it is yet essential for proper function of the lures . On a short , sharp jerk the lure would dive down with a strong wobble , generating a gurgling/popping sound and a small "explosion" of bubbles on the surface . Tested the action in my bath tub , but outdoors it would work a lot better , I suppose . With a thin and shot wire leader attached the lure hangs at about 45


