

diemai
-
Posts
3,867 -
Joined
-
Last visited
-
Days Won
23
Content Type
Profiles
Articles
TU Classifieds
Glossary
Website Links
Forums
Gallery
Store
Everything posted by diemai
-
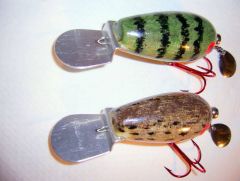
 Two more model versions of that lure , this time made with a deeply cupped tail portion . The lures are approx. 2 1/3" in length(without lip) , a small lead sheet weight has been glued into their belly slot as far to the front of lure as possible to assure a head-down swimming position at rest . Though this results into minor casting performance , it is yet essential for proper function of the lures . On a short , sharp jerk the lure would dive down with a strong wobble , generating a gurgling/popping sound and a small "explosion" of bubbles on the surface . Tested the action in my bath tub , but outdoors it would work a lot better , I suppose . With a thin and shot wire leader attached the lure hangs at about 45
 -
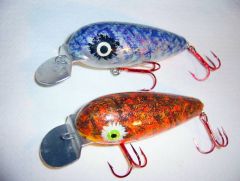
 Here are two different model versions of that "Go Deeper Crab" , made these a little shorter(approx. 2" without lip) and rigged a small spinner to the tail . Due to being quite small I have only rigged one larger treble . Made in the same manner like those previous "Go Deeper Crab" versions , these have a small balance lead sheet weight glued in right ahead of the hookhanger . I assume that the weight of the spinnerblade arrangement at the rear would still provide a good casting performance , probably I could still rig a little large blades , since the lures wobbling action is very strong , as I found out in bath tub tests prior to painting . I brush-painted these trying to resemble two local species of perch , so that it would look like these are struggling to eat a small minnow . Hoping to attract larger perch that way , since these are very envious fish , they begrudge their fellow perch about the prey and try to grab it themselves , often had perch doubles hooked on each treble of a lure:yes: ! greetz , diemai
 -
I'd just like to join in and wish everyone a Merry Christmas and a Happy New Year . All the best:yay: , diemai
-
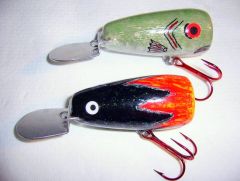
 Two more made after an oldtime design , also lathe-turned . Body length is 3" , through-wired in a slot cut in their bellies . The wood , that I used , is medium buoyant , the lures have two balance weights fore and aft the belly hook hanger , these are small pieces of roofing lead sheet glued in together with the internal wire form . Tested them in my bath tub prior to painting , they feature a bit of a "lazier" wiggle , but certainly do work OK . Also painted with modelmaking enamels , since it would have been too tricky to mask the lip for spraying . Have also applied some glitter-jelly prior to topcoating them with several layers of epoxy and automotive 2k topgloss . greetz , diemai
 -
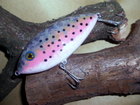
 Two of my latest lures , made after historic example . Since I have made one like this about two months ago , I decided to build some more , since I am quite convinced about their violent wobbling action . Turned from buoyant wood(broom handle) , they would not dive too deep , maybe only 5 to 7 feet , but this was not my goal of design , anyway . I'd rather use them to bounce the bottom of shallower swims , so they'd rise off obstacles rather quick . Body length is a bit more than 2 1/2" , the lip is made of 1mm aluminium sheet , through wired in a slot cut in their bellies . Glued in a piece of roofing lead sheet into that slot as well , located at fattest part of body at the rear , this would surely improve the casting performance . Brush-painted with "Revell" modelmaking enamels , found it to finacky to mask the lip for spraying with my rattlecans . greetz , diemai
 -
@ Helmout Many years ago , at the beginning of my luremaking career , I have made maybe a few hundreds of spoons and spinnerblades out of stainless steel , copper and brass sheet . A certain share of these I have also painted . For best possible adhesion of the paint design you must at first roughen up and clean the metals surface , I did this at my work by sandblasting , but rough sanding and/or cleaning it up with a rotating steel bristled brush(drillpress)would work as well . Counting for copper and brass , all tarnished surfaces must be cleaned down to the bare metal . Well , I have primed the blades/spoons with ordinary solvent based white primer paint from the local tool store , but nowadays I switched to acrylic based primer , due to better compatibility with other different kinda paints . The coloration I always did with "Revell" modelmaking enamels , off course by hand-brushing , only a few I have lateron also painted with rattlecans . In earlier days I used to seal the designs off with a few layers of ordinary solvent based clear lacquer , but soon I switched over to a certain kinda 2 component clear gloss , said to be coming from the auto industry , two to three coats of this are OK for sufficient coverage . Probably you might as well use epoxy for it , but I never did , since that 2 component lacquer dries a lot quicker , no problems about paint flowing like with epoxy . Prior to this one I'd apply one or two layers of acrylic clear paint onto the paint design , since sometimes some paints might get dissolved by certain kinds of cleargloss , so this is a kinda protective coat . I have found my metal coloration method to be quite durable , once I needed a certain blade shiny polished , so I took an old , painted one to clean off the paint again , it was a real PITA to get off all of the paint with that rotating steel bristle brush ! Off course the paint chips away on the edges occasionally , due to contact with rocks , mussels, etc. , but never to an extend of bigger portions coming off . BTW : I have also ocassionally purchased readily colored spinnerblades from various US mailorder stores . I have found these paints vulnerable to the softeners containing in plastic lures , when stored together . After one sticky mess , I have sealed those blades also with that 2 component automotive lacquer , and no such problems anymore ! good luck:yay: , diemai
-
@ Wilbur311 I always re-draw it whilst sanding , before it vanishes completely . But if the bait is not of too complexe shape , I'd mark and drill my pilot holes for eyescrews , or cut the belly slot for internal wire harness and the lip slot prior to rounding it off by sanding . Meaning , that at this stage only the outline of the the bait is cut out and smoothened , the sides(flanks) are still parallel plane . So the centerline isn't that important anymore , though a good aid for eyeballing for symetry ! good luck:yay: , diemai
-
By all of you guys posts I now see the sense in measuring in weight , not in volume , it's just logical ! And the two ingredients definately do have different weights , since in my small mixing cups the hardener always swims above the resin(or vice-versa ?) . I can clearly observe this , when waiting for the stuff to fall level to the cup's marker lines , the catalist has a slighly darker color ! It's just like oil swimming on water ! But for the very small amounts , that I mix for one painting proccess(max . 0,006 litres !) , the error measuring by volume would not be that much in relation to mix larger quantities that way , I guess(ever been poor concerning maths:huh:) ? And I have made my experiences doing it that way , at first once or twice the finish remained tacky , but now I get it straight time after time . greetz , diemai
-
@ jflures Thanks about that hint , checked that VMC site for these sureset hooks , since I did not quite know about them . Suppose , that they are quite new on the market ? Things , that proove to be successful in the US , most likely do come over here a little later , obviously . Haven't seen them on the trays of tackle shops before , only on a new model of a "Rapala" bait . But it seems logical , that this hook increases hook-up rates with its one big wide gap hook bend potruding widely over the lures edge:yes: ! greetz , diemai
-
@ mark poulson Hi , Mark , thanks for sharing your experiences with that different method , I'm really eager to see some (detail)pictures , after you're done;) ! greetz:yay: , Dieter
-
 Nice foiling , for only 20+ grams it must be quite a small lure:? ? greetz , diemai
 -
@ mouldybits You could make 2 , 3 , 5 or even 10 "identical" lures of wood after the same template , even out of only one woodboard , and there would always be one amongst them , that you will consider to have a better action than the rest of them ! It is simply handwork with a natural material , but the differences would be subtle ! The more accurately you work them down one by one , the greater their alikeness would be , but never 100% the same ! Mark has already said it all ! good luck , diemai
-
@ Terrydabassman Got pain in my belly of laughter , thanks for sharing ! .........really should have said sumthin' ! merry Xmas to you too:yay: , diemai
-
@ bassman843 Don't know about jig hooks , but concerning their trebles , the Gamakatsu brand is sharper and of better quality . But at least over here in Germany they are also more expensive . The VMC , Mustad and Eagle Claw trebles , that I rig onto most of my lures , offer good quality at a reasonable price:yes: . But onto my jigging spoons I exclusively rig the ones from Gamakatsu , since the fish sometimes are only curious about that bottom-dancing lure and "bump their nose onto it" , and the Gamakatsu's are the only ones , that I know to still nail them like that ! greetz , diemai
-
It's just incredible , can't find words:) ! hats off to you , diemai
-
@ mark poulson Thanks , Mark , but I guess , it's not talent about my eyeballing , I just got used to it from my work in the metal industry . I am grinding carbide hobs within tolerances of just a few 1/1000s of a millimetre , and to have it easier to set the grinding wheels into the hob's profiles(and also other work-related operations) , I have practised my eyeballing abilities for many years , it's just faster that way than handling different measuring devices . But that doesn't mean that I am also as accurate as that few microns , lol:lol: ! Greetz , Dieter
-
@ XLBASS In this case you might also utilze a "Dremel" with a cutting disc or a round sawblade(if the baits are not too large , since you could only go about 2/3" to 3/4" deep with that tiny tools) . But this requires very accurate eyeballing , you have a little option to enlarge parts of the slot a fraction bigger as the lip thickness to fool around about getting the right angle for glueing the lip in . This "Dremel" operation I do just by my two hands , without fixing the workpiece somewhere . When I have to place readily shaped blanks in a vise , I'd put a piece of very soft grained balsa on either side of the vise's clambs , so the lure won't get squeezed , you might as well tape some pieces of cardboard box together for that purpose ! Greetz , diemai
-
@ XLBASS Yep , like said before , when blank is still in a blockform , its the most accurate way , that you could go . When not utilizing a bandsaw but just handsaws , you could pencil-mark your slot by means of a geometric sketching triangle or an 90° angle gauge and strictly follow the marker lines with your sawblade . Take care not to clamb that softer balsa too hard in the vise whilst cutting , since it might get squeezed too much , probably support it with your free hand . good luck , diemai
-
 There is something about that eye:huh::eek: ! Great mottled paint design ! Greetz , diemai
 -
@ icemanrrc I do my epoxy mixing in small transparent plastic jugs , that are normally used for medicating patients in hospitals . Got that idea many years ago , when my wife needed some surgery . I asked her to gather these for me , and she brought home dozens and dozens from the entire floor of the hospital , which I all cleaned up thoroughly . After they were used up , I ordered new ones from the local chemist's(drugstore) . I find these jugs very handy , since they have 1-millilitre steps divided marker lines . I poor in the epoxy straight from it's container , requires some patience , since the stuff is not that liquid , just to settle straight level to spectaculate on the marker lines . After just stir up the mixture and brush on:) ! good luck:yay: , diemai
-
@ mark poulson Mark , at first glance your line choice , that I have considered a "rope" , looked really thick to me , but after your explanations I really see sense in using it for those big swimbaits . Just remember to have lost a couple of lures years ago(most likely spoons and plastic shads , but also sinking jerkbaits)because of an improper reel(was a quality brand) , that would shut close its bail ocassionally on a powerful cast !!!!! It was too much of a good thing , the rotor of it turned so smoothely , that it hit the closure notch for the bail sometimes ! If I think over it , if I would have been geared with your own choice of line instead of my thinner braid , I would still have all of these lures:huh: ! But seeing the sheer digits like 17 or 25 just put me off , I still have a handful of line spools like that in my basement , ordered them from the US years ago , didn't have an idea about their thickness , since over here we measure our line after metric thickness , not pound test . So well , if my memory serves me right(have a conversion card in my basement by now) , a 17 lbs. test mono would be well over 0,40 mm metric diameter . This is , what I would use for deadbaiting a 50" pike , if I knew , where to find one , lol:huh: ! Got only two rods/reels spooled with this thick line , using it exclusively for fishing real big eel(very poor casting with float set-ups) , since you can't afford to play with these , once they are hooked , just gotta toss 'em out as fast as possible . Really seems, that in Europe we probably go a bit thinner concerning line diameter as you do in the States ! Thanks for your explanations ! greetz , Dieter
-
@ kahawai So far I've made more shallow runners than deeprunners , but not because of snagging-up issuses . You might lose those shallowrunners and topwaters easily as well , thought not to bottom snags but by inaccurate casting , strong winds , etc . ! When I make a new lure model , I would never think about losing it already , lol ! If I have made a new model , that proves or even only seems to work well , I won't fish it anymore , until I would have made some more after it ! But losing an old "warhorse" surely would bother me a big lot , only finding out about a new "sure catch" favourite in my tacklebox could ease my pain , lol ! @ mark poulson For European issues you're fishing "ropes" , I guess , our attitude clearly goes to fish thinner lines . Lure anglers over here hardly use mono anymore , but in the pre-braid times a 12 to 16 lbs. test mono was recommended for pike , for perch , zander(european walleye) , trout , etc. somewhere between 4 and 12 lbs. test . But on the other hand , the lures , that are(or also were) used over here , are not as heavy by far , a thicker line won't cast them too well . Once I have spooled up a 0,25 mm braid for fishing the "Elbe" river , which is full of snags , this way I could often get back my ledhead shads by just pulling and bending the hooks open , but this way I don't have enough feel to control the lures with that thick line and miss a lot of strikes ! I went down to 0,20 mm braid , still a little thick for subtle working plastics , finally I ended up at 0,12 mm for this purpose , 0,20 mm for heavier average lurefishing and I've got that 0,25 mm braid on my heavy jerkbait rod , since it has to withstand a lot of abuse with this method . In a nutshell , I have learned for me , that it is quite useless to choose line diameter accordingly to avoid losing lures , at least for certain types of lures and fishing methods . Greetz , Dieter
