

diemai
-
Posts
3,867 -
Joined
-
Last visited
-
Days Won
23
Content Type
Profiles
Articles
TU Classifieds
Glossary
Website Links
Forums
Gallery
Store
Everything posted by diemai
-
 Not much to see really apart from the "kill spot" ! Scale pattern looks interesting , but as said above.................. !
 -
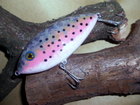
 Two more experiments in jerkbaits . Both lures have in common to have grooves cut into their chin to generate a popping noise and splash , when twitched or slightly jerked "on the spot" . For this purpose they are tail-weighted , or , in other words , I took over designs , that just ought to be swimming tail down for proper function . Both lures fulfill this design target , even though the black/silver/orange one turned out to float up a little improper . The lure with a tailfin is an own design , in fact it was the first jerkbait design , I've made without any knowledge at all many years ago , and it caught some small pike:yes: ! As said before , one can work these lures almost "on the spot" to tease a pike to strike , but also jerk them coming back in a "walk-the-dog" or "glider" style . The lure with the tail fin dives down to 3 to 5 feet on constant jerking , darting unpredictably to either direction , also ocassionally overturning on a sharp jerk . The "orange head" lure pops , splashes and darts 1 1/2 feet down on a sharp jerk , on constant twitches it "walks-the-dog" , either on surface or a few inches below , depending on intensity and direction of rod movements . I had posted this two lures somewhere in a thread before in a blank condition , but can't find the thread no more , even with all search functions I haven't been successful . Somebody out there remembers ? Would be glad about telling me where ! Greetz , diemai
 -
 I designed this two prototype lures having in mind , how to shape a crankbait , that would cast further than comparable "usual" designs . To my surprise I have found during first bath tub tests of the blanks , that the best location for the balance weights is in the rear , at about the transition to the pointed tail's taper . This fact off course also improves the casting distance . Yesterday I have field-tested these for the first time , and they do look promising in terms of good casting:yes: . The smaller lure has a tight wiggle at about 2 to 3 feet , the larger one goes maybe down to 10 to 15 feet (estimated , the pond I tested in is quite shallow) and has a very strong head ,- and tailshaking wobble . Hopefully I'd finally be able to test them on fish coming weekend . Greetz , diemai
 -
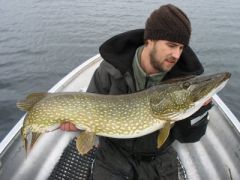 Man , this is a monster ! Just comparing its head size to yours ! Just great ! tight lines , diemai
 -
 Top lure is homemade , sporting a typical "Finnish Style" so-called saddle lip , that provides a tight wiggle , hook hangers are screw eyes . Bottom lure is a repaint , my wife found that crank on a fleamarket for little money , the finish badly damaged and sticky , since the previous owner obviously had stored it together with plastics , the original clearcoat by "Abu Garcia" was not wormproof:boo: . Sprayed on the chartreuse and orange base color , the other two colors I brushed on with modelmaking enamels . Thought that such a paint design would be something different to offer , especially since I had a missed strike on a painted similar lure the other day:yes: . greetz , diemai
 -
 I have uploaded this lure here already months ago as a blank , just to show , how I furnish the line tie arrangement on such a kind of cranks . Well , at my "snail's pace" I finally got done with it:huh: , I had to embed a 1/4 ounce weight behind the belly hook hanger to stabilize its wobbling action . On my first test yesterday I have found , that on BOTH toweyes it dives about equally deep (1 to 2 1/2 feet) , but on the lower eye its "snakelike" wiggle is real tight , whereas attached to the top eye it runs with a very pronounced wobble and tail shake:yes: . I have decided to brush-paint that lure with modelmaking enamels , since I had to care about not applying too much paint onto the bib , since the toweyes turned out not to potrude too much , couldn't mask them for spraying . By brushing , I've thought , that I would just have a better control about paint amounts on certain spots;) . Greetz , diemai
 -
@ MINESAPINT Great to see your first ones evolving:yes: ! Never thought about placing the weightholes under an angle below the internal harrness , but I guess , you did not have any other chance ! When making your next ones , you will already know about having done the working process easier ! I don't know , which lure action is neccessary for yor target species "seabass" , but it seems to me , that the diving bill of your lure is rather small for its size , it would only provide a very moderate wiggle to your crankbait . Or it is by intention ? For my needs for pike-fishing , I would have made the lip at least 1/3 longer(rather a bit more) and have it potrude sideward over fattest part of body for approx . 1/10" either side . This way the lure achieves stronger moves , yet dives deeper . Greetz , Dieter
-
@ Jio To me the beads size is not that important , this counts at least for spacer beads rigged somewhere on the wireshaft , its up to personal taste , how the baits look . But what is important , is the blade size just straight under the blade(s) or clevise(s) , the smaller these are , the less friction would occur and the easier the blades spin . On my in-lines I always put one or two beads 2mm to 3mm directly under the clevise , then one of approx. 5mm to 6mm , this one also acts as a spacer to keep blade standing away from the spinnerbody a bit(works best or even exclusively only with "French Blades") . But in your case I'd suggest a minimum of three beads under the clevise , maybe 2-3/4/6mm front to rear , if your bodies are even thicker , you may rig a fourth one 8mm for smooth transition , that should do ! Make sure , that these are of metal to withstand wear , spacer beads on the shaft may also be of plastic and/or facetted to add color attraction to the lure . Good luck , Dieter
-
@ smalljaw Google for "doc shelton blades" ! Some also call them "hatchet blades" . They don't come equally sized , meaning that you cannot get clockwise and counterclockwise spinning blades of same size , they are always slightly different . These are supposed to be rigged on spinnerbaits , smaller blade lower , larger one on top of spinner arm . I have ordered a few some years ago from the US to try them , I have made some double-bladed weight-forward in-lines from them , also the smaller blade in front on wire shaft . Vibrates more than an ordinary in-line spinner , and , even better doesn't twist the line too much ! greetz , diemai
-
Very poor picture , sorry , but eastern winds constantly placed my small boat this way against the morning sun around the anchor rope . A not too large average perch just nailed my new "SuperBug" version(it's history shown in thread : new "Banana" lure) this morning . These perch are ocassionally quite greedy and go for larger lures . Also hooked an approx. 25" pike on that very lure a while after , but unfortunately it came loose at boatside , too bad ! But this luremodel from "Down Under" has really earned my confidence , gonna make some more coming winter ! @ MT fishingrods Truly great story about your son , reminds me , when my daughter was in that age , she sometimes outfished her parents as well ! greetz , diemai
-

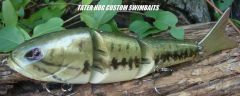
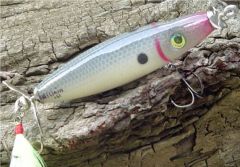
New Bass Pattern I painted other day
diemai commented on MR KNOW IT ALL KIND OF's gallery image in Hard Baits
 Absolutely great looking life-like appearance ! Is the tail made from metal sheet ? Greetz , diemai
 -
 Really hits the tradition very well !
 -
@ MINESAPINT Quite a unique way of determing about the weighting , I'd say:yes: . I wonder , why you use different materials for it just to weight them up against lead later on your scales:? ? I use lead straight . I'd cut rectangular stripes of roofing lead sheet , 15 mm to 20 mm high , about 120 mm to 180 mm in length , "U"-bend them and hang them onto the belly hook of the temporary readily rigged lure blank . In the water bucket I can now test the sink rate , I would shorten that stripe until desired sink rate or floatation is accomplished . Now I use that stripe as a template to cut out a second one of same size(just in case , I'd mess up the first one by false separating , when two weights are needed fore and aft , most likely on glider jerbaits) . Now I'd roll up that stripe as tight as possible , even comprime it by slight hammer beats on a steel surface , constantly rolling it to keep it round . Now I tape that lead roll onto the blanks belly with some plastic tape(cable insulation tape) , at a location , that I believe to be best . A test run in my bath tub shows the results in terms of lure action , I can always fool around with different locations , until I am satisfied . After I'd hang the blank to dry , remove harware and mark weight location with a felt pen . In my drill press I'd then drill a hole of approbiate size and glue in the lead roll with two-component glue , as close as possible to belly outline . You only have to consider a little fraction less buoyancy on the finished lure later due to drilling out buoyant material from the blank and various paint coats to be applied . For instance , if you want your lure to slow sink , the blank's back should just stick out very slightly of the water whilst the waterbucket testing , so it would sink later , also put a larger paperclip or wire piece on the toweye to resemble the steel leader(if intended to use later for fishing) . You could still do a little fine-trimming with thicker wired hooks , but that is very subtle:yes: . It is essential to apply one or two simple clearcoats prior to putting the blank in water , so it won't soak water , at first this could render your tests inaccurate or even do damage on the lure , certainly it would slow down the proceeding of the lure , since it would take days to dry it thoroughly prior to painting . I use acrylic clear paint for this , prior to priming the lure later , I'd just buff it a bit for good adhesion of following paint coats . Sometimes certain lure shapes won't accomodate the size of a required weight hole , in this case I also furnish elongated slots on my hobby routing machine , and shape the lead roll not round but somehow cubic . On smaller lures I don't use lead sheet , but small round in-line sinkers or leadshot , I'd rig these on a looped piece of mono line to hang them onto the belly hook for testing sink rate , after I procced same way as described above . good success , Dieter
-
@ MINESAPINT You are right to assume adding sufficient weight to let lure swim upright . In addition the weight must also balance the wobble of the lure . It might happen on first trial , that a lure swims upright at rest , but when retrieving it , it would swim on its side , in this case still more weight is needed (or the lip has to be shaved) . Round ,-or sligthly oval bodied lures are a bit easier to handle , they most likely already provide a certain kind of swimming action , a weight most likely improves that already given action . High-bodied cranks like yours are bit more difficult , in my opinion , since they must at first be balanced to swim upright and ALSO balanced for action . But you will certainly achieve this as well ! Good success in finding , what you need , Dieter
-
@ philB Since this eye is made of SSt welding wire dia. 1,0mm , it would have a diameter of 3,0 mm at its shank . I placed these into the holes by twisting them in , not pushing , so in softer woods the hole could be maybe 2,6 to 2,8 mm , since these woods could "squeeze" a bit under tension , in hardwoods the holes must be 2,9 or even 3,0 mm , but in every case I would go as tight as possible with the eye's bore . The hole affair stands and falls with the quality of the glue bond , so I thoroughly fill up the hole with glue , by slowly twisting the eye in the liquid glue "climbs" into the gaps of the wire coils . I haven't yet tried a slightly larger hole , like you described , but I am convinced , that a hole diameter , in which you can just push in the shank snugly , would be OK as well . The twisting-in of the eye is rather more important for perfect glue flow and coverage than for physical stability of the bond , this stability is achieved by the glue for the most part , anyway . PS : I wrap these eyes around a nail fixed vertically on one edge of a vise , first make an "U"-bend , then shape the eye around the nail , hold one tag end(shank) in your guide hand and twist the first half coil under the eye by hand around the shank end to attain a first loose closure of eye . Then firmly grab the coil end with pliers and wind around the shank in possibly even coils , leaving a gap of approx. wire diameter inbetween each coil , apparently a kind of thread evolves . With each winding you have to change grip on your pliers . The shank of above pictured eye is 20 mm long , but you could also go longer , but the longer your shank gets , the more finacky the winding of the coil becomes . After completing , I cut the two wire ends off with gate cutters , the coiled end would always potrude a bit over the shank diameter , so you need to press it somehow tightly against the shank , but I have a small grinding wheel in my workshop(a sanding disc works as well) , so I just grind off the potruding piece . All in all it's not that difficult , once you get the hang of it . Well , long text about a little thing , hope its understandable:) ! greetz , Dieter
-
Very good idea , though obviously I am too dump to figure out about the "COPY & PASTE" procedure described . I really see sense in it , since even in one nation with one language there are some terms , words and jargons , that people , who live just a few hundred miles apart in that nation are not equally familiar with . I know about this in Germany and why should it be different elsewhere:huh: ? And here at TU we are a bit more apart than just a few hundred miles (only physically) ! Greetz , diemai
-
@ MINESAPINT Obviously you're on the right path and already hooked into lurecarving , won't let you go anymore:nuhuh: ! Nice blanks you got there ! The problem about glueing in lead sheet together with the wireharness is , that you cannot accurately determine about the weight required for possible best action and/or balance of lure . You are forced to estimate for the start , lateron , when making more cranks of one size and shape , you already would have an idea about how much weight needed and on which location . It is also of advantage to keep records about it(To my shame I must say , that I don't do , only have my sketches . I just don't make too many lures of one kind , I like experimenting with always new shapes) . Talked about the best weight location in a previous post , and if I look at your blanks shape , it should work out like this . If your lead sheet weight should later turn out to be not enough , you could always drill some small holes left and right of the slot to glue in some more lead shot . Surely I can't determine about your wood's density , but from a distance I'd say , that your lures might require at least 1/3 ounce of belly weight , maybe even 1/2 or slightly more . They are reasonably large . But this is just a guess from afar , the more lures you make , the more you would get a feel for estimating the weight , but trial should always be paramount:yes: ! Keep on carvin' , Dieter
-
@ MINESAPINT Usually I use SSt screw eyes on my lures , since it is so simple , but ocassionally I also make them thru-wired by cuting a slot into their bellies . For an essay for a German angling magazine I have made this wire eyelet , since those SSt screweyes are not available over here just "round the corner" . Before publishing this design I have off course pull-tested these : I have glued them into the ends of a wood dowel with 5 min. two-component glue , let it set for three days (maximum strength after describtion) and after fixed one end onto my vise with a piece of cord . On the other end I have tied another cord onto the opposite eye and used my fishing scales and pulled as hard as I could , at 23 kilograms(50 lbs) the cord snapped , due to the sudden release the scale spoilt ! But the eyes did not move a bit ! Under real fishing conditions such force would not occur(maybe with musky and silure , but not with pike) , since the pull force would not be in alignment of the wire shaft of the eyelet , also the rod and drag would feather down the pull force quite a bit:yes: . So I am confident about those eyes of SSt welding wire , provided to be glued in thoroughly . You need them to fit SNUGLY into their bore , best is , if you can only TWIST them in , not just push:yes: . You need to fill up the bore with glue by means of a toothpick or wire piece , not just apply glue to the eyes shank , since it would wipe off when placing the eye ! Also extend the entry(1/5 to 1/4 of shaft length) of the hole to a slightly larger diameter , so that a kinda "glue-plug" evolves there , wipe off excess glue , after curing 24 hrs you can cut the eye clean of glue with a knife and/or "Dremel" , but in this case don't tie on your line straight to the toweye , use a snap , since micro-blemishes caused by the cutting on the eye might damage your line . I've been using this welding wire for many years(spinners , thru-wires) , there is a shop for it two villages further down the road , it comes in rods of one metre length and is a lot cheaper than special luremaking wire from tackle suppliers . It's just a little softer , does not have to be considered for such a purpose , only for lures with rotating parts I use a more rigid kinda wire for the center axis . I use it in diametres of 1 mm and 1,5 mm(for big lures) , also coiled welding wire of 0,8 mm is available , but this one always has to be straightened out before shaping its form . Greetz , Dieter
-
nice place !
-
@ MINESAPINT Hi , Do a search at "Search Forums" on top right column of page , type in "posting pictures" , there are some threads there explaining how to upload pictures , I suppose:? . I upload my own thumbnails from my own computer file . After loading them from the camera into my foto program(Picasa 2) I reduce their original size to 650 pixels and export them into a file , also I re-name them , since sometimes double named pics occur , when taking pictures at different times and having deleted the memory of the camera before . Two pics with same name won't work out in one file or one post. When writing a post , and you want to add a pic , just scroll below the typing field to a bar "Manage Attachements" , click on it and a second window will open with three "Search Files" bars . Clicking on these should open your own picture files , so you could choose and mark the ones(three possible)you want to upload . After choosing scroll in that window to the right to the "Upload" bar , click it........ , and you're done . The pics name appear at the "Manage Attachement" field and you can submit your post containing thumbnail pics . Ok , this is from an absolute computer dummy , but maybe , it could help . When looking for lip material , do not use plexiglas ! It looks rigid , but will break ! There is a thread about it in here , don't remember its name , try a search on "Lip Broke " Good Success , diemai
-
@ Jio There are weighted wire coils(with round or triangular cast on weights) available . These are supposed to tie bucktail hair on , but maybe , you could also rig shirts onto them . Another possibility to rig skirts onto a wire shaft is pushing the skirt over a pop rivet head of approbiate size , rig the thicker end of rivet towards tail hook , so the skirt can't be stripped down by enthusiastic fish . There are also special round brass bodies available to put skirts on , but I guess , those might be too small for the giant lures , that you are planning on ? Check Welcome to Moore's Lures , download the PDF catalog , you'll find those parts in there . Don't think , that there are two wireshafts build into those lures , only thing is , that the closure loops tag end might be bent backward , potruding through one or more of the lower body parts , but this really depends on each single design . good luck , Dieter
-
@ MINESAPINT Sounds good way to start , but Mark is right , a CD as a lip won't last long , really better to use these dividers on a short run . One tip for future lures : I find it easier to cut the lipslot and drill the pilot holes for eyescrews(off course mark them as well) , when the blank is still in a flat condition , meaning just cut out and sanded smooth along its outline . You'd be able to work more accurately this way , that counts especially for a perfectly angled lipslot:wink: . Also if you intend to make a lure with an internal wire harness , glued into a slot at the bellyside , it is better to cut this slot at this stage , you always have the two flanks , still paralell , for reference . The balance weight of such lure , that you have described , would most likely have to be located somewhere between lip and belly hookhanger , sometimes also just behind it . I determine about this weight by taping it on for a test run in my bath tub , trying different weights and locations , until I am satisfied . I apply two coats of acrylic clear paint before to prevent the unfinished lure to soak water , I'd buff that clearcoat a bit lateron before priming the lure . good success , diemai
-
I don't use templates , I glue cut-outs of photocopies of my luresketches onto my woodboards . After I cut the shape out with a bandsaw , and sand the shape down to the marked outline . Location and direction of lipslot and screweye pilotholes I can also determine by that copy , the center line around the circumference of the blank I mark with a pencil just by eyeballing , I find it quite easy since the lureblank is never rounded somewhat at this stage . These sketch copies can be minored or enlarged on a photocopy machine , if you should wish to make the same blank in different sizes , only have to re-calculate about some measurements accordingly to percentage of size change . Greetz , diemai
-
@ MINESAPINT Alright , to make wooden lures , you'd need a minimum of tools , I started out many years ago with a carpet knife(Stanley knife) , a sandpaper file and a "Dremel Multi Tool"(with various , routers , drill bits , sanding drums , cutting discs , etc.) , also some kind of saws(wood , metal and jigsaw) , files and sandpaper , shears , pliers and some others . For making the hookhangers and toweyes you could either use SSt wire(throughwire or twisted eye) or special SSt screw eyes , available in many shops in the USA and Europe . At Lure Fishing UK you can find a lot of these sources of lure components , just click on "links" there on the entry page . You'd also need some kind of epoxy ,-or two component glue to fix diving lips and hookhangers to your lures . These lips are partly readily available in some shops , but you might also cut them out of polycarbonate , lexan or metal sheet(aluminium , brass , copper or SSt) . For painting your lures you could start out in a simple way with acrylic paints or modelmaking enamels(by brushing) , but a tough topcoat of epoxy or similar is essential , just ordinary clear laquer won't be sufficient enough . The easiest kinda lure for you to start out with would be a popper lure , make sure , that you take a buoyant kind of wood for it . Also vintage lure models like "Heddon's Vampire" or "Creek Chub Pikie" and "Creek Chub Wiggler" are thankful crankbait models for the beginner , they do not require complexe shaping , just whittling tapers to a round wood dowel (more or less , briefly said !) Also if you google some related terms like "homemade lures" , "luremaking" , "lurebuilding" , etc. , you should find something to take you further and give you first ideas . Just check around first , wether you'd find something to suit you , don't set your goals too high for the start , might lead to disappointment . Nobody here would write a detailed explanation on how to furnish a plug from lumberyard to first catch , its just a too big effort , but there are sources in the web , I know(can't remember 'bout the links anymore right now) , try and find some , and you're ready to go . For oncoming specific problems and questions you will always find an open ear here on TU , trust me ! Good luck , diemai

