

diemai
-
Posts
3,867 -
Joined
-
Last visited
-
Days Won
23
Content Type
Profiles
Articles
TU Classifieds
Glossary
Website Links
Forums
Gallery
Store
Everything posted by diemai
-
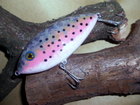
Well , here is the second "Banana" , it did not turn out quite as good as the previously shown "SuperBug" version , also the layer of metal flakes got a bit thicker , since I messed things up at first and had to redo it:( ! Also the sprayed-on "fishbone" pattern turned out to be a little too low on the flanks , but the fish won't bother , I guess:huh: ! Greetz , Dieter
-
Hi , folks Finally my last two "Banana's" are now done with their "metal flake finish" ! Haven't applied this on wooden lures before , only on casting spoons . I have found , that it adds quite a bit of weight to the lures , since apart from the metal glitter particles it requires some more top gloss coats as on "normally" painted lures . But not as much to render them to be sinking ! Had to paint on the eyes of the lures , since decal eyes wouldn't hold onto the rough glitter surface very well . Sometimes they do , but also the eyes locations on these lures are quite curved , it requires a rather plane surface for them to stick at all ! Next time I should cut eye sockets and leave them bare of glitter flakes , so I won't have that problem again ! Quite time-consuming to do and not very detailed , but in fact something different to offer to the fish ! Greetz , Dieter
-
Still had some time left before lateshift , so I cut through the 3/4 body width saw cuts and also marked the the hinge bores onto the corresponding planes of the three sections . I drilled the bores 3mm dia. freehand with my "Dremel" , and it worked out fine:yay: ! The wire coil hinges , that I've made already yesterday(little shorter than the ones shown in my first post about this new , small bait) , fit in nicely , they even bind sufficiently for the first bath tube test to come ! Since it would be a PITA to shape all these tiny lure sections separately , I have planned from the start to stick the sections together with some sort of pins , so I utilized some bamboo barbecue sticks , that I normally use for float building , for the purpose . These were a little too thick in diameter , so I cut them a bit longer than neccessary and fixed them into the chuck of my lathe motor to sand them down to fit into the hinge bores , also ground a little point onto either end to have them inserted easily , after having cut them to approbiate length . Since I took care(wasn't that hard), that the opposing bores would be positioned reasonably flush , I gained an almost perfect fit , and it takes quite a bit of force to poke the parts together and also pull them apart again , so they should hold up this way for all outer shaping by grinding and sanding . Now I can shape all the three sections like it was a one-piece lure blank ! Next task is to furnish the concave/convexe shape of the corresponding section planes , I must also care about a snug fit of these , since it would add stability to the temporary pin bonds . Also would have to drill the hinge bores deeper to fitting length , at least at the convexe portions ! After this I would finally start out with shaping the body taper and rounding-offs , also carve the details ! Hope , things would continue to get along well , Murphy should leave me alone for this time:p ! greetz , Dieter
-
And I couldn't wait to start out with it this morning before work ! As I always do , I first cut out a photocopy of my sketch and glued it onto my wood board , I cared about setting the center reference line of the sketch paralell to the bottom edge of the board , so that I cut furnish the 90
-
@ captsully18 Thanks about that information on the twisted eyes ! But are they supposed to sit snugly in their bores or are they even twisted in:? ? Or you even bend the ends of the twisted portion backward towards the eye to achieve a kind of hook to find grip in the glue:? ? I know , that the bore must be thoroughly be filled up with epoxy , when glueing them in ! Yesterday during my workbreak I have put my initial sketch of my second swimbait into a neat shape , it turned out to have approx. 3 3/4 body length . I am eager to find out , wether it would work out the way , that I have planned ! Here it is ! Greetz , Dieter
-
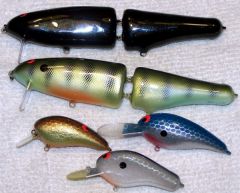 I like that perch pattern on the wake bait , also like black as THE top color for surface lures ! Probably you should have utilized the small scale mesh of the perch pattern for the crankbaits as well , these bigger scales somehow look unproportional to me , sprayed some lures like that as well years ago , I don't do it no more . But actually the fish won't care ! greetz , diemai
 -
Also don't know any deep diver with a square lip , in fact such lips are not very common over here on commercials ! Deep diver lips are most likely rounded at their forward end , and narrow down their base end towards the lure's body . In the book "Crankbait Secrets" by Joe Bucher I have read , that "triangle" lips(like on lures like "Cisco Kid" , "Depthraider" , etc....) are best suited for cover , and I believe it , since these lips make those lures "shake" left/right in a way , that any debris or vegetation would fall off the lip . @ carver If you're seriously interrested in crankbait dynamics , I would advice you to take a read in that certain book , it's a pack full of knowledge to me ! Easy-to-follow style of writing , even for me , that English is not my mother language ! Greetz , diemai
-
Don't think , that D2T is widely available in Europe(if at all) , but I think , that in RC-model shops I have seen similar stuff . Or maybe google for Devcon distributors over here ? greetz , diemai
-
Mark and David , thanks a lot for your encouragement ! (also got pain in my back:yes:) I have already made a first sketch of a new swimbait , that one is going to be 3 3/5" in length . Have to make new hinges for it , since it requires shorter hinge wire arms , but now , that I gained some experience , it would only be a matter of minutes ! @ DSV Do you refer to captsully18 or to myself with your query ? To speak for myself , I don't mind posting about my progress in here again , but you might have noticed , that I am not on the speed course with my luremaking ! How about some first pics on making the hinge coils ? I could do that in the morning , now its already past midnight over here , have to go to sleep soon ! Sorry , can't supply any links on that subject , maybe some other folks can ? greetz , Dieter
-
Hi , folks It just urged me this morning to try out making those small wire coil hinges , that were on my mind for days now . It went on pretty fine , finacky job though , but manageable . My goal is to build a three section bait up to 4" in length to also have an appeal on smaller predators like perch , asp and zander(walleye) . This brief sketch here(not the lure-sketch , just to explain my intention) still shows a little longer lure(4 1/2") , but I guess by shortening the wire arms of the hinges I could still gain space for a smaller lure . So , my idea is , to make that lure out of reasonably sturdy light wood like abache or pine , the wire arms of the hinges will be epoxied into the bores , after the lure sections have been entirely finished and topcoated . To accomplish this finacky task , I'd have to somehow bind the two hinge parts in a straight position temporary , and glue them first into one section , after curing into the other ! I am thinking about plastic tape or pressing toothpick points into the female hinge part to bind the bail inside . For shaping and painting the lure sections in a connected condition I am planning on sticking them together with wooden or plastic tubing pins , that are inserted temporary into the hinge bores . If the bores of two opposing sections should not come sit quite flush , it would surely be possible to heat up the plastic tubing pins with a lighter and then kink the temporary softened tubing a little offset , so that it would fit the two opposing bores , even when they are not quite flush:wink: . I am aware , that probably the wire arms of the hinges might pull out with a big fish on , but I just want to try it out this way . With some more subtle work effort I could also secure the hinges with some crosswise wire pins , that engage into the "U"-bends at the end of the hinge wire arms . But I think , that they will hold with epoxy only ! What do you think about all this ?????? Greetz , Dieter PS: To determine about hinge size , five squares of the background paper make up for 1" !
-
 Very beautiful and realistic work , this one should fool the big mamas after spawning in springtime when biting off their "loverboys" !
 -
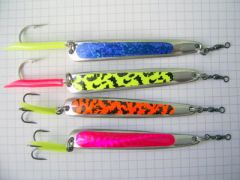
 Made these on a short term last week at work just too wipe away the time faster , as all of my machines were running . They are cut out and ground to shape out of soup spoon handles , after bent , drilled and polished . Usually soup spoon handles are rather thin and therefore not suitable , but two weekends ago I've found four , quite unusual Chinese made spoons on a fleamarket(paid 1
 -
@ hazmail Thanks a lot about your hints , but being professionally involved into precision metal grinding , I am aware about all of such issues , but its very kind of you , certainly other folks would also benefit from your remarks ! But I don't think , that I could go much larger in diameter than the 5" , maybe 6" , since there is not much more clearance between center of my lathe's motors chuck and the bedding of it . Apart from the center point for fixing wood dowels for turning I frequently put rotary wire brushes , polishing wheels and a velcro sanding disc holder into that chuck , the latter is exactly 125 mm in diameter , and there is not much space left at the bottom:nono: ! But I guess , this size woold be fine for most of my lures , anyway . thanks again , Dieter
-
Thank you , guys:worship: , Now I know exactly , what to use , we have two great brands over here in Germany("Pattex" and "UHU") , that produce all different kinds of glue for any purpose . greetz , Dieter
-
Thanks , Pete I guess , contact glue is ordinary allround glue , not really any special purpose glue , don't have any other translation for it . But I'll be OK with it:yay: , thanks again , Dieter
-
 Thank you , guys , but fishing is presently very slow due to strange weather phenomenons , I guess . In fall season I am gonna fish it toroughly , got a few weeks off October/November , they just oughta strike someday in my local waters !
 -
@ jamie , @ captsully18 Thanks a lot for your kind words and support , guys ! I am also hoping , that local pike would like my work , too ! But presently the fishing has been extraordinary slow:( , the best time is still going to come in fall(gonna have three weeks off then !) , and this is the time , I am usually switching lures in my tacklebox to the bigger , heavier and deeper running ones , so this little carp is gonna be amongst those as well for sure . @ mark poulson I have read about that 90
-
Absolutely cool idea , I'm gonna go to the scrabyard of my work more frequently now during my breaktimes . Sooner or later I'm gonna find something suitable there , I'm thinking about one of approx. 5" dia. , 1" width , turned down from aluminium . For the chuck of my lathe-motor it should have a shaft attached(a bolt and two nuts counterscrewed)of about 1 1/2" potruding and 1/2" dia . ! This bolt shaft would run exactly centered , when mounting it first to the blank wheel and then fixing it into the chuck of a metal lathe at my work and have the shape of the wheel milled down , no problem about that ! But which type of glue exactly to use to apply the sandpaper segments and how to get them off again , when worn out:? ? Anyway , hazmail , thanks a lot for the input , great idea ! Greetz , diemai
-
For safety's sake there should not be any misunderstanding about freehand routing ! I was only talking about the small "Dremel" router bits , even some of these can also pierce your fingers a bit , when not watching out . Certainly one should NEVER use bigger profiling router bits or any other bigger rotating tools freehand , no way , not at all ! These ones can cause real severe injuries that might lead to permanent disability of hands and/or fingers:eek: ! take care:yay: , diemai
-
 Very nice paint and foil job , well done finish , they're gonna score for sure ! I am always interested in such smaller jerkbaits for lighter piking , so I wonder , wether you have found any noticeable difference in swimming action concerning the two tow eye positions horizontal and vertical ?
 -
Here is my very first swimbait , beechwood , approx. 6" in length , painted with modelmaking enamels , topcoated with a few layers of epoxy and two-component automobile clear paint . You may read the entire story about it coming to being in my thread "swimbait , very first attempt" . My gratitudes go to all the TU guys involved , especially mark poulson , for their kind support and assistance , without them I might not have got as far at all ! Thank ya' all , diemai
-
 Here is my very first swimbait , beechwood , approx. 6" in length , painted with modelmaking enamels , topcoated with a few layers of epoxy and two-component automobile clear paint . You may read the entire story about it coming to being in my thread "swimbait , very first attempt" . My gratitudes go to all the TU guys involved , especially mark poulson , for their kind support and assistance , without them I might not have got as far at all ! Thank ya' all , diemai
 -
So well , here are two more close-ups of the detacheable hinge pin affair ! Greetz , Dieter


