diemai
-
Posts
3,867 -
Joined
-
Last visited
-
Days Won
23
Content Type
Profiles
Articles
TU Classifieds
Glossary
Website Links
Forums
Gallery
Store
Everything posted by diemai
-
@ scrubs Hi , Bill , Years ago I had designed a simple lathe -turned plug that I've named "FatButt" , ....virtually it is a horizontally sinking glidebait , but due to having the bigger portion of ballast in it's rear , it casts pretty well and far . I do not have any sketches available , but it is to be seen in this video at about 1:20 : Another "FatButt" model also shown in another video at 2:30 (3rd from top in orange color) : My goal of design was to be able to place more weight into the rear , as this would provide a better sideward glide , side effect is a perfect casting performance , ........thus the body is tapered more slender towards the nose resulting into a more buoyant rear which can accommodate more ballast still retaining a horizontal sink level . Ballast sits in front AND rear belly positioned as far to the body ends , as the mounted screweyes do permit . I've made the face slightly slant as shown to allow the lure to dart downward as well , ....in practice this means , that it darts more randomly , but not just to either side and also retains general working depth better . If you want the lure to run closer to surface , you might cut off the nose tip at 90° or just round it off to a flat dome , ....if the face was slant vice versa , it would permanently dart back to the surface after letting it descend a bit , I guess . Paramount to the design is to make the body tapered to be thicker down the tail . Greetz , Dieter
-
@ littleriver I had also considered about using playdough ,Vic , .....but since it is kinda greasy , it put me off so far , I'm having concerns about proper putty , glue , -and paint adhesion at finally assembly . Greetz , Dieter
-
You might want to install a transparent lexan lip , ...in this case some ballast on the lip side might become neccessary to let the lure float up as much vertical as possible . My lures do not have any added ballast , alone the aluminium lip's weight and the minor buoyancy of the tapered front body portion let them sit nose down that much . When the retrieve is paused and the lure is rising up again , it would sit at an about 45° level , as the water pressure on the cupped tail pushes the lure to that position , thus when breaking through the surface , a good portion of the water inside of the deep cupping would be released so that the cupping would be sufficiently deep enough again to create a vaccum and popping sound on the next jerk . Naturally you'd need to utilize a buoyant kind of wood , ..mine are made from Abachewood , but which is hard to obtain in the USA , as it seems . Good luck , ....diemai
-
@ benm98 I had tinkered on a lure design sporting a similar action a couple of years ago , ......floats at rest and pops on the surface to dig down steeply when the retrieve is commenced with a little jerk or twitch of the rod . Check out these gallery pictures of mine , ...it is the lure with a metal lip : http://www.tackleunderground.com/community/index.php?/gallery/image/2562-cuptails/ http://www.tackleunderground.com/community/index.php?/gallery/image/2563-cuptails/ http://www.tackleunderground.com/community/index.php?/gallery/image/2564-cuptails/ In this video at 5:02 there is a similar lure employing the same principle on bath tub display , ....sadly the frame rate of the vid collapsed for some reason , so not much to be seen , the audio is OK , though. This design really works , but the lip is pointing downward rendering the lure tailheavy , not upward as you had stated . I think , that a tailweighted lure with an upward pointing lip could never get to dive down too deep , as tail ballast always counterworks diving performance . Greetz , diemai
-
Hi , Folks , After having received about 600 views for that video above so far , I've thought to do a little swimming action display video of such lures as well , ......probably it might provide some more help and input on fellow tinkerers around ? greetz , Dieter
-
@ joliepa Check out this video put out by Mr. Paul Adams from the UK , .......IMO a most ingenious lure tinkerer , unfortunately he does not apppear to be a member in here . He has a dead sure sense for amazingly simple solutions on how to work down lures and/or making simple jigs or tools to proceed his lure and tackle work . You may also check out his entire YouTube channel : http://www.youtube.com/user/paulpadam?feature=watch Enjoy , .......greetz , Dieter
-
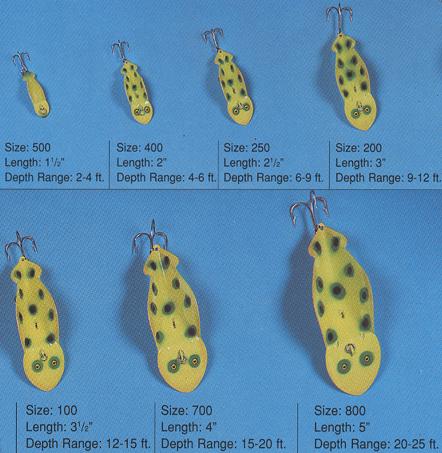
Hi , Folks , Just a brief question from the other side of the Great Pond : Came across these lures in the internet , .......being a somewhat special design but not available nor probably even known over here , I've become curious about this Buck Perry Spoonplug , and I'm thinking to get myself some from US Ebay . But before I'd start bidding , I'd like to ask you guys in here , whether someone would be familiar to this lure and could give me some hints and pass on own experiences or knowledge , ...I figure out , that it is mainly a trolling lure . But I most likely cast my lures from the bank , so would it be well-suited for such as well , ...or casting is just the minor option ? Thanks a lot , ...greetz , diemai
-
Welcome to the TackleUnderground , hope you'd enjoy yourself in here ! Seems to me , that you should specify about your luremaking intentions a bit to get some more replies to your request . Also browse through the forums for a while , you would surely find some hints , inspiration or input in here , ...also YouTube provides some nice "how-to" videos . greetz , diemai
-
@ mark poulson As long as I can feel a good throb in my rodtip retrieving my deep runners , I'm OK with it , ........and when fish would finally nail them , even more ! Greetz , Dieter
-
@ mark poulson First time for me to hear such , Mark , .... thanks for sharing your experiences , but sadly I do not have much of a clue as well . Maybe as the lure rolls around it's center axis , a line tie further standing off the lip provides more leverage to force the lure back , thus it won't roll to either side as far finally resulting into more stability of the wobble ? If so , the loose self-centering line ties cannot fulfill this feature , as under the line pull they do not move about as much to be able to act as a lever . Greetz , Dieter
-
 Very nice , Mark , .......reminds me that I need some foiled "Heiddys" for next season as well . You've altered the basic design quite a bit , ...but all for good , as it seems ! Greetz , Dieter
 -
@ mark poulson Just had a look at your gallery picture , ...missed it out for my last post , .....surely the flat back of your lure plays it's part in letting the lure dart downward . Years ago I had received a couple of gliders with flat back and belly portions through lure swaps , ......IMO their action is somewhat less lively compared to gliders with fully rounded circumferrences . They still perform , but rounded ones just kinda "slice" better into the water resulting into more fluent and more versatile movements , when working the lure . But I see , that you had put much thought into your lure , ......the V-belly is a good idea to actually get more momentum into a forward glide rather than wasting it for a roll . Now the first 4 pounders are in order , Mark , ...........greetz , Dieter
-
I guess , that you've explained it very well , Mark , .....actually I haven't wasted too many thoughts on the exact hows and whys before ! I only remember one occassion , that I came across such line tie for the first time many years ago , ...it was on a plastic crankbait , that I had mailordered from the USA , can't remember the brand , though . Intending to connect the lure to the snap on the end of my line , I noticed , that the tow eye was moving , .....the two tag ends of the omega clip sat in a centered groove in the thicker center part on the underside of the lip . Damn , ....I've thought that I had bought what we call a "Monday product" over here , .....they've forgotten to fill up the groove with glue to fix the line tie ! But it did not take that long for me to figure out , that the loose line tie was intended ! I assembled these line ties to quite a few of my recent deep divers , ......I find it less elaborate to furnish than a through wire harness , ...also I do not have to go through so much tuning work with every new bunch of lures done , .........and last but not least , .....I am pretty much convinced , that my assembly would also hold up against even bigger local pike . Greetz , Dieter
-
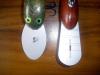
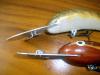
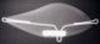
Here ya go , ......shot some pictures of my own design , which consists of a simple so-called "Omega-clip" poked through a centered slot in the lip secured by a splitring . Naturally the lip requires to be of a rigid material holding up against the fighting power of a hooked fish , in this case I've used 1mm thick Aluminium sheet of a very hard alloy(softer sheet won't work , as it warps to easy) , but also 3mm Lexan is rigid enough , I suppose , ......done some lure with sucha Lexan lip as well . My lips sporting such self centering line ties are glued and pinned to the body with two 1,5mm stainless wire pins , same wire use to bend the Omega Clips , .....you can see the pins on the nudie lure . Also the lips have some holes through them and small notches cut into their bases for better glue bondage . The Omega clips have enough play in their grooves to move 0,5mm up and down and can swing 15° to 20 ° to either side , ...lip grooves are made by drilling three1,5mm holes in line and extending them to a slot with a small Dremel router bit . I do not know , whether these line ties would still let a lure come back straight , if there should be little flaws in terms of symetry of the lip or when it should not be aligned well , ....I'm working these lures down as accurate as possible and I can proudly say , that I never had sucha lure not tracking true . About working accuracy , .........when making the pin holes through lureblank and lip , ...make sure , that the lip would sit FIRMLY and well aligned to drill the pin holes through both parts , .......I achieve this by applying some bits of insulation tape to the base of the lip , if neccessary , ...., so that I can press the lip in to the slot real snug not to move whilst drilling through . Whilst pre-assembly of the lure , I'd leave the wire pins a bit longer and bend off their ends 90° , ....just for better handling . Cutting them to matching length just when finally glueing parts together , also it helps a great deal to grind a small pointed tip to the inserting end of the pin . Greetz , Dieter
-
@ HickoryHollow I've been making dozens and dozens of spoons through the years and I still do sometimes , ......tried all kinda finishes on them as well : http://www.tackleunderground.com/community/index.php?/gallery/image/2508-metal-flake-spoons/ http://www.tackleunderground.com/community/index.php?/gallery/image/2497-array-of-spoons/ http://www.tackleunderground.com/community/index.php?/gallery/image/2498-array-of-spoons/ http://www.tackleunderground.com/community/index.php?/gallery/image/2499-array-of-spoons/ As Ben had already stated , ....you need to buff the spoon surfaces to be painted , really increases paint adhesion , ...also degrease surfaces before painting ,....... with acetone , like Ben said , ..... or mineral spirit works as well . I even used to sandblast my spoons at work , but sandpaper or o rough wire brush works as well . On my own painted spoons I most likely put on white acrylic primer and modelmaking enamels , all brush painted by hand , ...my topcoat is epoxy . Since a couple of years I had quit using rattlecans to paint my lures after having ruined an entire bunch of timber paits to require paint stripping and repainting , .......some rattlecan paints are just not compatible to other kind of paints , primers or even different brands of rattlecan paints ! Acrylic paints are always better in that way , as they do not contain any solvents to affect previously applied paints . Regarding the peeling of paint when assembling splitrings , .........this happens to any finish , as the splitring applies a very strong mechanical force to the paint , -and topcoat , ......just like as if you would scrape a knife's point over the spoon surfaces . But with a bit of concentration and sufficiently sized splitrings you can avoid this : Open up your ring holding it with splitring pliers and insert the starting end into the spoon's attachement hole from the unpainted underside of the spoon , do this over the outer rim of the spoon holding the ring at about 90° to the spoon . Utilizing slender pliers you would now twist in the ring just far enough that the rear end of the ring's wire would still bind against the rim of the spoon , naturally the ring is still open that way . Now grab this wire end with your pliers , kinda pulling it away from the spoon same time twisting the ring in that last bit , keeping the ring at 90° to the spoon all of the time . This moment of holding it with your pliers is enough to keep the ring's wire end away from the painted surface thus not damaging it , ...........but you ring must be large enough ! Rig hooks or swivels in a second operation to the assembled splitrings , ...this way is the possible best method to save your paint finish . Good luck , diemai
-
@ mark poulson Mark , ....I know that such is not essential for bass fishing like it would be fishing for pike or muskie , but still you should use a one strand rigid wire leader for working those glidebaits , your hooks won't foul with the line that much this way , ........1 1/2 times the lure length should be OK , .......the company "American Fishing Wire" makes some fine leader wire , also available in bronzed camou finish . But maybe some stiffish fluocarbon or hard mono would do as well . Some glidebaits tend to foul more than others , much depends on the action , body shape and also on the distance of the belly hook to the tow eye . Even a one strand wire leader fouls on occassion , but this also depends on the way , that you attach it to the tow eye , ......most fellas use a DuoLock or CrossLock snap of approbiate strength , ....but this joint also provides a good portion of loose play(nevertheless play is essential for best lure action) , .....a splitring instead would be the best solution , but this would be just to darn inconvinient . I would have been pretty much surprised , if I heard , that "the Roach"(aka "Heiddy")would not have worked for you , ...it's a great design , easy to build and easy to fish . If your lure is darting downward to much , it could be nose heavy(does it descend at horizontal level ?) or also your tow eye may sit just a tad too high , I reckon . For working a glider just below the surface , make it to sink real slow , maybe 1/2" or 1" per second or so , ....also there are floating glidebait models , that would dive down a foot or two , when jerked , ....slowly rise up again , when paused , ....the above mentioned "Salmo Slider" pops into my mind , available in floating AND sinking versions , ...check this out : @ scrubs Glad if I could provide some assistance , Bill . good luck , Dieter
-

Where Are Folks Buying Quantity 2 Part Epoxy Please?
diemai replied to Tallbald's topic in Hard Baits
@ Tallbald I'm buying mine from a local mailorder shop for all kinds of resins , actually a shop selling materials for making laminated hulls for boats or any other of such parts ,... ...they have a good choice of epoxy and polyester resins , glassfibre reinforcements and stuff like that . Here is the link , you may utilize a translator programme , no English original version available , .........just as an example , won't be worthwile ordering overseas , ...but try and find something similar at your place : http://www.bootsservice-behnke.de/ Godd luck , diemai -
Just used the German term "Jerkbait Röntgenbilder" , ...but really not much to be found , just some links showing some crankbaits X-rays : http://xoomer.virgilio.it/cjbur/a_xray.htm http://derholg.twoday.net/stories/1208425/ Especially with smaller glidebaits you need to add hooks , when trimming the blanks , .....do not underestimate the influence of hardware and topcoat , ....not only in terms of the sinkrate , but also the sink level of a lure ! F. e. if you want a 4" bait to sink real slow , it requires to stick out of the surface just a little bit whilst trimming with ballast taped to the belly . When embedding the ballast chunk later , you'd also drill away buoyant material ! I find slow sinkers and slow risers harder to achieve than fast sinking gliders . Greetz , Dieter
-
@ ArdentAngler Some general info on weight placement at the beginning of this thread , Charles , .....but basically I'd say , ...the smaller a glider , the harder the job getting it to perform . Here is the X-ray of a "Salmo Slider" , .....guess , I had mentioned this bait before being one of the smallest commercially available : Did some brief googling , ...can't find more right now , gotta go for my first weekend shift right now . Cheers , Dieter
-
@ Tallbald Me too learned the profession of a tool and die maker , but working as a grinding machine operator since the end of my apprenticeship back in '82 . Sounds , like you've now found the right place to be with your passion for lures , shared by all of us in here , .......so ,.... welcome to the TackleUnderground , .......greetz , diemai
-
Thanks a lot for your feedback , guys , ...guess that I'm gonna do some more during coming weeks and months . @ littleriver Vic , thanks for the hook's link , ...never knew these before , guess , that they are not(yet) available on local market , and probably never will . Put I must admit , that their price also puts me off ! In my opinion the best hooks for their price are "VMC's 9650PS" , these are Xstrong saltwater hooks , tinned(or at least rustproof) and are even a bit cheaper than the thinner wired bronzed freshwater VMC versions , not to talk of the "VMC Barbarians" . They are widely available around here , many tackleshops carry them , ...but If I should need them in bulk , I'd surely mailorder . Their shank is not extra short , but still quite a bit shorter than these "Eagle Claw Curved Point" size 2 hooks , that I had rigged to the lure in the video at first and which did foul with the diving vane , got these cheap off local Ebay the other day . The ones, that finally matched the lure , where "Mustads" size 1 , .......got a bunch of different "Mustads" from the closing sale of a Hamburg gun, -and tackle shop last year , 50 pcs. each size and style for 5 € , .......tore a little hole in my wallet back then ! I like to make different lures all of the time , ...no serial production , so it won't be worthwile to make some kinda jigs for marking lines onto the lures , ....I'm very happy to have been given a good estimation of eye , though not always perfect as well , but I can't remember any serious flaws caused by wrong eyeballing . This pile of timber material has been gathered through the years , there are 27 X 80mm abache boards from a local lumberyard , beechwood stool and table legs salvaged from scrap collections , 27mm dia. replacement broomsticks of a buoyant but unknown tropical wood and also of poplar bought from a toolmart , kitchen steak or cheese boards of teakwood and sometimes also children's stilts of tropical timber , the latter two one can find for very little money on fleamarkets sometimes . Thanks again , folks , .......greetz , Dieter
-
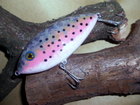
Hi , folks , Yesterday I felt like doing a video displaying how I work down vinatge style floating wobblers similar to the famous old "Rush Tango Minnow". Sorry , that the footage turned out a little long , but hopefully it might still provide some input or inspiration to fellow lure carvers around . For more information , ...also to access exact measurements of genuine "Rush Tango Minnows" , you may also check out this older thread in here : http://www.tackleunderground.com/community/index.php?/topic/17724-my-latest-lure-test-video/ The lure blanks displayed in the video would differ to the "Rush Tango" in terms of wiggling action and especially diving depth , but nevertheless they are reliable swimmers , provided that the tow eye is properly positioned and the diving plane angled accurately . Greetz , diemai
-
Maybe the acrylic clear might not be neccessary , if you're using acrylics for your paint schemes(though I have not tried it on my own acrylic paints so far) , .......I just got used to it , since during previous years I used to spray my lures with rattlecans holding solvent-based paints , .....but definately it is a fact , that on acrylic clear the glitter particles do hold up better than on the sheer solvent-based spray paint . When brushing on my epoxy topcoat onto sheer solvent-based spray paints after the glitter glue has dried , I have far more glitter flakes in the paint brush and thus in the mixing cup , as if applying acrylic clear prior to the glitter glue. It's not a big deal , also not that many glitter flakes would come off in general , but I find it kinda disturbing , because with one epoxy mix I do several lures which do most likely have differently colored glitter flakes on them , so single flakes of different colors get onto lures that won't match in color . The acrylic clear bonds the glitter flakes better , as a result such does not occur that much as if going without , ........but me just thinking , that if using acrylic colors right from the start , another acrylic clear coat might possibly not be neccessary anymore , dunno ??? But nevertheless it also does protect my signatures against the final topcoats @ littleriver Thanks a lot for posting your gallery picture , Vic , ......the blue metallic glitter flakes of the glitter glue , that I had smeared on that lure , are clearly visible , .......often many pictures don't do them justice , but yours does , .......and needless to say , that if only even a little bit of light falls into the water , these flakes would provide a nice visible sparkle and flash to a wiggling lure . Greetz , Dieter .
-
I use it on almost all of my lures . After the paint the paint job is done(hand brushed acrylic paints)I would stick on eyes and sign my lure with a waterproof felt pen , ...then I'd apply a layer of acrylic clear . I've found that this acrylic clear coat protects the signature from smearing possibly caused by following topcoats , but also really enhances the adhesion of the glitter glue , which I'd apply now in matching colors , just spreading it with my fingertip . Without the acrylic topcoat the glitter particles tend to come off more often bonding into the epoxy brush used for the final topcoats , but it's not that bad still . The glitter glue that I use , is also water based like the acrylic paints . Greetz , diemai
-
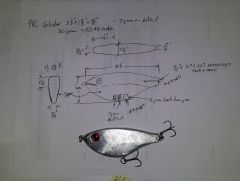
@ joliepa A typical Japanese minnow , .......if you want a tight wiggle , you've gotta go for such or a similar shape , a curved body shape would wobble too pronounced , but not neccessarely slow(at low frequency) . In that sketch there is no tow eye location stated , ....but tow eye position dictates a big deal of the lure action , ...just like lip shape , size and angle do as well , ...off course also general body shape and dimensions and even the buoyancy of the timber material being used . For example for this lure sketched , ...place the line tie underneath the chin quite close to the lip , and your lure might possibly get to rotate and blow out , .....if not , it would at least rock from one side to the other very strong , the frequencey of this movement would be quite low . Place the line tie directly at the tip of the nose , and your lure might not wobble at all but pull downward straight , .......though I think , that with this reasonably narrow lip it might still sport a subtle wiggle at a high frequency this way . Greetz , diemai