diemai
-
Posts
3,867 -
Joined
-
Last visited
-
Days Won
23
Content Type
Profiles
Articles
TU Classifieds
Glossary
Website Links
Forums
Gallery
Store
Everything posted by diemai
-
Hi folks , Just came across this one on YouTube recently , .....a commercial clip put out by a local Hamburg tackle shop here in northern Germany , ...........only very few words spoken , so no problems to understand ,............ .....................slogan in the end means about as much like "if you're feelin' like reelin' , do it with us" . Just thought I should share ! cheers , diemai
-
 Very nice work , Ben , I like that pattern , ........often thought about such "sandwich" construction as well , but never put it to practise . greetz , Dieter
 -

German engineering strikes again with this Cherokee lake Bronze back!
diemai commented on littleriver's gallery image in Trophy Room
 I'm so happy , that this bait produces for you , Vic , ....big congrats . greetz , Dieter
 -
@ Brent R ..........great idea for those deciding on a short term , I guess . @ JBlaze Absolutely great idea about those swivels , John , ...thanks a lot for sharing , been missing such this morning applying the second epoxy coat , ........all joints had already clogged up after the first layer , so I could not turn the lure around anymore , had to twist my wrist to access all spots with the paintbrush ! Next time I definately will install those swivels ! Greetz , Dieter
-
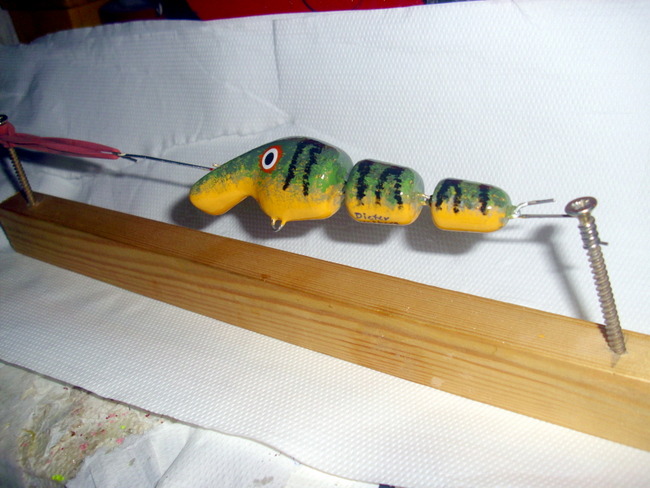
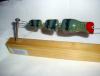
Hi there , folks , Just got up from the workshop having shot some pictures for another thread , .....since I'm just busy painting and topcoating another bunch of lures , I've thought that following pictures might be of interest for one or another fellow carver in here . This is a simply made frame , that I'm using to fix jointed lureblanks for painting and topcoating , .......it is important to stretch out the jointed lure real firm . If rubber bands should be too weak for bigger and heavier lures , one can also tie a simple loop of some kinda rigid twine or cord and utilize a kinked nail to twist the twine loop up to apply highest possible tension , .......the nail is then bound and secured against the dowel or one of the two long woodscrews somehow making it impossible to untwist again . Since the the timber dowel is quite narrow , one can easily access all spots with a brush , even turn the bait around a bit putting one finger on the belly hook eye . I'm painting my baits with a handbrush and modelmaking enamels , for topcoating I'm using a fast curing epoxy with only about 20 mins processing time , ......this way I do not need a rotisserie to avoid dripping , but only have to switch the bait around a few times whilst the epoxy starts to set . For the lure to dry I'd clamp the frame dowel in my vise or utilize spring-loaded or carpenter's clamps fixed on the ends of the wooden dowel to serve as a stand . But I'm sure , that it would be possible to design a rotisserie to accommodate such simple frames as well . Impossible to avoid clogging up the joining eyes with epoxy topcoat , ......after the final coat has cured , I would utilize my Dremel with a 1,0mm drill bit and a tiny cylindrical router bit to cut the eyes free very carefully , ....a finacky task , but it always worked out for me , ........the blade point of my old carpet knife with interchangeable blades takes care of the rest of glue remainders . Greetz , diemai

-
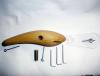
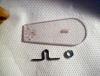
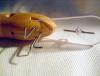
Just found a timber bait still under construction equipped with such an above mentioned "omega clip" and shot some pictures . The lip consists of 3mm thick Lexan , the wire pins and the omega clip are made of 1,5mm stainless steel welding wire , .........at final assembly these pins will be snipped off flush to body outline off course , prior to glueing them in one by one . The lure blank is 5 1/4" long . @ mark poulson One more thing to add to your stats , Mark , ......amongst my recent bunch of lures receiving topcoats right now there are two baits , that I've probably messed up ! Made the same way as pictured in my post above , but somehow the belly slot was too narrow and/or not aligned well on the center lengthwise axis of the blank , .........as a result the lip was pushed a bit sideward by the springy force of the wire form whilst the glue was still curing , ....when I finally took notice at last it was too late , the epoxy glue had already bonded the lip entirely . Still going to finish them , .........the flaw is clearly visible , but toweye tuning or maybe even doctoring on the lip's outline might get these lures to track true , ...I shall see ! .................so far for the "Metal Meister" , Mark ! greetz , Dieter
-
Here is the way that I do it , .........please check out post #20 of this older thread of mine , some pictures there . Usually I would lead the rear tag end of the internal wire form backward into the "U"-bend of the belly hook hanger , ....but in this case the belly slot was not deep enough , so I anchored the rear tag end as shown . Usually I do not pin the lip , only did it on this particular lure , because it is so long , .....normaly I'd only drill through the lips base and/or cut some little grooves into it's surface for a better bond of the epoxy glue . http://www.tackleunderground.com/community/topic/13043-new-banana-lure/page__hl__%20banana%20%20lures In Australia such pinned lip designs are quite popular , ......the guys over there would just place a little wire form sometimes called an "omega clip" through a centered slot in the lip , secured by a splitring , ........due to the little play of the clip versus the lip this construction also self-centers the lure on it's path of retrieve , ........no tow eye tuning neccessary, Not even possible though, quite accurate lip alignement essential , I guess . Off course such design requires real rigid and unbreakable lip material . greetz , diemai
-
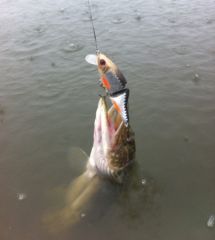 I can't believe it , ....60 hook-ups in one day , absolutely awesome ! Big congrats .
 -
Haven't thought about this , Ben , ......surely it would pay off to go different , ...often recommended in terms of other lure types as well , anyway ! I've said , that I haven't had much success with these baits before , ...........I can only think of a nice perch on a "Rattlin' Rapala" and a small pike on a burnt "Rat'L'Trap" on a day when nothing else could stir them up . But what I do remember is one occassion , when my wife and myself where vertical jigging below the boat at about 45 feet depth , .......I had a 3" fast-sinking "Rat'L'Trap" on the line and my wife used a small homemade jigging spoon of lead . I could clearly observe on my sonar that the loud rattlebait seemed to call the perch to come by and investigate , ....nevertheless they would not bite it but strike my wife's jigger dancing across the bottom right next to them . After having observed this for the first time , we often utilized this tactics some times again with success to fill the bucket with tasty perch . greetz , Dieter
-
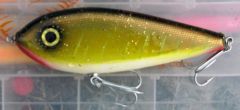
I've sometimes cracked my brains about making such designs like the "Ratt'L'Trap" or "Rapala Rattlin' Rap"(though I've never had much success with these) , .........never put my thoughts to practice though ! I think , the key to success of such lures are their super loud rattles , which I think cannot be mounted into a timber, PVC or even resin-cast blank , ........one can get the vibrating action at home , maybe also even assemble a smaller rattle chamber , ..... no problem about that , .........but never achieve the "real" loud sound of these commercial baits , period ! Unless working down lure kits of hard plastic , ...glueing two halves together with a lot of BB's inside , ...such kits are available at some component stores . Here is another bait of this style , .......quite old design , .......and , as far as I'm concerned , ...does not have any rattles : http://www.landbigfish.com/showcase.cfm?PID=4331 just my , .........greetz , diemai
-
 I see , that you've thought of some new color designs , Janne , .......lookin' really nice !
 -
 I like these oldtime style plugs , .....looking cool with their feathered rear hooks !
 -
These PVC crankbait blanks really do come in a breeze , Hubert , ........thanks for sharing ! greetz , Dieter
-
.....................I'd be interested as well , Gene ! Greetz , Dieter
-
@ Firechief Just came across this thread this morning , now I've got the time for writing : As Ben kindly wrote before , I've made quite a few of those oldtime designs , .....most likely just out of curiousity about how they would swim . By that time I absolutely had no idea of all of the many vintage lure models around , also did not have internet back then . Until one day back in the 1990's I've seen a lure collectors book in a British mailorder catalog , instantly got me an issue and soon started to carve some lures after the book pictures . Some more books and shop adresses were mentioned in that book which enabled me to obtain a few more books about vintage lures , thus more lure models of mine came into being , ......some of these led into unforgetable catching memories of my angling carreer , ......in particular to mention the "Whirligig" , the "Lucky13" , the "Lazy Ike" , the "Bass Oreno" and the old "Rush Tango" , ........all lure models that I had never heard of by that time . I always carry at least one of the above mentioned homemade lure models in my tacklebag EVERY season , ...all of them have caught me pike over here I Germany before and surely would in future as well . I have also written about some of them in different threads in here , ........gotta check if I could find them back for you , if interested : http://www.tackleunderground.com/community/topic/13043-new-banana-lure/page__hl__%2Bbanana+%2Blures__fromsearch__1 http://www.tackleunderground.com/community/topic/17724-my-latest-lure-test-video/page__hl__%20rush%20%20tango greetz , Dieter
-
@ Griffond .............great idea , ...would never have thought of such , .........good luck , ...greetz , Dieter
-
..............you would need some kind of a rectangular cornered jig to clamp the round dowel into , ........cracked my brains about it many years ago , but to me personally this freehanded grinding is the best and easiest solution , .......don't have a bandsaw , anyway . Maybe make yourself something roughly similar like this : http://www.klo-und-so.de/images/product_images/popup_images/rasoschs45rs-1.jpg But instead of a ring of sheet metal you would do two semi-squared blocks of wood connected with a bolt and nut on either side , both countersunk for plain edges and with an approbiate bore in center to accommodate your dowel diameter . This way you could clamp your dowel letting the end to be tapered sufficiently protruding , so you could access it with the sawblade to do four cuts everyone 90° offset to the previous one . To do a octagonal taper , you would have to turn the workpiece around for 45° after having cut 4 planes . Or , a bit more simple , ...take carpenter clamps and such an angled jig : http://www.schneidladen.de/media/Sony$20Schneidlade$202$20003.jpg Clamp your dowel into one corner , let the end to be tapered protrude an cut two opposing planes , .........you'd have to loosen the clamp now and turn around the workpiece for 90° , fix again and cut the other two planes , ..........for an octagon switch arounf for 45° again . But one would have to take care about the clamps won't squeeze and indent the dowels at unwanted locations , .......probably use some kind of protection pads , .......last option would be woodfiller , ......anyway . Disadvantage of both jigs would be , that you would hardly be able to see the sawblade , as the jigs would stand in the way , maybe one's gotta look from the side ? OK , mate , ...this just theory , .....my weird ideas on a short term , .......up to you whether you wanna try it out ! greetz , diemai
-
Hi , folks , Had this big timber blank readily carved yesterday , ......thought that I might show the way I did the hookhangers and linetie construction in here , before I'd proceed with that lure . I know that on some commercial baits , particular on diving glidebaits , cotter pins are used as hook hangers , .....but I don't like the way that their bent tag ends are still showing on the back of the lure , ........so I've thought about this method shown , .........more elaborate though , ......but surely looks better and also renders the lure less vulnerable to water sepage , I guess . Any further questions will be gladly answered , naturally , .........tight lines , diemai
-
Sorry , mate , ...maybe it's not quite clear to figure out , ....this is also done on the sanding disc shown at 3.07 , ........first two paralell aligned curved planes , after sand to a square alignement and finally to an octagon , ...afterwards start to round off , .....either with a "Dremel" coarse sanding drum or coarse sandpaper , ......remember that constant turning and equal material removal is the key thing to remain centered with the taper . The first grinding on the sanding disc takes a little "twist of the wrist" , as the single planes are not straight but somewhat curved , ........practise would occur whilst working ! good luck , diemai
-
It works quite well to shape round dowels into spindle-shaped lure bodies either just with a carving knife knife and sandpaper or a disc/belt sander and sandpaper , ........off course it takes considerably longer and also a certain amount of elbow grease , ..........but when working accurately it would be hard to differ such blanks from lathe-turned ones , .................I started out this way as well about 20 years ago . The latter is shown in here , as from 3:02 it is shown how to do the tail taper on a sander and with final hand sanding : The carving method goes as follows : -mark center of dowel end , draw a circle around center to resemble the about dia. at dowel end , ........draw a line around the circumferrence of the dowel somwhere away from the end where you wish the transition of the tail or also nose taper to begin . -take your knife and start carving a blunt taper at the marked end , ......make sure to possibly take away equally sized chips , after every knife stroke turn the workpiece a littlle further around in your holding hand , take good care about equal material removal all around the circumferrence . You should carve this blunt taper almost down to your circle marking at the dowels end center , just leave some "flesh" for sanding . -now lead your knife a bit downward away from the dowe'ls end and carve away material at the transition of your blunt taper to the original dowel diameter , again make sure to take off equally sized chips all around the circumferrence , .....always remember to turn ,...... turn , ..... turn your workpiece , ....DO NOT carve on one spotor level alone ! -this way your blunt taper becomes a little more rounded , .....when done with that level on the dowel , still go further down the dowel to carve off material equally along the circumferrence , .........always lead your knife at about the same level around the circumferrence , always take away about equally sized chips . -you'd procced this way , until you're satisfied with the shape and grade of your taper , ........do not carve right down to the transition line around the circumferrence , but leave some flesh for sanding again . -with sanding it's the same again , .....after every pass you'd turn the workpiece a little further , ......constant turning and equal material removal is the key to an equally spindle-shaped lure blank having centered tapers on it's ends . EXECEPTION : If you should have found a spot that became too thick or out of center , you must sand this one back to level naturally , .....this should be the only occassion that one needs to remove material at only one spot or level of the taper ! To determine whether the taper is running centered to the outer diameter of the dowel just roll it over your workbench and eyeball down the taper from it's end , you'll see quite well , whether you need to rework on certain spots . You can furnish blanks with a taper on one or on two ends this way , BUT , .......you must leave a reasonably large dowel portion untouched between the two ends , as this must be your reference for sufficient centering of the tapers(if making a taper on either end , first finish one side COMPLETELY before starting with the other) . Naturally , for topwater lures you want to use only the lightest timbers you can get , possibly still lighter than pine , ......sinking gliders can be made out of less buoyant stuff . Hope , that you could figure out about my humble explanations , .........good luck , 61diemai BTW , ......google for "Woodchopper Lure" to access pictures , .......guess , that they are no longer made .
-
@ littleriver Thanks for your interest in my video , Vic , ........in fact all of the spinners shown are homemade ones , except the ones at 1:06 and the two "ABU's" at 1:21 , ...........the ones shown at 1:06 are my favourite commercial spinners back from the time , that I've started to fish back during the late 1980's and early 90's , ......named "Balzer Colonel" . This German brand used to be a bit cheaper than my other favourites "Mepps" and "Blue Fox" and the "Colonels" did perform and used to catch pretty well , too . The lower ABU weight-forward spinner at 1:21 is the famous "Abu Mörrum"(named after a famous Swedish salmon river) , originally designed for strong river currents it also made it's way into the tackleboxes of stillwater anglers to be fished real deep and jigged along drop-offs or underwater structures , ......IMO it's the best weight-forward ever made ,......... despite the kinda small blade it's said to be able to catch even bigger fish . That squid spinner at 0:37 is a homemade one , ....also shown later in the video with some lookalikes . These kinda spinners are quite easy to make , just put a matching olive or teardrop inline sinker in the squid's head , you'd also need two small metal beads and a piece of cable insulation tube as a spacer towards the hook eye . The blades are homemade of 0,5mm stainless steel , ........there is another picture compilation on my YouTube channel displaying how to shape such blades . At 6:11 there are two special versions of squid spinners shown ,....... these rather have a bigger plastic bead and a very light sinker in the squid's head(only somewhat around 1/10 ounce) and an integrated anti-twist leader , rigged with commercial colorado blades in this case , .........these lures were first designed by Belgian or Dutch anglers to be fished in the shallow drains and ditches of the Netherlands , ....but naturally they work over here in local drainage ditches of the north German marsh lands as well , .......due to a lot of air resistance and lack of weight very poor to cast(ditches and drains are only a few yards wide and just up to 5 feet deep , often even less) ,...... spinning gear essential , ......but run very shallow even on slowest retrieve paces , just perfect for the job . As far as I'm concerned , there are no spinners with ammo casing bodies shown in this video , .......the ones , you must be refering to , have bodies of metal tubing cast out with molten lead . But I've made ammo casing spinners before : http://www.tackleunderground.com/community/gallery/image/5429-early-career-inline-spinners/ These large ones turned out a bit too heavy ,........ I've also made smaller ones out of special blank pistol casings ("8 mm knall") available over here , ........matched with blades size 3 these made up for perfectly balanced spinners . Concerning the banana lures , ........it was not easy to get these to work properly in the end , but finally I got behind their dynamics after having produced quite a few rejects . The linseed oil method really takes away some buoyancy off the timber material , but this strongly depends on the kind of wood as well , ......I'm only using this sealing method for abache wood exclusively nowadays , ...made bad experiences with other timbers , either it turned out too heavy afterwards or the oil reacted with containing raisins in the wood affecting the later paintjobs . In future I will definately prime linseedoil-treated blanks with epoxy topcoat prior to painting , ..seems to be the only reliable way to prevent the oil from "sweating out" some day to yellow or even spoil the paint jobs as it happened to some , ....though not all , .....of my baits made this way ! But these lures in the pictures also have very heavy hardware assembled("figure 8" wire forms epoxied into bores and crosswise pinned , ...no screw eyes) , but all in all abache wood works well for such baits , especially around the 3" to 3 1/2" sizes , ....only requires a little belly ballast somewhere between tow eye position and belly hook hanger , .......rather more to stabilize it's swimming action . I'm just busy these days making a few different banana baits out of PVC , .....these have to be overloaded with ballast , as the material is so buoyant , ...but first blank bath tub tests looked promising . greetz , Dieter
- 6 replies
-
- 1
-

-
- lures on video
- lure compilation
- (and 2 more)
-
Thanks a lot , mate ! tight lines , diemai
-
@ ING Thanks for the hint about that WD40 stuff , ........I fish in freshwater exclusively , ....so I guess , that my rust problems would be quite a bit less , ......I've often read , that saltwater is always more aggressive in terms of corrosion , though . greetz , diemai
-
@ mark poulson Probably I've mixed it up , Mark , ........over here we have a WD40 lubricant in spraycans , are you referring to that one as well ? http://en.wikipedia.org/wiki/WD-40 Just saw it , it's US made , .....must be the same stuff that I had in mind , ......but has slightly different contents over here . But read the text properly , ....the containing fish oil is stated a legend there . Heard of many purposes of such oils , ....but never about using it as scent for fishing , no matter what species ! But on the other hand I recall to have read somewhere , that genuine turpentine(not the commonly available artificial one)can be used as scent as well , ...it was for local zander , if my memory serves me right ? I'm also utilizing clear nail polish , always carry a bottle along , ...but rather more to fix floats and bobbers , when their topcoat should get damaged . greetz , Dieter
-
When coming back home I always take all my stowaway boxes out of my tacklebag and put them down open to dry , anyway ! But do you think , that the smell of W40 is attractive to fish ? greetz , diemai