

diemai
-
Posts
3,867 -
Joined
-
Last visited
-
Days Won
23
Content Type
Profiles
Articles
TU Classifieds
Glossary
Website Links
Forums
Gallery
Store
Everything posted by diemai
-
 Very neat foiling , .........must have been quite finacky to do with the mesh underneath the foil ! greetz , diemai
 -
 Absolutely great paintwork on your baits ! greetz , diemai
 -
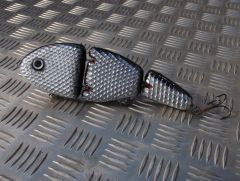
 Quite funny , ........I'm presently working on a PVC bait with a similar surface texture like yours , I've made lots of small dimples onto the smooth PVC surface with my "Dremel" and a small ball router bit , covered the lures' sections with aluminium tape to achieve an appearance like a metal spoon in a so-called "hammered finish" , .........never got further than that with it so far . But as I look closer at the picture of your bait , I see , that your texture consists of more than just round dimples , they really look like fish scales , .........did you carve these indents one by one with a small chisel especially shaped for the purpose ? greetz , diemai
 -
Thanks , Mark , .......would you believe , that this patch is located only 15 minutes by car from the very heart of the city ? greetz , Dieter
-
Sorry , Pete , ......saw this too late , .........hope , that you've had a nice one ! all the best , Dieter
-
@ Hoist-N-Hawgs I also think , that the prop is a bit too small , the water current can't hit the blades well to get them to spin . I did encounter the same problem as well with these shop-bought props , as the bearing surface of these is rather short(only the thickness of the sheet material) , so they often "edge" on their shaft , which prevents them from rotating well . To overcome this problem , I've extended their center hole somewhat bigger and turned down a small bearing bush on my lathe , simply by filing some fitting round brass stock against the turning direction of the lathe , ..........the workpiece looks like a kinda rivet head later , the center bore must be done PRIOR to filing it to approbiate diameter , leaving a rivet head on one side . I'd simply insert this bush into the extended prop's center bore and hit the thinner end of that bush with a hammer to kinda rivet it into the prop's bore , ........the center bore in the bush might deform a bit , but after having assembled the bush it can be re-drilled . This way I have extentended the bearing length of the prop by multiple times and it can't "edge" on it's shaft anymore , ..........sadly this only works on medium and larger sized commercial props due to space reasons . But to be honest , I prefer to cut my own style props out of 0,5 mm stainless steel sheet , these would have TWO aligned bearing bores(like a buzz-blade)and are dead sure to get to spin . It's quite a finacky task making such props , often taking longer than shaping the entire lure blank , but in the end these are absolutely free of any hazzle and you can also try out a variety of different shapes . In this video you can see one of my propbaits equipped with such homemade props : good luck , .......greetz , diemai
-
@ Vodkaman Sorry , mate , .....but truly there are days , when you better should not have gotten up from your bed in the morning , ..........you know , Murphy never sleeps ! But fortunately there is always hope for a better one to come your way ! greetz , Dieter
-
If I drill crosswise holes trough wooden blanks to insert rattle casings , I've found , that the Forstner bits would still cause the woodgrain to tear away at the exit of the hole . I now drill a kinda small pilot hole all the way through , so that the center tip of the Forstner bit can center itself on either side of this small initial bore , the entries of the holes usually won't tear , .....if working accurately , both bores would meet centered , ....I'm talking 'bout rattle casings dia. 5mm and 8mm , pilot hole dia. 2mm . greetz , diemai
-
I know , that many luremakers from Finland use transparent concrete sealer to dip a topcoat onto their lures for several times , ........never found out about the particular product names , but they seem to be locally made and they provide rock hard finishes , .........I have a few swap lures from Finland made this way , ......never had any problems with the topcoat chipping off ! Many German builders use epoxy from a local supplier http://www.bootsservice-behnke.de/index.html , basically there are two kinds of resin and a couple of suitable hardeners available , so that the curing time , consistency , etc. can be altered . Some mixtures are better suited for coating , glueing , ...... whereas others are better for laminating fibre reinforced workpieces . greetz ,diemai
-
 "......new dresses bound to make a change " , .......great work , Mark , ....good luck throwing these ! greetz , Dieter
 -
@ HAWGHUNNA Thanks for sharing your work , ..........I'm not too fond of cutting my 3 millimetres polycarbonate with snips , as often little cracks evolve which would lead from the cut towards the center of lip . These are usually not very long , so with leaving enough "flesh" on the lips outline , I could afterwards still grind the lip to proper shape on my disc sander showing no flaws no more . Maybe , my ordinary sheet metal snips are not as suited for this particular cutting job ?? But still I prefer cutting out the lips with a jig saw , that has a piece of a coarse metal bandsaw blade attached(fine toothed jig saw blades always bind into the hot polycarbonate(heated by the friction of the sawblade). greetz , diemai
-
I've made quite a few baits like that utilizing homemade lips of aluminium sheet . Prior to sealing , painting and topcoating your blanks , pre-assemble your lip to the bare blank just to check out for a perfect and angled fit . First mark and drill only ONE wood screw pilot hole into the blank(prefarably the center one out of most likely three) , fix your lip with one screw and set it to a perfectly angled position , ........now mark and drill all other pilot holes trough the screw holes of the lip . If a pilot hole should have run out of position , thus it is not possible to set the lip perfectly angled and/or centered , do not try to extend or doctor on the pilot hole , this would only weaken the screws fit into the wood ,..... just extend the hole in the lip to an oval shape with a router bit or a small round file , the screw's head would later hide that little imperfection . Also utilize round head screws exclusively , woodscrews with 90° countersunk heads are not suitable , as their angled heads are likely to push the lip into unwanted directions by having an effect on the edges of the lip's holes . After you're happy with that dry fit , proceed your blank with sealing , painting and topcoating , the lip assembly would be the final work operation(before rigging the hooks ) ,....start again with only one screw , set lip correctly and after fix the other screws , .........I like to apply some epoxy glue to the screw shanks and pilot holes for added strength and to seal of the pilot holes interior ,...... put in the first(center) screw dry to be able to set the final lip position , you'd twist it out again to finally glue in , after the other two screw's epoxy has set . good luck , diemai
-
 These turned out very nice and neat , .....I suppose , that you've left the reverse side plain polished ? But to me this exactly seems to be a problem about painting brass or stainless steel spoons , .......their surface is so shiny , that I've always had concerns about proper paint adhesion on those surfaces , ........I've done some spoons hand-brushing them with model making enamels or plating them with sprinkled-on glitter flakes , ....for perfect adhesion I've at least buffed the surface with coarse sandpaper or even sandblasted them at my work . greetz , Dieter
 -
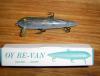
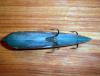
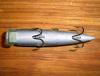
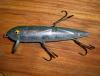
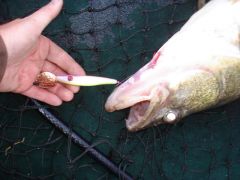
Hi , folks , Just saw a gallery comment by Rofish on the latest swimbait of John Hopkins digging up the idea of these hooks rigged on the back of a lure again(to my shame , my blank still hangs in my lure rack unpainted ) ! Anyway , I have positioned these double hooks with a wire eye clip plus a magnet , John uses a magnet exclusively , as far , as I'm concerned , ............well , here is another ingenious contruction to hold such hooks in place , ....this is a Finnish salmon lure supposively made during the 1970's . My Finnish friend , who sent me this little gem a couple of weeks ago , said that it does not swim too well , but nevertheless the way of fixing the hooks is pretty interesting . The open shank doubles are slid over an enlongated wire form somehow anchored into the interior of the bait , ...these forms run down a bore centered , ....so that the doubles would bind into the bores once getting pushed down the bore , .......a hooked fish is supposed to pull out the hook from the guiding bore , so the hook eye can now swing freely in the eye at the end of the wire form preventing hook leverage . Can't say , whether this principle works fine or even at all , but the design is quite remarkable to me . greetz , diemai
-
 Sucha great bait as usual , ......absolutely perfect craftmanship ! Rofish , if I recall right , I've seen that backhook rig at first on one of John's flounder lures , and I'm still sure , that it has already been there decades ago within the mists of lure history ! Gonna post pictures of a commercial lure from the 1970's(supposively) in my "back hook" thread , received it from a friend some weeks ago . greetz , Dieter
 -
All the best , Dave greetz , Dieter
-
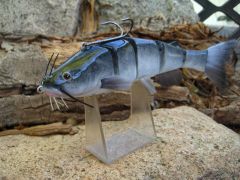
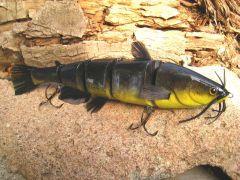 The realistic look of your swimbaits is most amazing , .......each and every time ! Absolutely great work , ......as usual , ....greetz , Dieter
 -
Though I can't quite get behind the mechanism , I'd say , that this device has probably been added to an ordinary casting reel to enable a somehow handicapped or disabled fisherman to still be able to operate it , ....maybe a wounded veteran of World War 2 ????? Just my ??? greetz, diemai
-
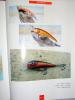
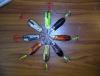
Yep , .....Mark , I just find this one to be a great instructíonal video , ........here are some more lures made by that guy in the video(two top pictures) , ...his name is Pauli Hirvonen . Picture taken from a Finnish book displaying the work of more than 40 national lure makers . greetz , Dieter
-
Hahahaha , Mark , .....I'don't even remember , ......was it My link ? @ Ken6645 Only CD I've come across so far is one made by TU member jrhopkins on how to make his outstanding PVC swimbaits , guess , that you can order it from him ? But there definately are some videos about luremaking on My link , also footage made by Larry Dahlberg . My prefered crankbait carving video is from Finland , put in term "making wobblers by hand" into the search function bar at "YouTube" ,.... otherwise also try terms like "luremaking" , "lurebuilding" , "homemade lures" , ....etc. ! Good luck , diemai
-
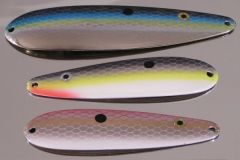
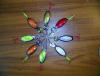
I usually don't name my hardbaits(maybe very few) , as I most likely only build one or at least very few of one particular model, ........but I've given names to some of my home-designed spoon models(constantly replacing lost ones) ,...... here are the latest "Creature Spoon"(left) and the "DinnerBell"(right) . Greetz , diemai
-
 Sounds like an interesting design , ........a pity , that there is not much to be seen of the lure , ......but a very nice fish though , congrats ! greetz , diemai
 -
@ Kelkay VMC's are a good standard and a little less costly than other brands over here in Germany , but if I want real sharp hooks that really stick , I'd go for Gamakatsu's , also Eagle Claw Curved Points do stick very well . The latter two brands are either hard to get over here(Eagle Claw) or pretty expensive(Gammy's) , most likely I use these hooks on jigging spoons only , as these also do nail perch that only "smell" them lures ! For most other lures I'm not that picky , rigging most likely VMC or Eagle Claw bronzed standards and even other local brands . Owner's are not very common over here , though some shops carry them nowadays , but also at quite a high price . greetz , diemai
-
@ Jeep Wanted to comment on your lastest video on "youtube" some days ago , but somehow it did not submit my text ! Anyway , here I go , ........enjoyed watching it pretty much , some extremely nice pike there on your outstanding lures , sucha great sight to see . greetz , Dieter
-
@ cadman Braid also requires different knots compared to monofilament to retain it's best possible knot strength . Thus having a much smaller diameter than mono at same knot strength , you would need a lot more of braid to fill the spool of your regular spinning reel(unless obtaining a smaller reel) , ......in this case I use some cheap mono at first as a filler , finally about 150 metres of that expensive braid are fairly enough for most lure fishing conditions . On low profile casting reels I most likely do not use mono filler , as I have them in sufficiently small sizes or spool on thicker braid for heavier pike lures , ........anyway , the braid tends to slip on the spool's core , so either put a stripe of textile tape around the spool's core first or , even better , tie and knot the braid onto the core and after tape it , .........these ways it won't slip . On spinning reels this does not happen that much , because the line has it's 90° offset detour around the bail roller , .....and I have the mono filler pre-spooled , anyway ! Because of the near zero stretch of braid and it's high strength you most likely need to loosen the drag a bit more than you would do with mono line not to put too much tension on tackle and fish , ........when snagged up , do not pull with rod and reel but wind your line around a round wood dowel(branch , priest , etc.) for a few times , take care that the single windings would not come lay accross one another , otherwise they might cut through when you now pull on that dowel with two hands . Some fish species are not that suited that much to be fished on with braid , or at least one has to take extra care not to tear out the hooks from their softer lips and jaws with the zero stretch of braid , so a well operated drag is essential , .........in particular I am extra cautious about our local perch . Bird nests on casting reels are very nasty , in particular with braid , ......harder to pick apart again than with mono ,....... I prefer somehow plated braids like "Berkley Fireline" on my casting reels , as these are a bit more stiffish compared to non-plated lines , thus eventual bird's nests are easier to get rid of . good luck , diemai


