

diemai
-
Posts
3,867 -
Joined
-
Last visited
-
Days Won
23
Content Type
Profiles
Articles
TU Classifieds
Glossary
Website Links
Forums
Gallery
Store
Everything posted by diemai
-
@ davedog I extend the pilot hole to approx. double diameter(1,5mm pilot hole , 3,5mm extension dia.) at about 1/5 to 1/4 of eye screw shank length , ........when twisting in the eye screws , I'd apply some 5 min epoxy glue onto the threaded portion of the shank , .......this way a kinda glue plug evolves around the entry of the screw , wiping off excess glue immediately . Not only for added strength , but also for advanced waterproofing the bait ,......... I mount the eyescrews before painting(should do it at least prior to topcoating) , though it means more work for me masking them when spray-painting . Never had issues this way , even not with my PB 47" pike ! good luck , .....greetz , diemai
-
 A rather experimental lure made after a two sectioned bait by an unknown maker , that I had received through a swap years ago . You may read more in my thread "some swimbait contruction pictures" , .............the lure is supposed to be retrieved in a "jerk-and-pause" manner , .......at rest it hangs "U" shaped at the surface with head and tail pointing downward( far more pronounced like in this picture) , .....on a jerk int straightens out to dive down with a trembling wiggle of its sections and the tail blade spinning , on a pause it instantly collapses back into its "U"-shape to rise back towards the surface . So far for the the theory , haven't yet tested it outdoors ,.......I hope , that it would not hook-tangle too much whilst casting ! greetz , diemai
 -
 A 8 1/2" bait of PVC resembling a pike , painted with modelmaking enamels and felt pens , transparent glass eyes with their background painted orange . The fins are made out od epoxy sheets , ....the lure sank rather slowly at its first blank tests unpainted . Made it without a lip at first , but I was aware , that it might possibly not work without one , as sucha slender body shape often cannot generate sufficiently powerfull vortices to get the bait to snake well ! And so it did , at first bath tub blank tests only the two or three rear sections would get to move , so I added that lip and afterwards the bit swam just fine ! greetz , diemai
 -
 Finally I got done with this larger PVC bait scratching 7" ,......it descends at a medium sink rate and sported a nice action during it's first(unpainted) blank bath tub test , ........still gonna make a video these days , when first testing it outdoors . Hand painted with modelmaking enamels and permanent felt pens , topcoated with two layers of each acrylic clear , epoxy and modelling dope . Had some issues with this one , ........it would not work well with the first tail fin of epoxy sheet(similar to circuit board) , the rear hook constantly bound with that larger fin and it also was a bit heavy to get to move nicely , I suppose . So I had to replace it with this present smaller fin of PVC , and the lure worked fine , .........you may view it's blank condition in my thread "some swimbait construction pictures" ! greetz , diemai
 -
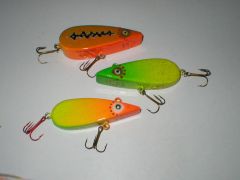
 Guess , that I had posted these somewhere in a thread before in unpainted condition , even made a video of two of them still blank , ....you can find these on my "YouTube" channel(61diemai) ! Anyway , they are made from plastic wine bottle cork , a very buoyant material , the prop blade of the "Globe" style lure is homemade from 0,5mm stainless steel sheet , all lures painted with modelmaking enamels . greetz , diemai
 -
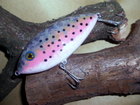
 Carved this one from PVC decking just out of a temper , ........later I also did not have any better idea on painting it ! Length without lip is about 3" , it is weighted for only the hump on the back to stick out at rest and on retrieve it has a tighter wiggle at a high frequency . greetz , diemai
 -
 Minnow crankbait scratches 5" , ...........the smaller sinking glider was meant to be worked with the pointed end forward at first(after some lures I had seen in here) , but did not glide sideward at all during first blank test in unpainted condition . So I've snipped off the original belly hook hanger of the thru-wire harness and mounted a screw eye on other location to be now able to work the lure the "normal" way ! It works fine like this now , darting to either side with a nice glide on a jerking retrive . "Scale" patterns are embossed into the aluminium tape with a small threaded steel drum(part of a tool for thread rolling onto steel rods that is produced at my work) , that I've got from the scrapyard of my work , lures are brush painted with modelmaking enamels and permanent felt pens . greetz , diemai
 -
Great design and execution on these , .........brilliant paintjobs as well ! Very interesting read on their construction and performance , too ! thanks for sharing ,................ greetz , diemai
-
 Nice pike pattern and great glide on that one , .........I like it ! greetz , diemai
 -
@ atrophius The smaller , moderately cupped ones also act as bearing surfaces for the the props on baits with propellers on either or only one end , ........very important for that purpose ! But in my opinion with the durable modern topcoats and hooks easily rigged with splitrings nowadays these cup washers have begun to be of no use for just hook rigging anymore , at least not as much as in previous decades . greetz , diemai
-
@ FishThanks Haven't come across this post before , don't have a router table like this either , but just wanna tell you , that this is a very smart idea , .......brilliant and neat execution ! greetz , diemai
-
 Very beautiful perch pattern , .......I like that bit of a high-bodied profile as well , makes up for a great target for pike and muskie ! welldone as always , ...........greetz , diemai
 -
@ rustyman I am wondering , whether your material is the right stuff ? I am cutting mine out just roughly with a small saw or jigsaw and sand them down to the marked outlines with a 60 grit sanding disc chucked into my lathe's motor . Even sanding off 1/2" from the Lexan material in one pass does not cause me any of the problems , that you have described . Never had issues about heating up and generating blobs , only a ridge of milky white rigid material would build up at the location engaged to the grinder , and it is not soft nor sticky at all ! I can easily cut it off with a sharp carpet knife , afterwards break the lip's edges with a small fine grade file and/or sandpaper(with the latter one needs to be very cautious to ONLY touch the edge , otherwise the lip's plane would become scratched) . good luck , diemai
-
@ philB This lure model is called "Floppy" , French made and obviously widely available in some European countries during past decades , .......I have seen some on local fleamarkets here in Hamburg as well ! Also saw it pictured and briefly described in a German angling book issued in 1977 , so it must have been quite popular by that time ! Obviously also known in Australia , ........you may sign in on My link to learn more about vintage and collectible lures(and view heaps and heaps of lure pictures) from mainly Australia , but also from all around the world ! greetz , diemai
-
 A real beauty ! greetz , diemai
 -
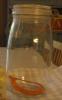
There are one ,-and two component concrete laquers around , as my Finnsh friend has once told me ,....... he himself is using one component stuff . He thins the laquer to a "pee" consistency(his own words ) and puts it into glass jugs , both for storing and dipping alike ! He dips six to eight times , always doing the next dip , when the previous one had already set , but not yet cured entirely , .......this way the single layers do bind very well ! These jugs have a kinda spring-loaded glass top lid , for storage he would put a cut-out sheet of a plastic bag inbetween the jug's upper rim and the lid to act as a sealer and to prevent jug and lid to bind with dried laquer . But I guess , such jugs without a lockable top lid do work as well , when sealed properly for closure(check picture) . Sorry , that I can't provide more info ,........ I haven't found a suitable one-component concrete laquer so far , they only sell colored ones in local tool marts , no clear . Another problem is , that most likely only large containers are available , as most likely only large concrete planes require to be covered ! still good luck though , ........greetz , diemai
-
@ DSV I know , that Finnish lure builders are using clear concrete laquer(the stuff to seal off concrete floors) to dip their painted lures a couple of times(up to 8 times) , .......I could never get my hands on such stuff over here in Germany , but I have some Finnish lures made that way and I can assure you , that the finish is rock hard and quite thick . From an Australian site I've also got the hint about using clear modelling dope(laquer to reinforce and stretch the paper tissue on RC model aircraft wing frames) . I have tried this as well , .......that laquer is easy to obtain in any RC model shop , quite cheap and easy to work with , special thinner available(turpentine won't work) . It's layers turn out thin , but cure very hard , ........at first it looks a bit wrinkled after brushing on , but stretches to a smooth surface later , .......dries very fast . Sadly it does affect some types of paint , so if uncertain , one should apply an acrylic clear topcoat at first to protect paint patterns and felt pen signatures , etc ........! But I would only use this modelling dope for lures used for rather non-toothy fish like trout , perch and bass , ........the topcoat would turn out too thin for big predators like pike and muskie . good luck , diemai
-
@ jrhopkins , @ mark poulson Thanks guys ,......... but you were the ones to guide my way ! greetz , Dieter
-
 Made a prototype the way described above out of PVC and to my surprise it did not work at all , it just darted straight forward ! The lure is thru-wired , so what I actually did to still get it to "walk-the-dog" underwater is to snip off the belly hook hanger eye and place a belly screw eye more towards the fatter portion , so that the lure now swims "the ordinary way" fatter portion forward . During the first bath tub test it worked fine this way , just busy topcoating it , will post a pic some day from now ! greetz , diemai
 -
@ java Nice idea , .....do you want to burn that pattern onto bare light colored wood and leave the lure unpainted(just clearcoated) ? But I'm afraid , that this very fine wire mesh might just overheat and tear or burn away , when heating it with a torch ,......... would be very hard to keep a constant heat level on the entire piece of mesh required . It might also take a considerable amount of time , until the wood starts to turn black at the contact spots , ........the tiny mesh would not keep sufficient heat for long ,........ it would cool down very fast , once it is taken off the torch flame . Might work better on PVC blanks ,....... that artificial material would probably require a less hot mesh and a shorter contact time with the hot mesh to show a result , .............but which would not be a darker scale pattern , but maybe a kinda empossed pattern , that still would have to be painted over carefully to show some kinda effect ! Probably it is possible to heat up the mesh to a constant and controllable glow with electric current(did such experiments back in school physics lessons 35 years ago with wire) , but I really do not want to lead you into hazardous or even lethal methods , ........in this case it would require the advice and help of someone , that really knows about electric currents . Just my , .........good luck , diemai
-
@ Zolja That's one of the big advantages of the stuff , ........carves and sands like a dream and you can even test the blanks instantly with the wireforms just temporary stuck into their fittings , not even glued in ! After the swimtest I'd just dry the blank with some kitchen tissue paper and a few careful passes of a lighter flame , ....done for glueing in all parts My own PVC , that I've received from a guy here in Germany , contains a few tiny bubbles up to 1 mm dia. as well , .....but very few , most likely these close when priming and painting the lure blanks ! good luck , diemai
-
 Interresting design and very nice color patterns ! I guess that weighting approx. 1 ounce they're pretty buoyant for their size , do you intend tossing them over weedbeds ? I'd prefer such baits to hang barely afloat or even suspend . great work , ..........greetz , diemai
 -
@ wetflyguy Usually the rear section is tapered , shorter and thus generally less buoyant compared to the front section , thus won't float up that pronounced with it's mounted hardware . So it won't require any weight , anyway . A weighted rear part is more difficult to get to wiggle , as a higher weight would have to be moved by the first section . I 100% agree with BobP , that the ballast should become less and less per each section towards the rear of multiple sectioned baits , .........the very rear should always remain unweighted . good luck , diemai
-
@ eboll Welcome to TU ! I sometimes paint homemade spoons and blades of stainless steel , copper and brass sheet ,......... either with rattle cans or by brushing on modelmaking enamels . Prior to priming the blanks white , I'd either sandblast them at my work or at least treat them with a rotating steel bristled brush to clean of the oxide layer from brass and copper and to have the surface a little rough for better adhesion of paint . The painted blades and spoon do require a sufficient clearcoat for more durability and especially to protect them against the softeners containing in plastic lures , that the blades might get in contact with whilst storage . good luck , diemai
-
 @ CatchemCaro Just had a look thru all of your pics , ..........truly great lures , really great fish ! I always find it astonishing , that your local bass seem to frequently go for lures of that big size . greetz , diemai

