diemai
-
Posts
3,867 -
Joined
-
Last visited
-
Days Won
23
Content Type
Profiles
Articles
TU Classifieds
Glossary
Website Links
Forums
Gallery
Store
Everything posted by diemai
-
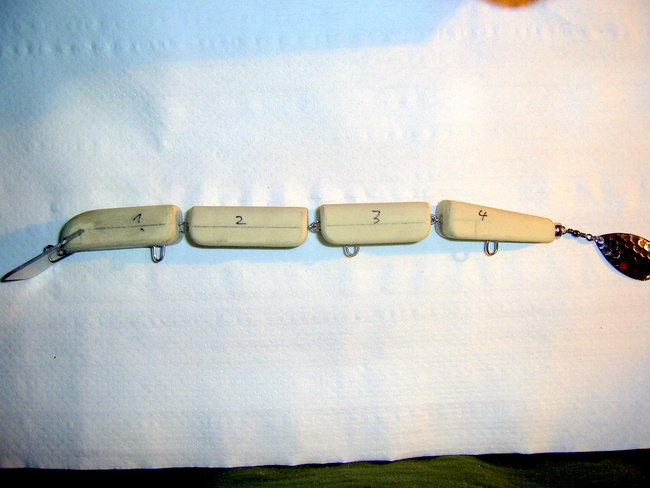
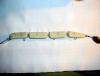
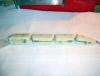
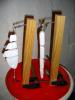
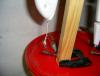
Hi , folks , Managed to proceed a bit with my actual batch of PVC swimbaits , ...........finally have them connected and also glued in all ballast weights . Had some issues with both of the carp ,- and pike-shaped baits ,..... they would did not swim in their original condition as shown above . The carp bait did not perform well because of it's bigger tail fin made of epoxy sheet(similar to circuit board) , ......the tail hook would always bind with it on retrieve and hinder proper movements , also the considerably heavy material put its share to this lack of action , I guess ? Therefore I replaced that tail fin with a smaller one of PVC , and the following blank swim test displayed a much better and improved action of that bait . Off course I had to add some more ballast to the fourth section to balance the now decreased weight of the rear part of the lure . As I had already expected right from the start , the pike-shaped bait did not perform well at all , .........the slender body shape is simply too difficult to generate those vortices , that get a swimbait to "snake" ,..................only the last one or two section plus the tail fin did move a bit at first . So I had to add a lip to that bait , dremeld out the accommodating pouches for the lip and testet the lure again , .......it swam OK now with that lip I've made , so I finally glued it in , .........problem solved ! Also made another bigger four-sectioned PVC bait along with these two swimbaits , ...........just wanted to try out this little different design of a simple pullbait ! It is based upon a lure by an unknown builder , that I had received years ago from a friend . That lure was called "The Jackknife" , .........it had only two sections , that did float up with head and tail down in a kinda "V"-shape . If you'd jerk it , it would instantly straighten out and dive down , .........pause it , and it would collapse into the kinked condition instantly and rise up to the surface again . On one picture a piece of wire resembles in about the water line , in about how the "U" shaped collapsed lure sections would hang on the surface . My own four-sectioned version of approx. 8 1/2" works the same way , tried the blank in the tub ,...... the action is pretty much OK for me , .......on the dive the sections even sport a little wiggle as the lure digs down . Only issue , that could still come up , is that the trebles might constantly tangle whilst casting , ..........but I guess , that stopping down the cast before impact would cause the lure to hit the water straightened out and not have the hooks bind , .......during it's jerk-and-pause retrieve it would not happen , I guess . When first priming these multiple sectioned lures , I've encountered the problem of the sections moving too much whilst brushing paint onto them , even the spring-loaded metal clams , that I've fixed onto either end , did not help that much , as they still had done with my previously built smaller swimbaits ! So on a short term I have made these simple frames to fix the lures into in a straightened out condition , the single segments are now rigid enough against one another not to move that much anymore . Guess , that the pictures say it all , .......one end of the lure is rigged into a wire hook , the other end is fixed with a loop of kite cord , that has been twisted with a kinked nail , so that the lure sections would be pulled apart , thus straightened out rigidly , finally I would somehow clog up and secure the nail against the tension of the cord , a piece of thicker and softer wire would do as well , ....even easier to secure it finally . Greetz , diemai

-
 .......just your personal style .........looks great ! greetz , diemai
 -
@ Piscivorous Pike Sorry that I am unable to help or provide any advice , but living in a country with heaps and heaps of partly senseless fishing restrictions and regulations I can really feel for you ! still good luck for ya , .........greetz , diemai
-
@ CatchemCaro I am familiar with that problem of the opening splitrings , but your solution sounds pretty complicated(though I am always chosing complicated processes as well ) . Just use a little bit bigger splitrings , these won't bend open that much anymore , sometimes it also helps to rig the splitrings with a little more care ,........... do not push splitring over screw eye and hook eye at one time . Splitrings of tempered steel(nickel , -or chrome plated) stay in shape better rather than stainless steel ones , also have a better pull test value , ...........but they'd start to rust sooner or later , if the plating becomes damaged , ........also they'd take more force to assemble . If slightly larger rings don't match your lure size , you may also look for thinnner wired screw eyes(thus be able to assemble smaller rings) , ........as far as I'm concerned , there are three different thicknesses available , I order mine from My link . good luck , diemai
-
 Nice lure construction and also well made trout pattern , ..........did you already swim it ? greetz , diemai
 -
@ RayburnGuy You can still do it if using glitter jelly ! greetz , diemai
-

arms race for the fishing season continues...part 2
diemai commented on solarfall's gallery image in Hard Baits
 Again your own typical paint style , .........looks great ! greetz , diemai
 -
 Very nice color pattern again , but I agree that a bit more of black color might have been of advantage on a topwater bait . I would rig bigger hooks , ........the distance between the single hook points should at least equal the width of the lure blank , much better hook-up chances that way ! greetz , diemai
 -
@ nitro98 The inside eye diameter and shank length of the screw eyes is listed in a table in the PDF catalog of "Moore's Lures" . Glad , if I could help , ..........greetz , diemai
-
@ hybrideye I make my liposlots in a way for the lip to fit in quite snugly , ........just to avoid the possibility of it sliding out of proper fit whilst the glue is still curing , ..........just Murphy's Law , so to speak ! To still maintain a good glue bond , I would drill some holes through the base of the lip(the portion inside of the blank) , maybe even extend them with a conical "Dremel" router bit on either side to make up for a kinda "hourglass" look . In addition I would also use a "Dremel" bit(or a small triangular file)to furnish some grooves into the lips base edge . good luck , diemai
-
@JP MYERS hazmail has put up a tut in here about how to bend or cup lexan lips permanently , it works with a homemade springloaded bending template and heating up the material in hot oil . But I have read in a lure collectors book , that the plastic lipped jitterbugs of the world war two period(no metal lips available due to material shortage)did not work to the satisfaction to the fishermen , as those lighter lips would not "shoulder" into the water as heavily as metal ones would , thus generating less sound ! good luck , diemai
-
@ nitro98 Do not shorten the length of the head , .........the head section is supposed to be the longest of all ! First to be able to carry the largest amount of ballast inside of the bait , second to generate currents and vortices in the water , that cause the lure to snake at all . The shape of your bait is 100% alright to me , .........it is a problem minor buoyancy of the material only . There is a thread somewhere in here about those currents and vortices , guess it was started by Vodkaman , .....not quite sure , whether it's named "vortex theory" ? If you do a search , utilize the term "Mandelbrot files" or "Mandlebrot files" , a rare term , should not lead you somewhere else . I buy my screw eyes at My link , there are also some small ones available there , ........all are made of stainless steel , no brass ! good luck , diemai
-
 Nice cork popper , ........did you put some weight in the belly ! These cork lures are rather too buoyant at times , .......just a little lead shot to help the popper to swim upright constantly ! What are the eyes made of ? When I first started out making lures about 20 years ago , I had also cut my first spinner blades from the bottom of beverage cans , as these already had an approbiate cupping . greetz , Dieter
 -
 Now this is real "lure" art , .........hats off to you ! greetz , Dieter
 -
 This marble effect seems to become your own personal style of lure painting , ........just looks great time after time again ! greetz , Dieter
 -
 @ StrykerLures You've achieved a neat scaling on this one ! Two things , that I've noticed and that I would change fo future lures , ............a horizontal line tie on a lipped lure disables the possibility of tuning the lure in terms of straight tracking , ..........with this particular lure you would have to bend the metal lip , if the lure should run out of course(these commercial SSt lips are darn rigid to bend) . Some glider jerkbaits still have such horizontal line ties to enhance their gliding abilities , these surely do make sense on such baits . Second is , that I would not use wood screws with countersunk heads to fix such lips(been there , done that) , .......most likely makes it impossible to set the lip at accurate right angle relating the lure's lengthwise center axis , .............just a little inaccuracy in positioning the pilot holes and the countersunk screw head would push the lip , where it wants it to go to , not where you wish it to be ! Always take round head screws for this purpose ! greetz , diemai
 -
@ nitro98 Welcome in here at TU ! Hard to tell on a distance just by a photo ! To me the bait looks alright and functional , though on my own swimbaits I prefer to put the line tie and nose low , not high like on your bait . But still my theory of uneven pressure and leverage around the line tie is fullfilled this way ,...... and you state , that your bait does "snake" well so far . I am sure , that your bait requires more weight in its belly to have it remain upright on retrieve , most ballast should be placed into the head section , further down the tail the ballast should become less on each section , ..........the bait should sink in a horizontal level(or also barely float up , if desired) . If it already sinks now with little ballast in its belly , you have made it not sufficiently buoyant , and I'm afraid , that there is nothing much you can do except try cutting some air pouches into its back(probably glue in buoyant material)and trim it again . The longer upward curved chin also enhances the tendency to lay on it's side on retrieve , but this won't be a real problem , if the lure was buoyant enough to accomodate enough ballast to act as a keel weight . good luck , diemai
-
@ StrykerLures After having my sinking gliders readily shaped , I'd apply a temporary clearcoat of acrylic clear to prevent them from soaking up water whilst testing for correct ballast in a water bucket(I'd buff that clear coat later for painting) . After I'd rig matching trebles and put a bigger paper clip into the line tie to substitute the wire leader used when fishing it later . Like BobP said , I'd now determine about the amount of weight needed to achieve the desired sink rate by hanging it onto the belly treble , ..........I like using 1 millimetre thick roofing lead sheet , that I cut to strips of about 1/2" X 6" , .......also a bit bigger for larger lures . I'd cut material from that lead strip , until I'm happy with the sink rate of my lure . After I would flatten it out and utilize it as a template to cut out a second strip of same size , ......put that one aside at first . Most likely such baits require two weight holes , one in the rear and one in the front belly , ...........I must now estimate , how to divide my lead strip into two parts to match either end of the lure . I'd roll them up tightly to a drum shape , most likely also comprime these lead drums with pliers and/or hammering whilst constantly rolling them on a steel plate/anvil . Now I'd take cable insulation tape and stick the weights to the lures belly to check for the bait's sink level , which should most likely be in a horizotal position . I can move the weights up an down the belly to a certain extend to achieve that ,...... but if my first estimation about dividing the lead strip should turn out wrong , I'd can take a second chance on the second strip laid aside before . But after having gained some experience after a few lures failures become seldom . After I'm OK with the positions of the weights on the lure belly , I'd mark these positions , disassemble the lure and drill approbiate holes to epoxy in the lead drums , .........off course the lure needs to be dry again . One must take into consideration , that the lure would sink faster later , as one would drill out buoyant material , also the paint and topcoats added later would cause the lure to sink a little faster . Also I like to match my wood material to the intended size of a jerkbait , .......would be useless making a 6"+ bait from balsa , would require too much ballast , that could either minor the action or not even fit into the lure blank , as it would be plenty of lead ,....better go with a bit less buoyant kinda wood . Same thing vice versa ,........... a 3" or 4" bait of hardwood(maple , oak , beechwood) might turn out in a way , that it is impossible to place enough weight to have the bait even swim upright , when working it , .............unless having it sink like a brick . You can find some sinking glider building sketches and info in here :My link , it is a Dutch site , but an English version is available . good luck , diemai
-
@ VermontPhisher These turned out pretty nice , ........eager to hear about the lure action , they'd provide ! Now , that you seem to have got the hang of it , you may wish to experiment with different shapes , widths and grades of cupping as well ! Actually I have never tried cupping blades or spoon blanks on a padded surface , might probably only work with soft aluminium and copper sheet(for spoons) ? Guess , that you did it that way to avoid too many blemishes ? good job done , .........greetz , Dieter
-
@ Benno I'm in Europe , but I have also often mailordered lure components , lures and stuff from the US . From other guys on German sites I know as well , that the big American mailorder companies have kinda fixed freight rates , no matter whether the order is of rather small or bigger money , .......off course they'd probably also charge higher shipping fees in terms of increased weight . I had also experienced this ,......... luckily I turned to be a customer of a rather small component business now(sadly they don't sell plastic making material)for years now , that sets the freight rates overseas more accordingly to the stuff , that I order , ........I may also choose between surface and air shipping , the latter is off course a lot faster , but I don't mind waiting for 5 to 8 weeks and save more than half of the airfreight fee . In a nutshell , probably try finding a smaller company , that stocks what you need , .......maybe you'd be lucky about more individual freight rates as well ? Don't know about Australia , but overseas orders over 22€ into Europe are additionally charged with about 20% VAT and import taxes(on merchandise value plus shipping fee) by local customs ! good luck , diemai
-
I can only second the stats of VermontPhisher and BobP , I do aggree with all of them ! Considering the learning effect of fish upon lures a Belgian friend told me years ago , that in the Netherlands(lots of pike there , releasing essential)they had observed that pike would go for certain lure models or colors during the fresh new season , but do ignore these very lures , as the season proceeds or latest during the next one , ........so the anglers would constantly have to come up with different lures and/or colors to prove to be good catchers . Off course this "lure type and pattern switching cycle" would turn out repeatative through a period of several years , I believe ! And it is also often recommended to fish different patterns and styles compared to all the other guys by the lakeside , I also see much sense in that ,...... going different to the average in pressured waters is a key to success . For example , .....since a few years ago I am annealing a few of my homemade polished stainless steel spoons to turn to a purple/brown/dark blue color , these have proven success a couple of times in clearer water , ..........you can't buy spoons in sucha color in shops , there they are all shiny polished or painted . Don't even think , that many anglers would buy a spoon that is rather dull and dark in color , .......but I know it better ! In less or little pressured waters it won't matter that much , what kinda lure to tie on , ..........fish never made as many bad experiences and are more likely to take a bite on anything"alive" that passes them by ! greetz , diemai
-
 Just came across these little cuties for the first time in the random gallery pics , ...........really a great inspiration to me ! I'd leave the outer shape and thickness in general , but taper the flanks towards the nose , put in a single weight somewhat rear to have it sink level a few inches per second , ........mount the line tie right at the tip of the nose , ........maybe even add some kinda tail , ..........should make up for a very lively glider jerkbait ! Thanks a lot for sharing , ........greetz , diemai
 -
 Just incredible , how you can keep your usual detailing and even number of sections on a smaller bait like this 4" ! Just absolutely great work , ........hats off , ......greetz , Dieter
 -
 @ VermontPhisher Very creative paint job , .....I like it ! Quite funny , just about two weeks ago I went to a bigger hobby , -and modelshop in the town , where my daughter lives , 50 miles from home and I've seen such paint there , that rayburn guy has described in his comment . They sold it in a set containing a few different colors for 12€(approx. 15$ ?) . I was in a hurry and also concerned about problems dipping my lures into that liquid , also about compatibility of that paint with my topcoats , ......so I did not buy it . Anyway , ....they had advertised it for dipping Easter eggs(got that tradition hiding chocolate eggs or real hardboiled ones for the kids on Easter Sunday in Germany) , ..........they've called it "marbling paint" , thus this particular effect is called "marbled paint pattern" . Great job , ..............greetz , Dieter
 -
@ hybrideye Good luck fishing , .........I'm envious , ....still got predators closing time around here , ....ends 1st of May ! greetz , diemai