

diemai
-
Posts
3,867 -
Joined
-
Last visited
-
Days Won
23
Content Type
Profiles
Articles
TU Classifieds
Glossary
Website Links
Forums
Gallery
Store
Everything posted by diemai
-
 Here are my very first swimbaits made from PVC , 95 mm in length(little less than 4") , three jointed sections with a moving tail fin made from lexan sheet . Brush painted with "Revell" modelmaking enamels . Watch them swim : greetz , diemai
 -
 A topview of my latest "maggot" lures , .......lips are homemade from 3mm lexan , the eyes are made from the plastic heads of tailors pins , embedded into countersunks furnished with a round "Dremel" router bit . I've snipped off the pins leaving a few millimetres of their length below the heads to act as stems , just pushed these into the PVC material , finally securing them with a drop of super glue after painting and prior to topcoating . Lures are brush painted with "Revell" model making enamels , only two colors per each lure , two baits are additionally plated with glitter jelly . greetz , diemai
 -
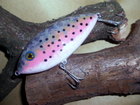
 My very first crankbaits carved out of PVC decking , named these lures "maggots" due to their segmented body . They are floaters and during the first bath tub test unpainted and with harness , ballast and lip just stuck in , not glued , they displayed a tight tail wiggle . They have a small piece of lead sheet glued into their belly slots at about 3rd and 4th segment in the rear , which stabilizes the wiggle and hopefully would improve their casting performance . greetz , diemai
 -

Any Tips On How To Put Crank Bill Baits On Straight?
diemai replied to apaseman's topic in Hard Baits
@ apaseman Best way is to cut the lip slot is , when your blank is still in a rectangular cross sectioned condition(cut out the outer dimensions only). This way you can clamb the blank in a vise or machine vise accurately without damaging the surface(yet unfinished) ,...... also hold it flat on the table of a table saw to cut the slot or even only mark an accurate lengthwise centerline and the lipslot direction with an 90° angle gauge and cut the slot accurately after that marked line by hand or with a "Dremel" cutting wheel . The key thing is to keep the blank still rectangular , ............apart from lipslots also pilot holes for screw eyes , belly slots for internal wire harnesses or even lenghtwise center bores for wire shafts(to a certain length, drilled from either end to meet in center) can be done this way . good luck , diemai -
 Nice old style popper you've made there ,...........does it have a wire shank running through it causing it's two halves to bang together on a jerk ? Does not appear to me to be a swinging joint ! great work , ............greetz , diemai
 -
 @ foxbites Thanks for further info , always happy about any kinda input ! greetz , diemai
 -
Looks very nice and neat , but I wonder about the action that it would have ? Could be a topwater glider ,...... but I guess , that legs+skirts would prevent it from darting sideward so it would only dart straight forward ! I may be wrong though ,...... don't have much experience with topwater lures sporting this kind of attachements . greetz , diemai
-
@ Lure-Prof Since the site's layout change the birthdays are not shown anymore on the frontpage , ...........I should really check the calendar daily as well in future ! Hope , that you've had a nice one ! all the best , .....greetz , diemai
-
@ Gdille Nice to hear your bait slowly turning out for good , ....hold on ! good luck furthermore , ......greetz , diemai
-
@ rofish Thanks for chiming in , ........as my missus was constantly talking to me as I was typing my post , I really forgot about mentioning the increased length of the first section thoroughly ! greetz , diemai
-
What The Best Material To Use When Making A Swimbait
diemai replied to bassbandit25's topic in Rod & Reel building & repair
@ bassbandit25 There are three options , that I can think of , ..........either wood , PVC decking or resin ! Wood is THE tradional lure material , easy accessible and easy to work with , but has the disadvantage to be vulnerable to water sepage , especially on lures like swimbaits with its multiple joints and/or hinges . There are many types of wood to choose from , many different grades of buoyancy and densities(could be important for the action of a lure and the trimming with ballast) . PVC decking seems to have become the latest hype for swimbaits ,..... it is extremely buoyant , cuts , carves and sands very easy and has the great advantage of not soaking up any water(its just a plastic material) . But on bigger baits it would require PLENTY of ballast weight to render it to sink/suspend or even float up upright , could provide issues about sufficient space for all of those weights . Some guys in here also do cast their baits from resin , .......I do not know much about that except that to me it seems to me to be the premier league in lure making , ............you'd need to make a master lure and make a casting mold from this master , after you could cast quite a few clones with that mold , ........but as said before , I do not know much about it . If you look around in here thoroughly , utilizing the search function , you could spend hours and hours with reading tons of info and threads about swimbaits and their construction , ..........there even is at least one tutorial in here . Just go ahead and have a look , .......if you'd have further specific questions , .......I am sure , those would gladly be answered ! good luck , diemai -
 Very creative and neat paint jobs ! greetz , diemai
 -
@ Gdille In my opinion you have chosen the most difficult body shape for your first one , ......I've never tried to make a muskie/pike bodied bait . A buddy from a German site has also tried his hand on one recently and it did not swim well , ....so he added a lip later to get it going ! I think , the problems about this particular body shape are caused the by the streamlined shape of the first section . There is a thread in here about vortices generated by the first section of a bait , that would flow down the flanks of a bait irregulary and cause the trailing sections to move sideward , thus do the typical snake motion . Dave "Vodkaman" had put up this thread in here awhile ago , and meantime I am also convinced about this theory making a swimbait swim well . Don't remember the name of the thread , but you could utilize the search function in here , take terms like "vortex theory" or "Mandelbrot files"(Mandlebrot files) , you should find it then . Or search all threads started by Vodkaman via the personal profile option . Anyway , I believe that the streamlined head shape of a flat muskie/pike body does just not cause enough disturbance in the water to generate those vortices down the flanks , ...........this is why these kinda baits are difficult to work . Jeep has recently put up a video and gallery pictures about his latest pike bait , that swims very well , ..........if you look very closely , you will see , that the head of this bait is somewhat wider with a flat and little hollow portion on top of the nose , ............I believe , that this is the key thing letting this kinda bait work , this little part of the head acts like a diving bill and also generates those important vortices . But same time such bait must have its flanks sufficiently tapered down the tail , so that the trailing sections would not have too much resistance aginst the water , when pushed sideward by the vortices , ........rather more flat trailing sections do work better to "snake" . Also the line tie position could play its part in the game , .........before I got convinced about Dave's vortex theory , I have thought(and also still do) , that a line tie placed in about center of the front section would not be of advantage , ..........I always like to place it in a way , that different pressures of the oncoming water would work above and below the line tie , creating a kinda leverage around the tow point . If these pressures would be equal above and below , no leverage can occur ,.........if you look at my baits , you will see , that the line tie is most likely located low at the tip of the first section , the nose and forehead back portion is a lot higher and longer than the belly side below the tow point . Some baits with the line tie placed higher upward have a kinda scooped out hollow upper nose plane to act like a diving vane . I also ALWAYS tend to keep that head portion above the tow eye quite plane , not round it off too much like one ususally would(just breaking the edges) , so that the oncoming current can engage better onto it generating disturbance and vortices . This way leverage around the tow point can occur , thus causing the first section to break out sideward and trailing the following sections into a "snake" course . Anyway , that is my personal theory about swimbaits moving , before I got convinced about Dave's , ...but probably both have a bit of truth in them ? Anyway , I guess , that you could only add a lip now to get your bait to swim or make a new and wider head section(and maybe second trailer for smooth transition of flanks) to be able to furnish such little flat nose indention like on Jeep's bait . Concerning the weights in a swimbait , ......the first section should possibly carry the highest amount of weight , thus being the thickest and longest section of all(more buoyant) . The second section would carry less weight than the first(should therefore be less buoyant) , the third trailer less than the second and so on , ............this is why the baits flanks should taper down the tail to render the sections less buoyant , thus require less ballast . Off course the weight of the joints and hooks requires to be taken into consideration , but really the hook positions are not that important for the action of the bait , they should only sit as far apart as possible not to tangle with one another(if possible at all) . Just my , .....if you should have further questions , I'd be glad trying to answer them , ......... good luck , diemai
-
 I love those vintage replics , doing them myself sometimes as well , .........yours turned out very well ,..... nice color sheme , too ! greetz , diemai
 -
Metals That Are Lighter Than Lead But Melt At Low Temps
diemai replied to Mo qwack's topic in Wire Baits
@ Mo quack Guess , that you don't have much of a choice on that ,....... I can only think of tin , which is a little lighter than lead , but has a comparable melting point . But it is much more costly to obtain . There may be other metals , but these would be rather uncommon and might be too hard to get , don't know , ..............other ones would have a higher melting point exceeding the possibilities of hobby melting pots and aluminium molds by far . Don't know much about casting lures from resin , ....but could this be an option for you ? good luck , diemai -
@ mark poulson These small baits really seem to be more elaborate , Mark , .........but I surely enjoy the work(I probably wouldn't , if I'd sell them ) . This morning I have weighted them in a waterbucket down the workshop ,...... they sank very slow in a horizontal position with the weights initially taped onto the lures , but after having cut out all of the ballast pouches , they'd finally sink a bit faster for sure . After all of the metal hardware glued in I am pretty much surprised about the amount of weight still required on this very buoyant PVC material ,............. I have used the lead chunks inside of curtain weight bands , these lead pieces are 5 X 10 mm cylinders , only flattened them out a bit to fit better into the lures belly ,..... guess , they are at about 3-4 grams each . Tomorrow I'm gonna clean off the excess glue and apply the first paint coats ! greetz , Dieter

-
@ garyo1954 Your lip appears to be plane , not cupped , ..............but obviously your lure still does work ! I have seen a commercial "jitterbug" style lure in a British catalog before , that ones lip wasn't cupped either , just plane as well , but it's two ends were bent(kinked) forward a bit , guess , that this might enhance the action . These were also rigged with a screw eye as a line tie , .............so probably my concerns about an integrated line tie could be denied with a construction like this . Thanks for posting , great input , ........greetz , diemai
-
@ Jeep Your latest bait turned out to swim very well , great sight to see ! greetz , Dieter
-
@ bassinhomer There is an old thread of mine named "new banana lures" , as from post #15 and #41 there are some pictures on a thru-wired deep diving lure with it's line tie located on the lip . Sorry , that I am unable to paste the link in here straight , .......if I'd try , my computer would break down for some reason and I need to re-start it ! To find that threat , click on my profile and there go to "find topics" underneath my avatar , you'll find that threat listed on page 2 quite a bit down at bottom , ..........or try putting just the term"banana" into the search function . good luck , diemai
-
@ BrownPigs My link has got some in the catalog as well , I always prefered the ones of aluminium , as steel lips come out quite heavy , .......often letting the lures float up head down a bit . greetz , diemai
-
@ mark poulson Thanks a lot , Mark , ..........in fact I have chosen this way of joining the sections due to the small size of the lures and also because I get my kicks in luremaking in always trying out different things and methods . I won't trust the joint that you've called "mortise and tenon" type of hinge on these small lures , .....I'm rather scared , that the latches of the female hinge portion accommodating the hinge pins at belly and back might break off , as they would turn out very tiny and thin , still weakened by the hinge pin bore . Don't have much experience about PVC yet(not even about swimbaits in general) ,.....still going to make one in the 6"+ range some day , ........but I think , that I would use the type of homemade sheet metal hinge , that I have described in one tutorial in here about one year ago . But I might as well use your proven screw eye and pin construction . All I know is , that I want the hinge construction on bigger PVC lures of some kinda heavier hardware , as this already adds some weight to the extremely buoyant stuff , so I won't have to place loads of lead in their bellies , .........just thinking , that otherwise I might probably get into space problems for the ballast . Just epoxied in all the joints into these baits today , quite a finacky work with toothpicks and small drops of glue on them , as I have to take care , not to clog up the hinge sleeves , ......but it came ot fine ! One sleeve got stuck up a bit , but there was still enough room inside of the sleeve to push a 1,0 mm drill bit inbetween to get rid of the little glue , that had gotten inside , ....all is moving alright now ! Gonna keep you informed , my friend , ......but I am not the fastest of a lure carver ! greetz , Dieter
-
Fishing has been very slow over here since two years , but for the oncoming season I am hoping to be more successful , as we have a very hard and long winter ,..... just the kind , that it used to be .
Still have predators closing time until 1st of May and small waters are still covered with ice , anyway .
greetz , Dieter
-
Thanks a lot for your friendship offer , gladly appreciated !
greetz from Germany , ......Dieter
-
@ BrownPigs I've been making casting spoons and spinner blades from sheet metal for almost 20 years now , so I don't see any reason , why it should not be possible to make "jitterbug" lips in the same manner as well ! I haven't yet tried it for one major reason which is the line tie intergrated on top of the lip ,....... it would take a special rigid metal alloy to render this line tie sufficiently rigid against bending and also the entire lip twisting within .The lip has to be quite light in weight , so I would furnish it from 0,5mm thick stainless steel sheet or 1,0mm aluminium sheet , .......both of these materials , that are easily accessible to me , would certainly not fulfill my demands in terms of stability of the intergrated line tie . I have made some jtterbug style lures with commercially available lips of different sizes and weights , these lips were not much thicker than I would make them , but they were a lot more rigid in terms od bending and twisting within than I could make them with my materials . These lips were not that expensive , so I haven't bothered to try to make my own , .......but it definately is possible ! You need to make a plane marker template at first to mark the outline of the lip on your sheet metal , drive around it with a marker needle or a thin permanent felt pen . Cut out the rough outline with shears , ordinary ones should do with the above mentioned materials , for more rigid sheets it requires bench shears , .............but the small latch of the intergrated line tie and the indention between the two wings of lip at bottom would give you problems cutting with shears , might as well use a metal bladed jigsaw for those details . Afterwards you need to grind and file the outline to final shape and accuracy , break all edges thoroughly . Make yourself a beating template of hardwood , utilize your lip template again for the outline and take a small round chisel and/or "Dremel"with oval router bits and gouge out the lips cupping curve in the hardwood , smoothen that indention as good as possible . Now utilize a small plastic hammer to beat your lip cut-out flush into the indention of your hardwood template to achieve the initial cupping of the lip . After you might use a small ball peen hammer to achieve sharper and/or deeper cupping portions . Now your cupped lip would look rather ugly with plenty of bumps and blemishes on it and you'd want to smoothen it's surface . You would do that with your small ball peen hammer on a rigid and plain steel plate/anvil or similar , place your lip onto the surface and constantly hit the cuppings inside(exactly where the lip contacts the plate) with the hammer , a change of the angle , that you hold the lip onto the plate does alter the grade and direction of the cupping ,..........takes a bit of practice , but it definately works , ........the more often you'd hit the lip with the hammer , the smoother the surface would become . After you're finally satisfied with the looks and cupping of your lip , mark line tie and screw holes with a felt pen(you could have done that from the start as well , but mark the holes with a center punch not to loose the location whilst doing the cupping work), mark with a 90° center punch , so that your drill bits find instant grip and drill through , also carefully break the edges of the holes afterwards with a 90° countersunk or a bigger drill bit ! Mark and drill from the inside of the cupping , virtually the front of the lip , .........hold with one hand onto a scrap piece of wood on your drill press ans drill through . Good luck , diemai
-
@ Geppa Thank you very much for providing this little tutorial , your step-by-step pictures turned out very well making it clear to understand the entire process ! Thanks a lot , .........greetz , diemai


